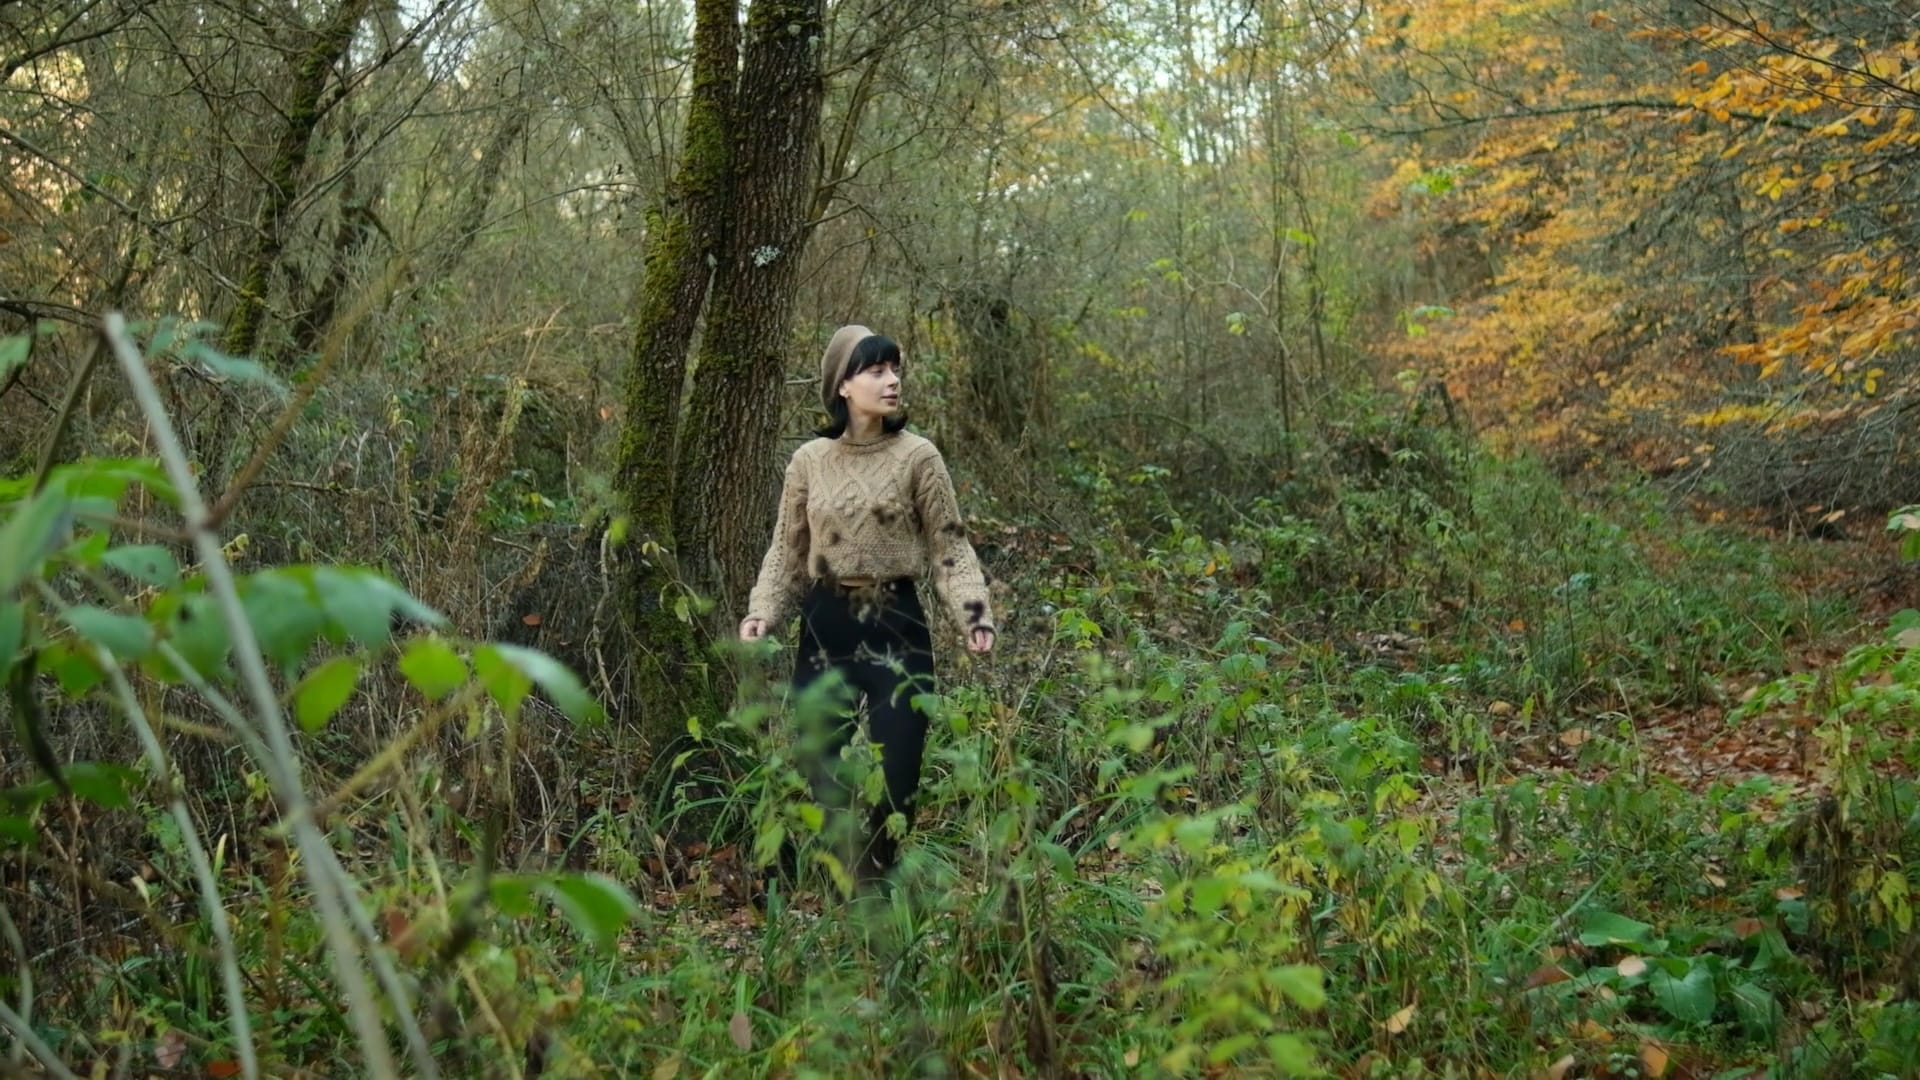
The world used to look like this.
Nx 3-Strip
A Technicolor Process IV reconstruction — built from physics, not LUTs.
In 1932, Technicolor built a machine that split light into three beams, exposed three strips of film, and transferred three layers of dye onto a single print.
The result was a color so saturated, so physical, so *heavy* — it defined what cinema looked like for an entire generation.
Not a LUT. Not a filter.
A complete computational reconstruction — running in real-time
inside DaVinci Resolve.
THE PROCESS
The Color That Film Forgot
Every filmmaker has seen it. The impossible reds of The Red Shoes. The emerald curtain in Gone with the Wind. Dorothy stepping into Oz.
That color doesn’t exist in any LUT pack. It can’t — because it wasn’t created by color grading. It was created by physics. Light passing through three narrow-band filters. Silver halide grains hardening gelatin into relief. Dye molecules migrating through a substrate until the gelatin couldn’t hold any more.
Nx 3-Strip doesn’t approximate this look. It computes it.
Every pixel passes through the same seven-stage pipeline the original light did — from prism to dye bath to projector.
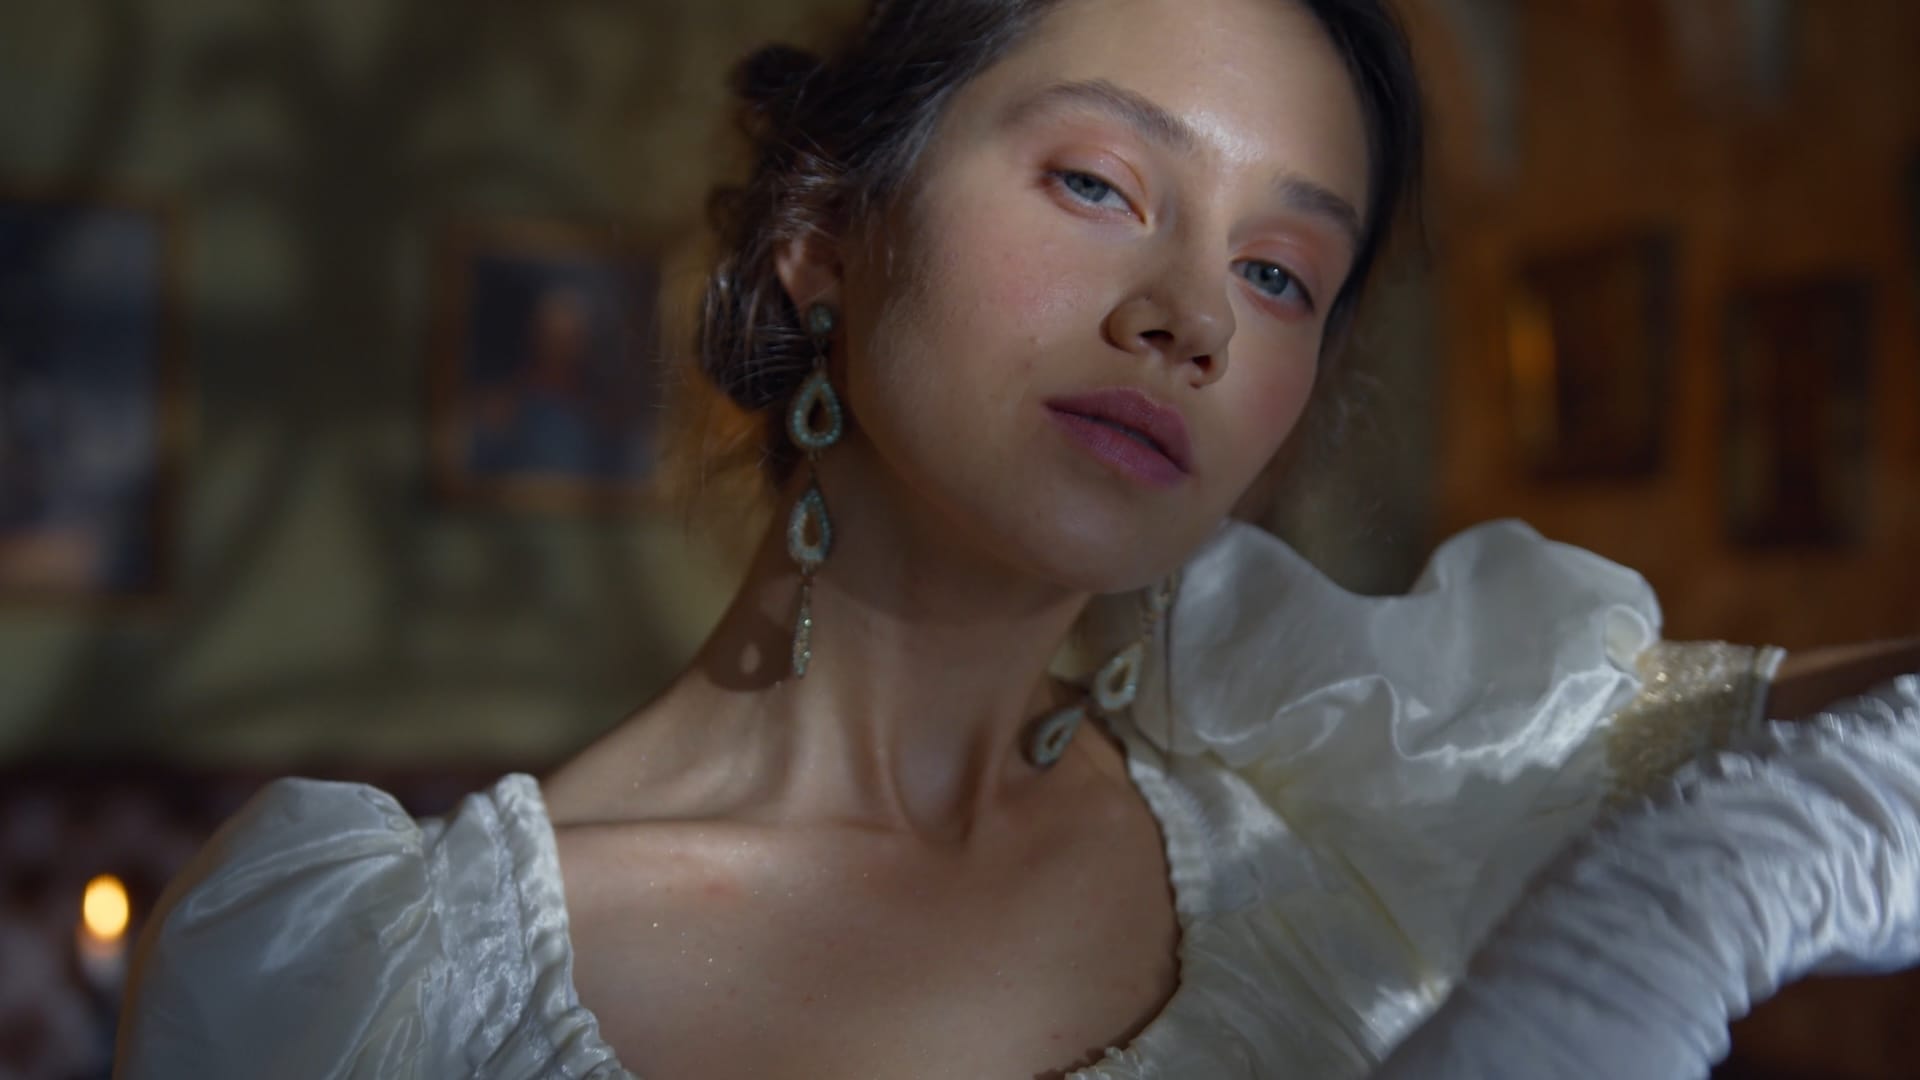
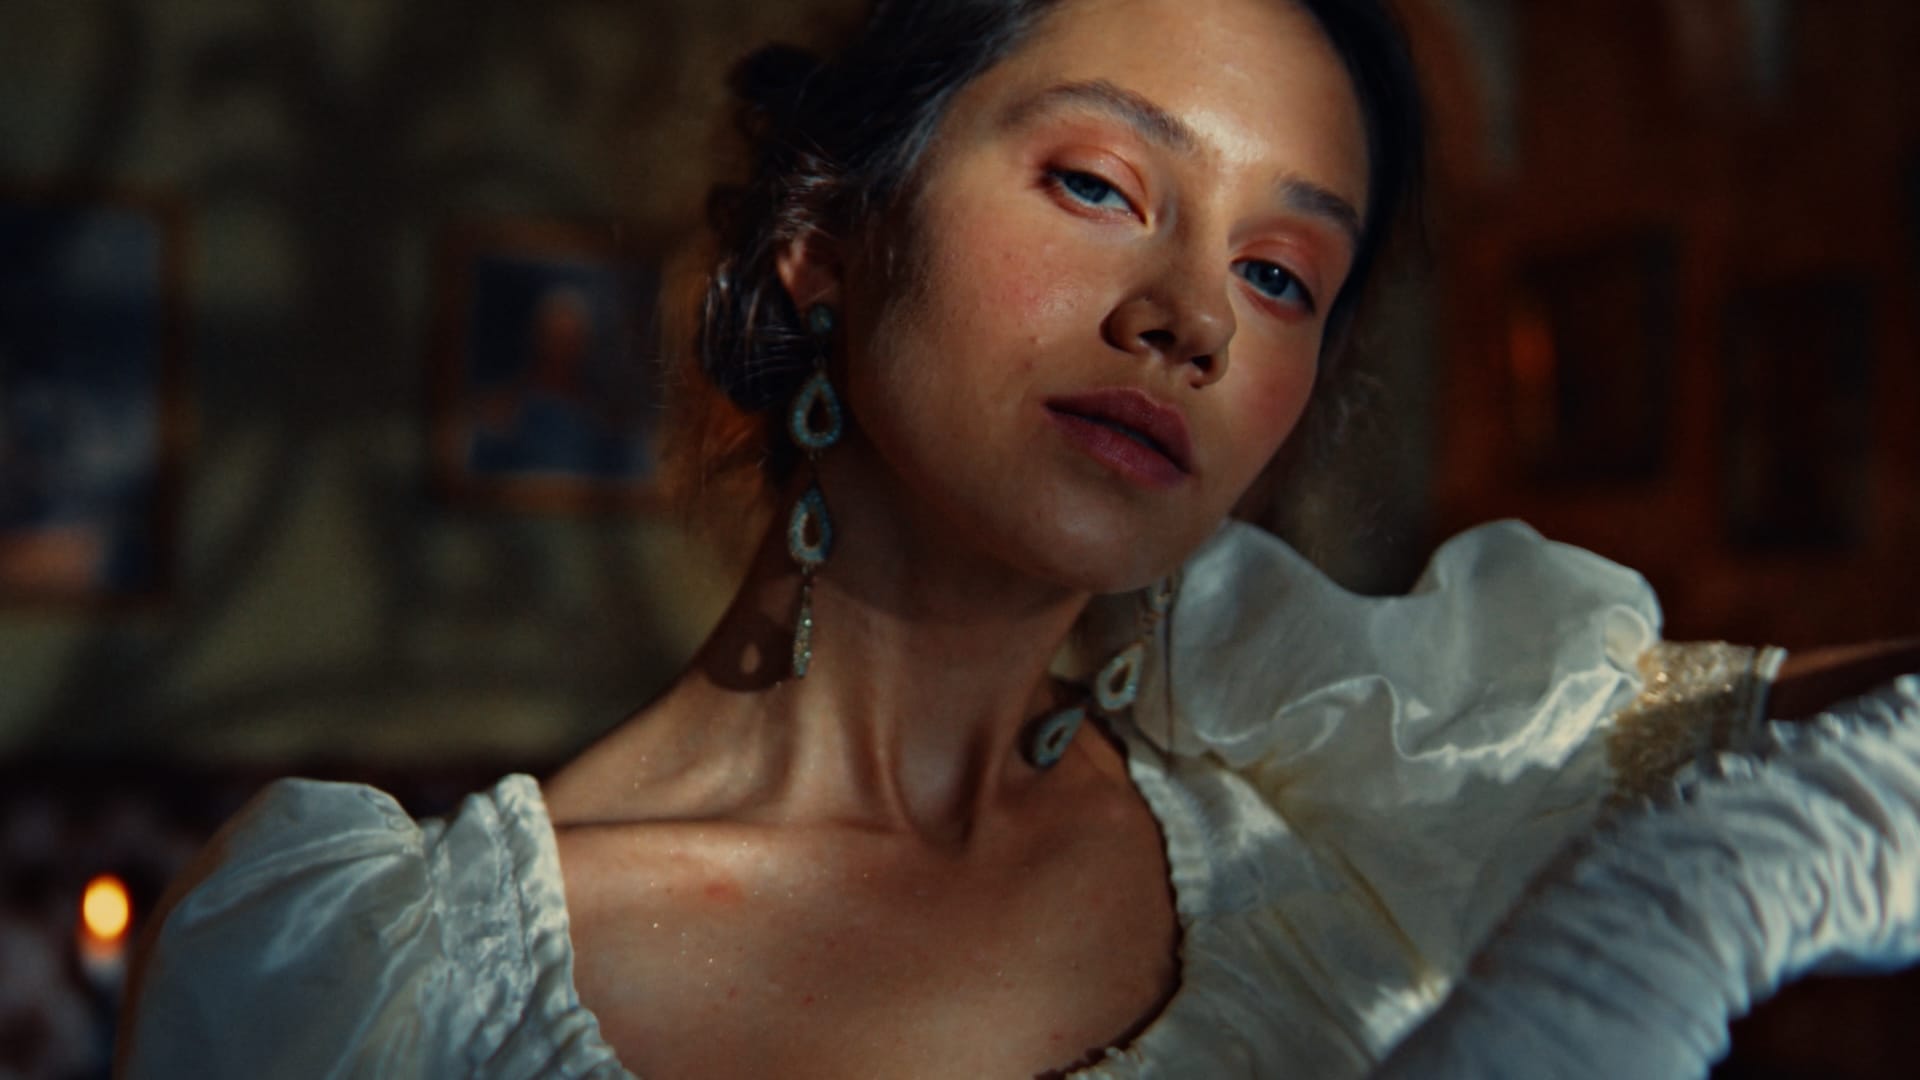
The golden skin tones aren’t dialed in on a color wheel. They emerge from the cyan dye’s spectral impurity — the same impurity
that gave Vivien Leigh and Gene Kelly their “Technicolor complexion.”
The warm ivory highlights aren’t a curves adjustment.
They happen because yellow dye clings to gelatin relief longer than cyan — a chemical fact, reproduced mathematically.
The cool, structured shadows aren’t a grading trick. They’re what happens when the third dye layer can’t absorb into gelatin already saturated with the first two.
The look is the physics. The physics is the look.
THE EXPERIENCE
What it Feels Like
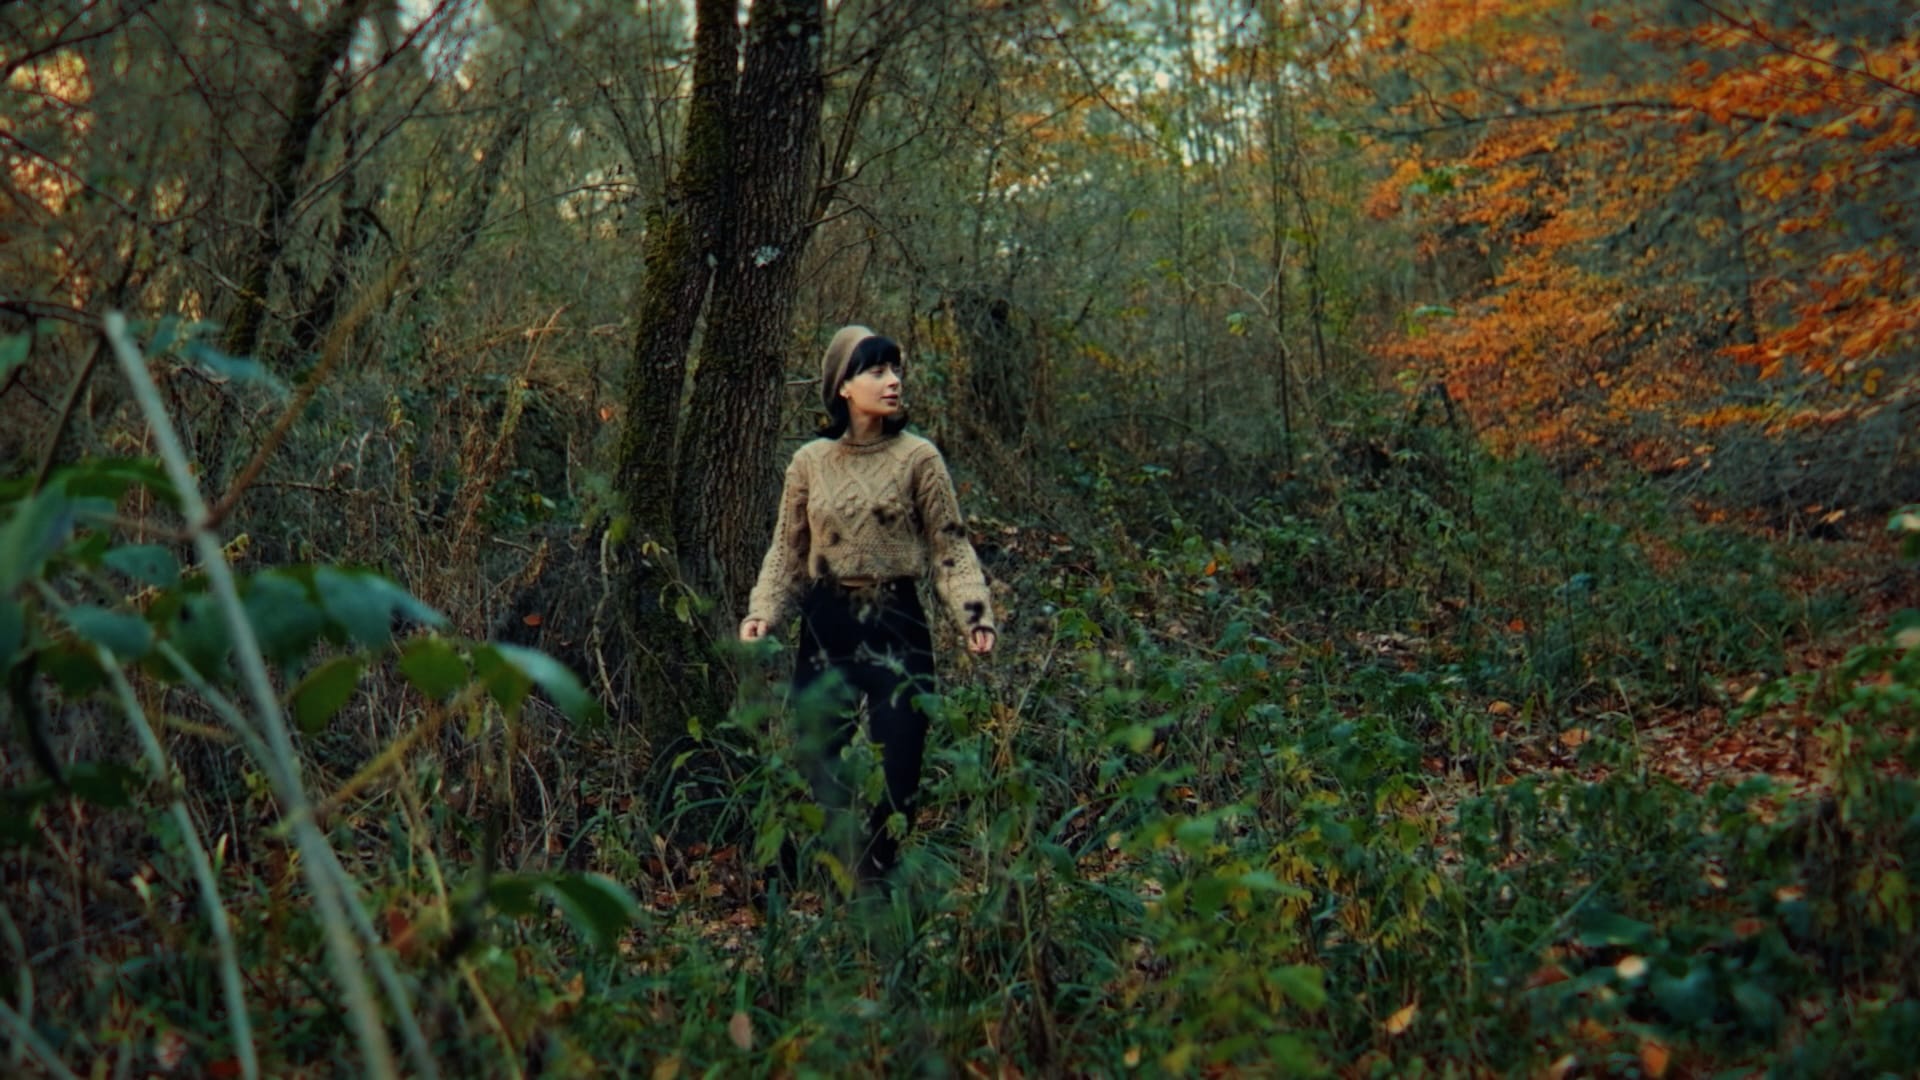
The first time you apply Nx 3-Strip, you’ll notice it in skin.
Skin tones snap into a register that feels present — golden, dimensional, carved by light instead of flattened by a sensor.
Reds deepen into something you can almost feel the weight of. Shadows cool and separate. Highlights soften into a warm, creamy white that breathes.
It doesn’t look “vintage.” It doesn’t look filtered. It looks like the image was always supposed to be this way — like the camera was finally seeing what your eye sees when it looks at a Technicolor print projected on a screen.
That’s not hyperbole. That’s what happens when color is computed through absorption physics instead of mapped through a lookup table.
THE PIPELINE
Seven Stages. From Prism to Print.
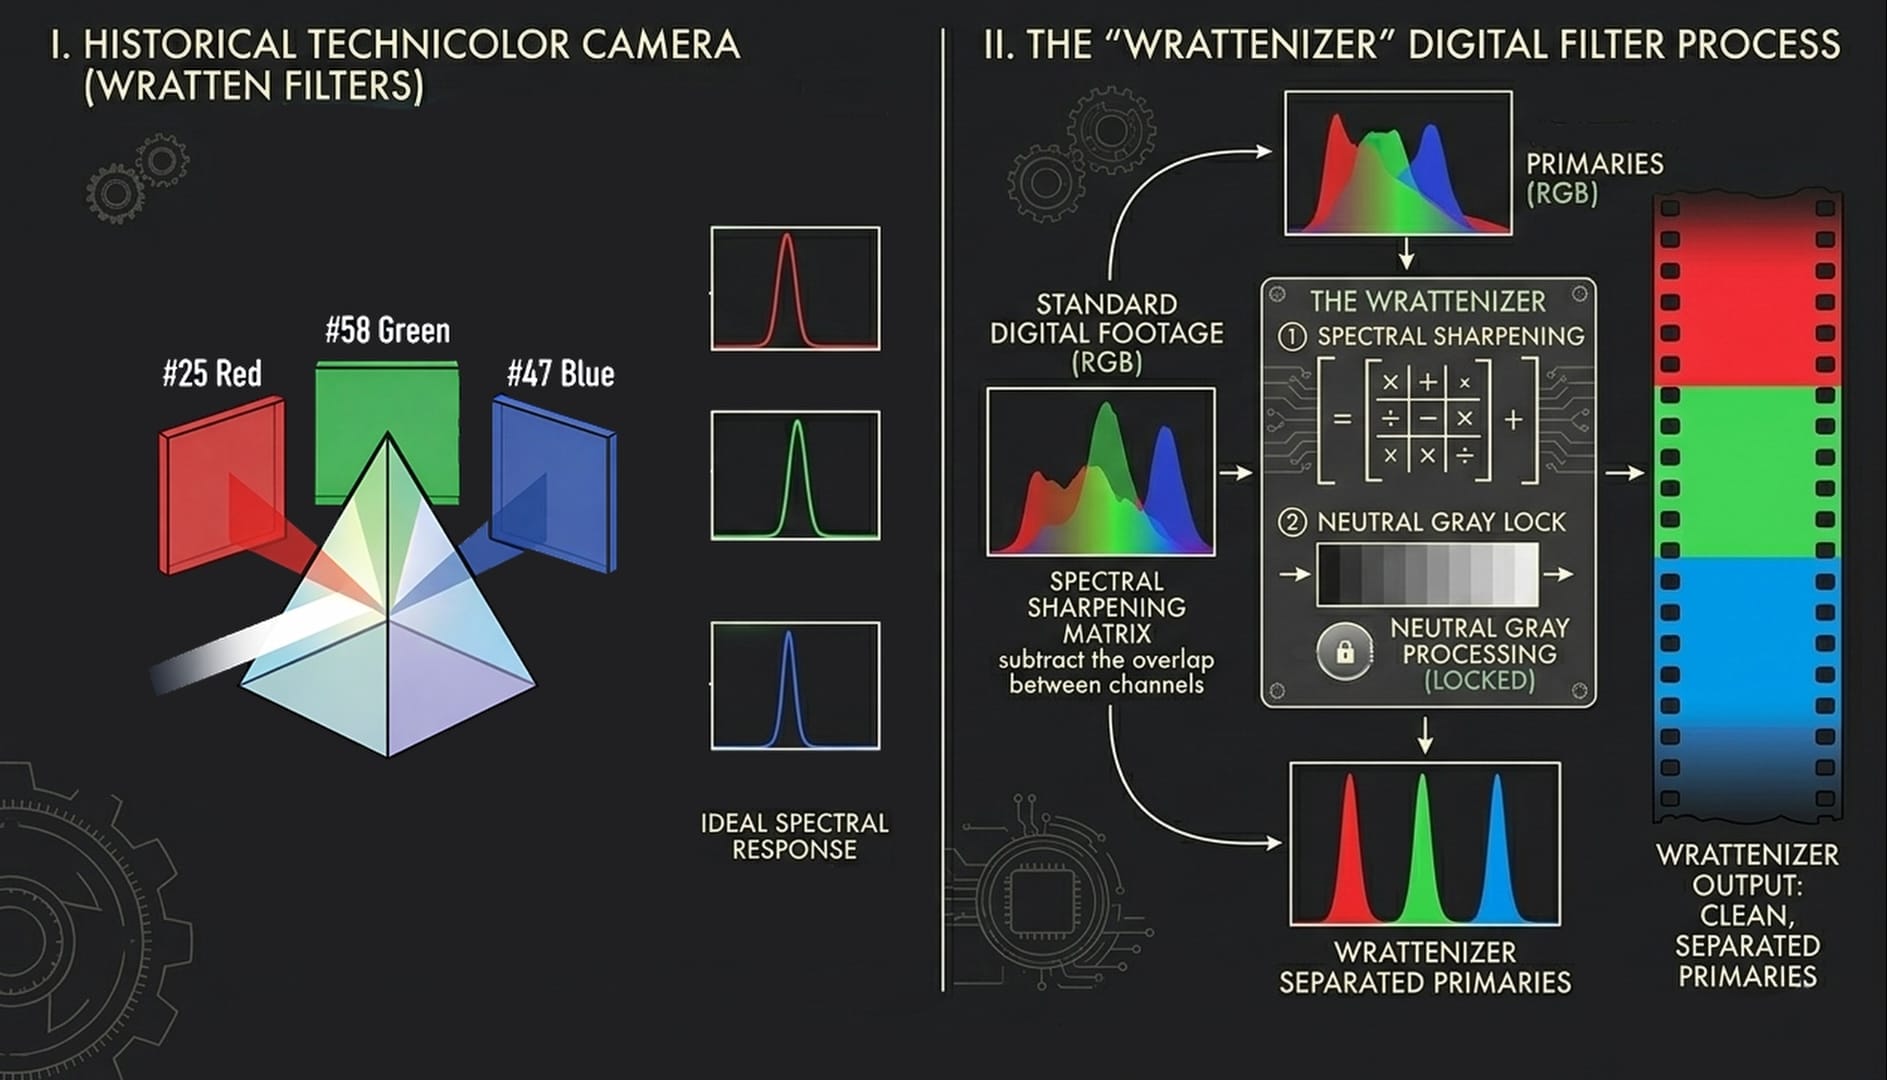
Wratten Spectral Separation
Your digital camera sees the world through broad, overlapping filters. Technicolor’s camera used three razor-sharp bands — Wratten #25, #58, #47 — that carved the spectrum into pure red, green, and blue with almost no overlap.
The Wrattenizer cleans your digital footage into the kind of separated primaries that would have entered the Technicolor beam splitter. It applies a spectral sharpening matrix that subtracts the overlap between channels, while keeping neutral gray locked at neutral.
Three-Strip Camera
A beam splitter prism. Three strips of film. And every optical characteristic that came with them.
Light leaks between the color records. A Petzval lens that’s sharp in the center and softens into the corners. Focus that shifts slightly per color — blue closest, red farthest. Subtle color fringing that grows toward the edges of frame.
These aren’t defects. They’re part of what makes everything shot on three-strip Technicolor feel *dimensional* — that slight painterly quality that digital doesn’t have.

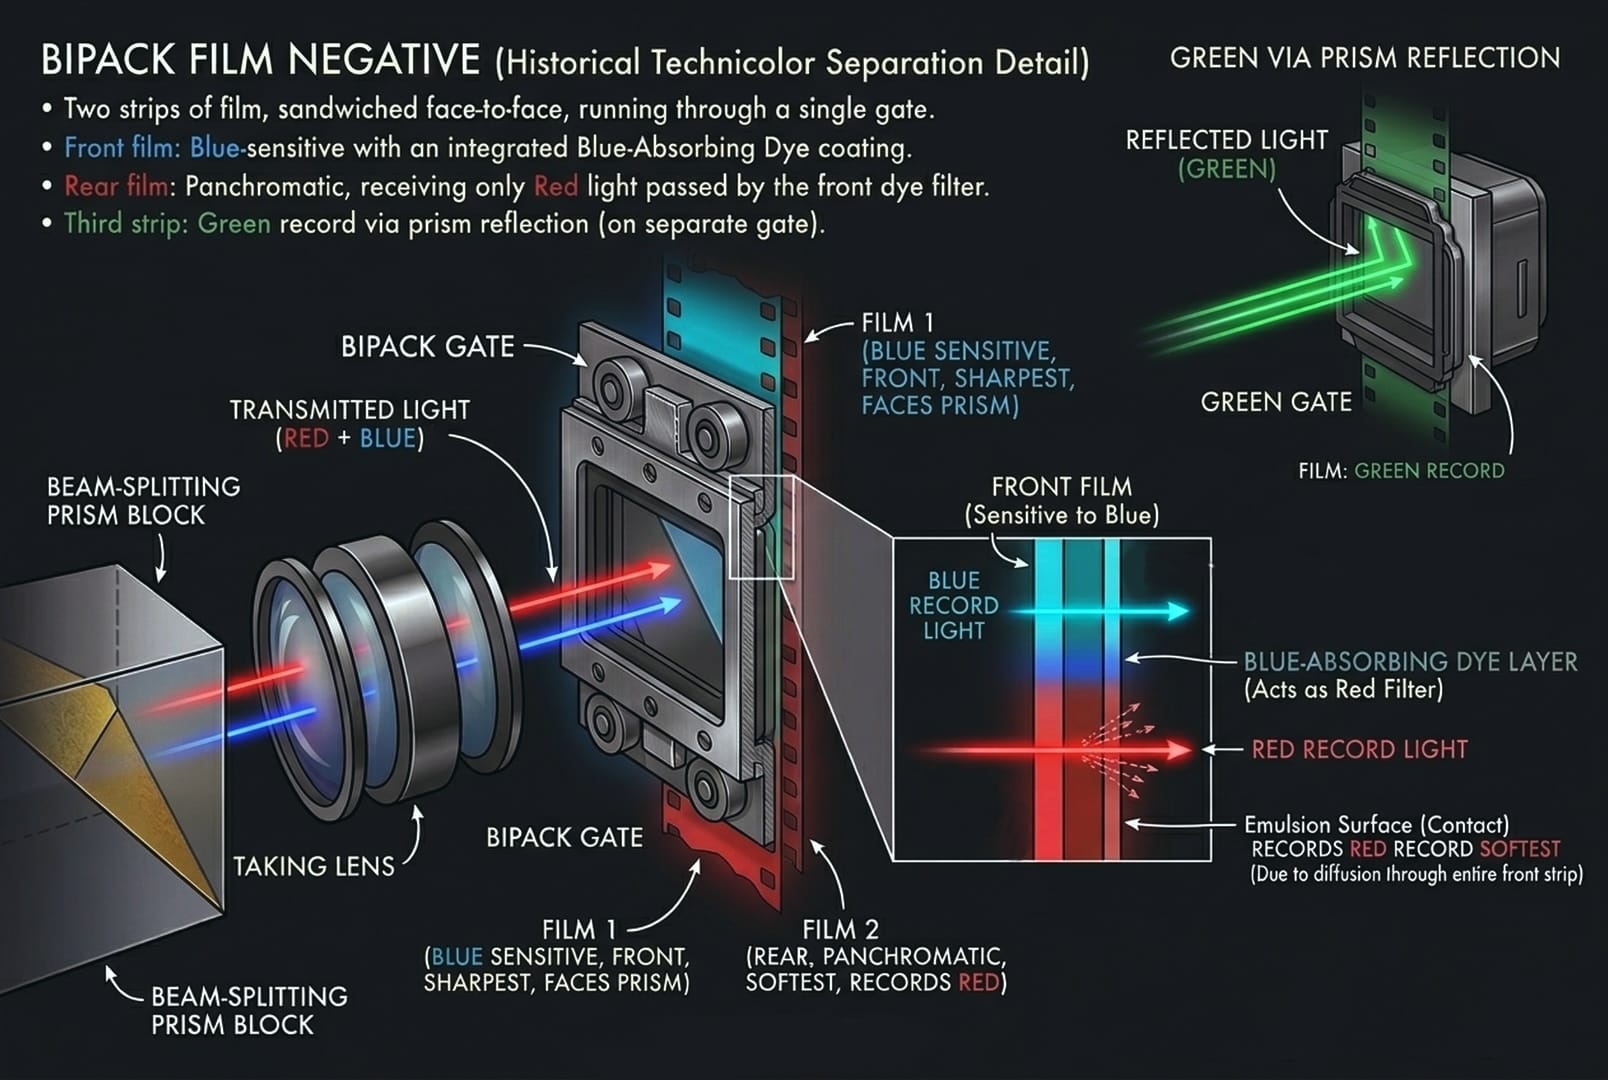
Bipack Film Negative
Two strips of film, sandwiched face-to-face, running through a single gate. Green on the front — sharpest, because it faces the prism directly. Red on the rear — softest, its light passes through the blue film base first. Blue via prism reflection — somewhere in between.
Light scatters through the bipack stack and creates halation — a warm glow around bright highlights. Nx 3-Strip computes this scatter per-channel and applies it in the exposure domain, *before* the film response curve, so it interacts with the negative contrast exactly the way real halation did. The warmth isn’t forced. It emerges naturally because the red record scatters most.
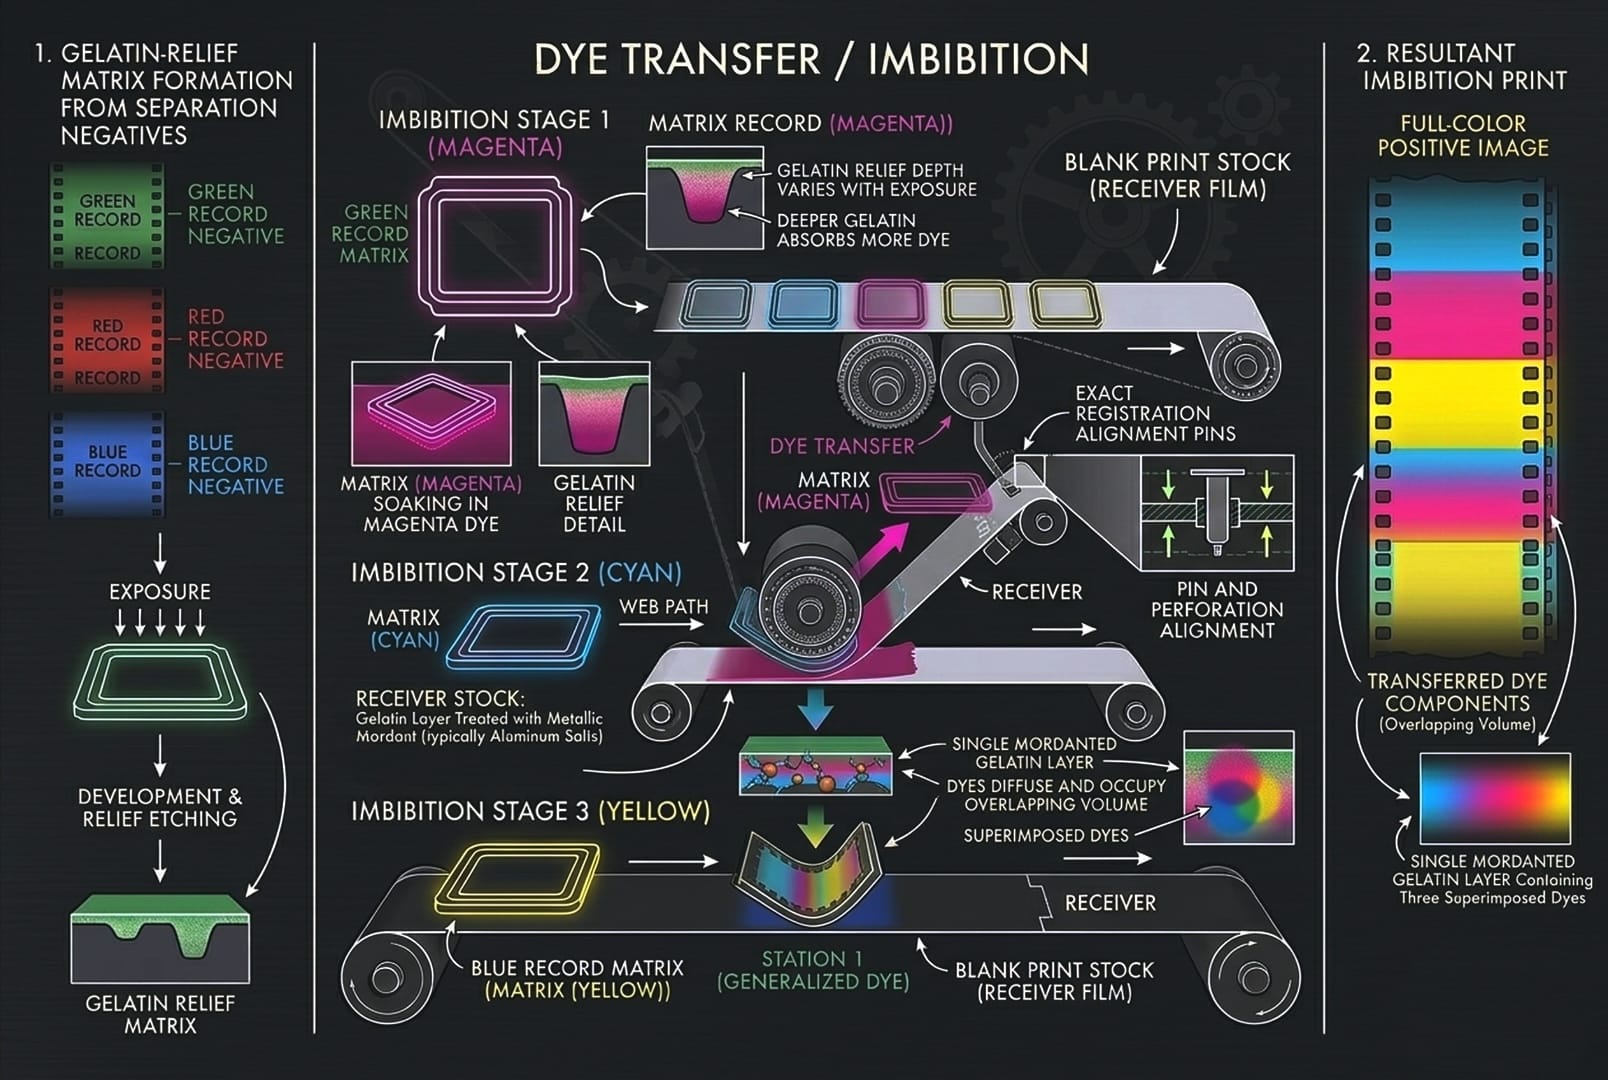
Dye Transfer & Imbibition
The heart of the Technicolor look.
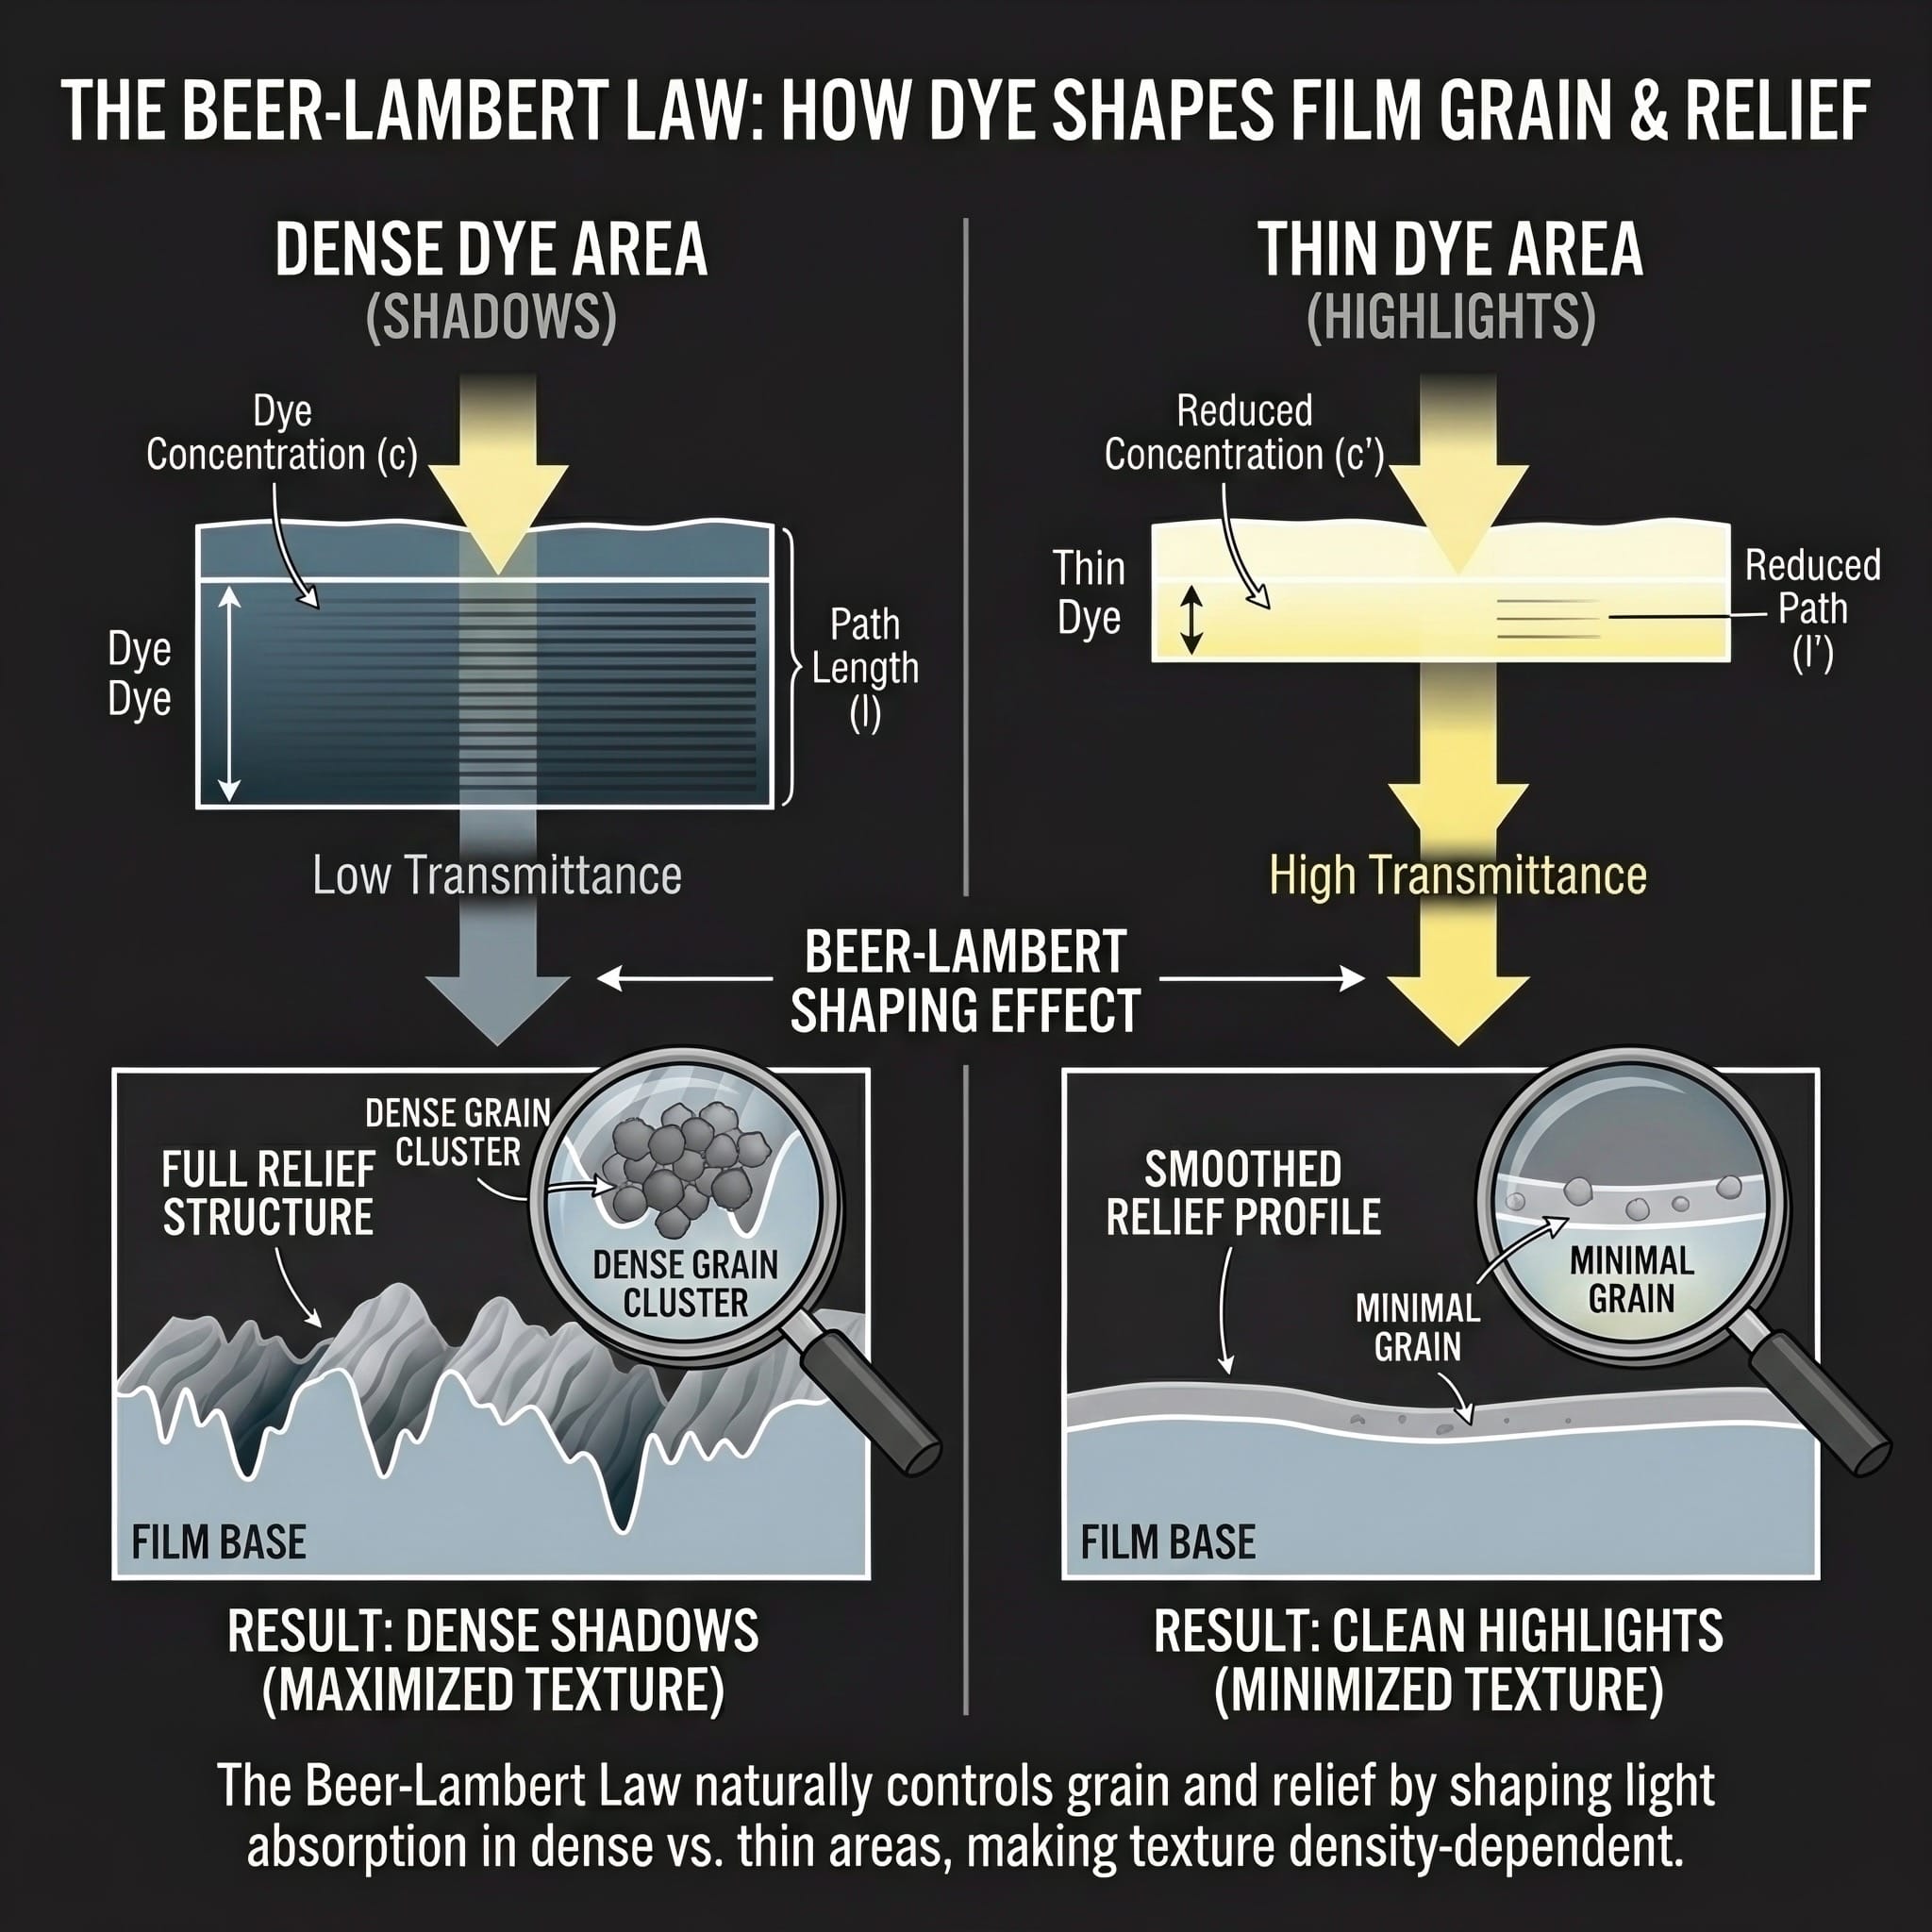
Three gelatin matrices — one for each color record — are soaked in dye and pressed against the final print stock. The gelatin relief determines how much dye transfers: deep relief holds more dye, shallow relief holds less. Below a certain threshold, the gelatin can’t hold dye at all — which is why Technicolor highlights have that distinctive *sparkle* before color appears.
The dyes transfer in order: **Cyan → Magenta → Yellow**. By the time yellow arrives, the gelatin is already partially loaded. It resists. Yellow gets trapped — more in shadows (where cyan/magenta are dense) than in highlights. The result: *cool shadows, warm highlights.* Not graded in post. Grown in chemistry.
Nx 3-Strip models this with Beer-Lambert optical transmission for the absorption and dye density modeling — the same mathematical frameworks used in photographic science.
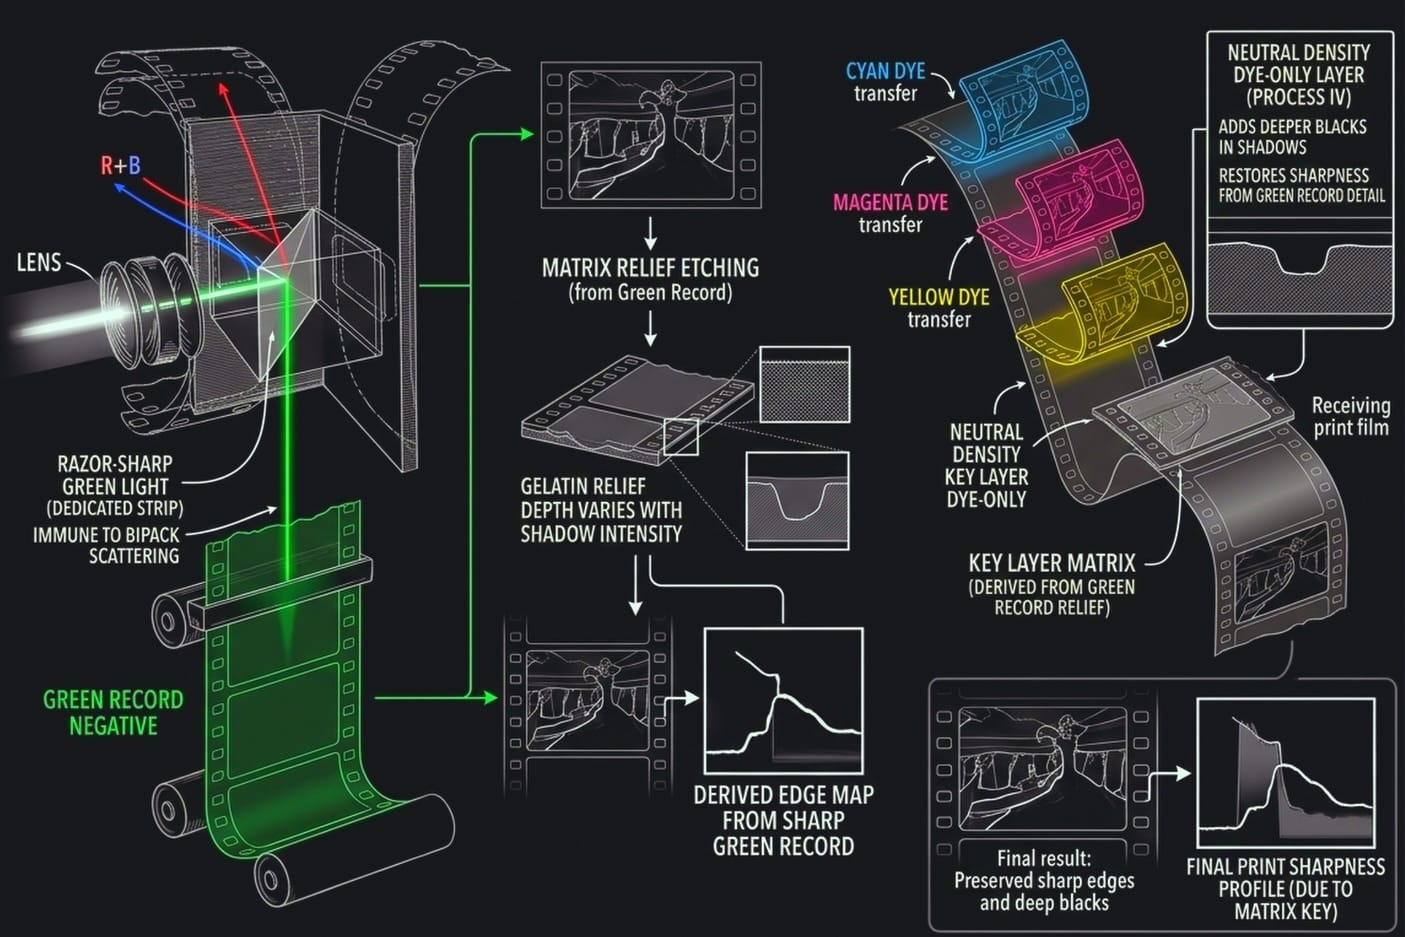
Matrix Key
The Green record — sharpest of the three — contributes a neutral density layer that adds edge definition and deeper blacks in shadows. No retained silver. Just accumulated dye. True to how Process IV actually worked.
Color Authenticity
Subtractive density — the single biggest difference between Technicolor and digital color. In your NLE, saturated colors get brighter. In dye-transfer printing, saturated colors get *darker*. Reds are deep, not neon. Blues are heavy, not electric. This is why Technicolor looks “real” in a way that digital saturation never does.
Gamut limiting — colors are constrained to the actual color coordinates of the Technicolor dye set, shifted to the white point of a 1940s carbon-arc projector. No impossible colors reach the output.
Highlight hue rotation — as dye layers thin out in bright areas, they clear at different rates. Cyan goes first. Yellow goes last. The result is the warm ivory tone at the top of every Technicolor image.
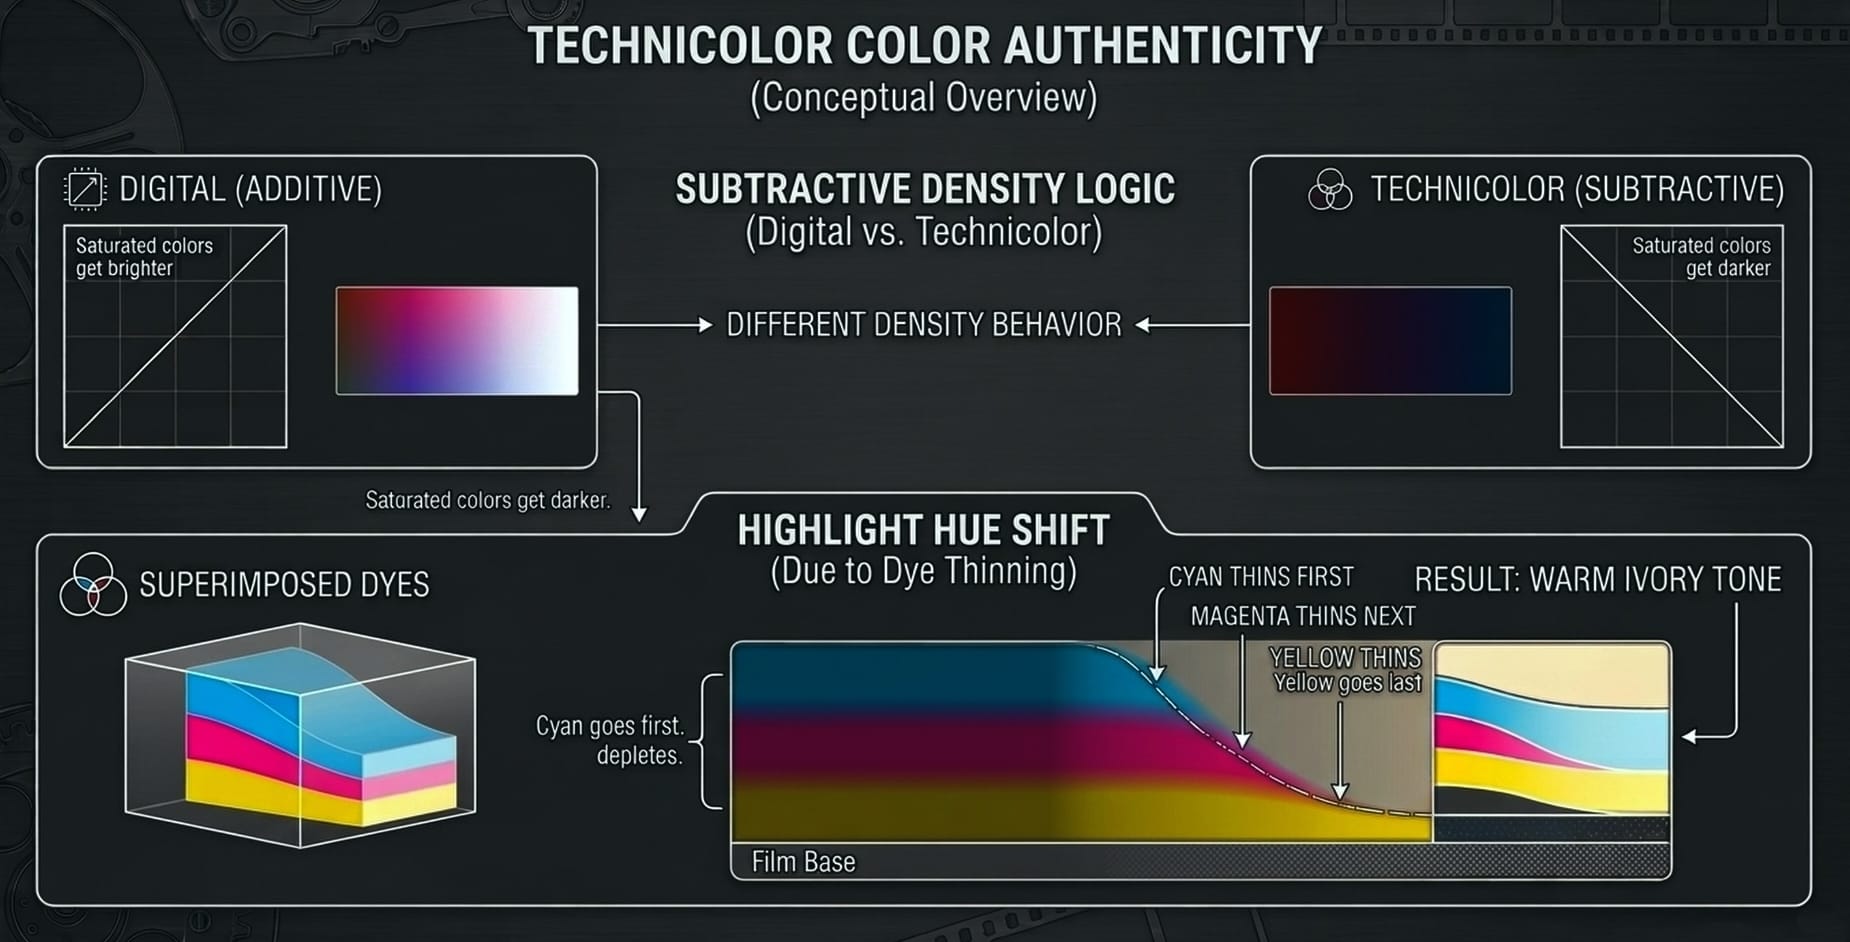
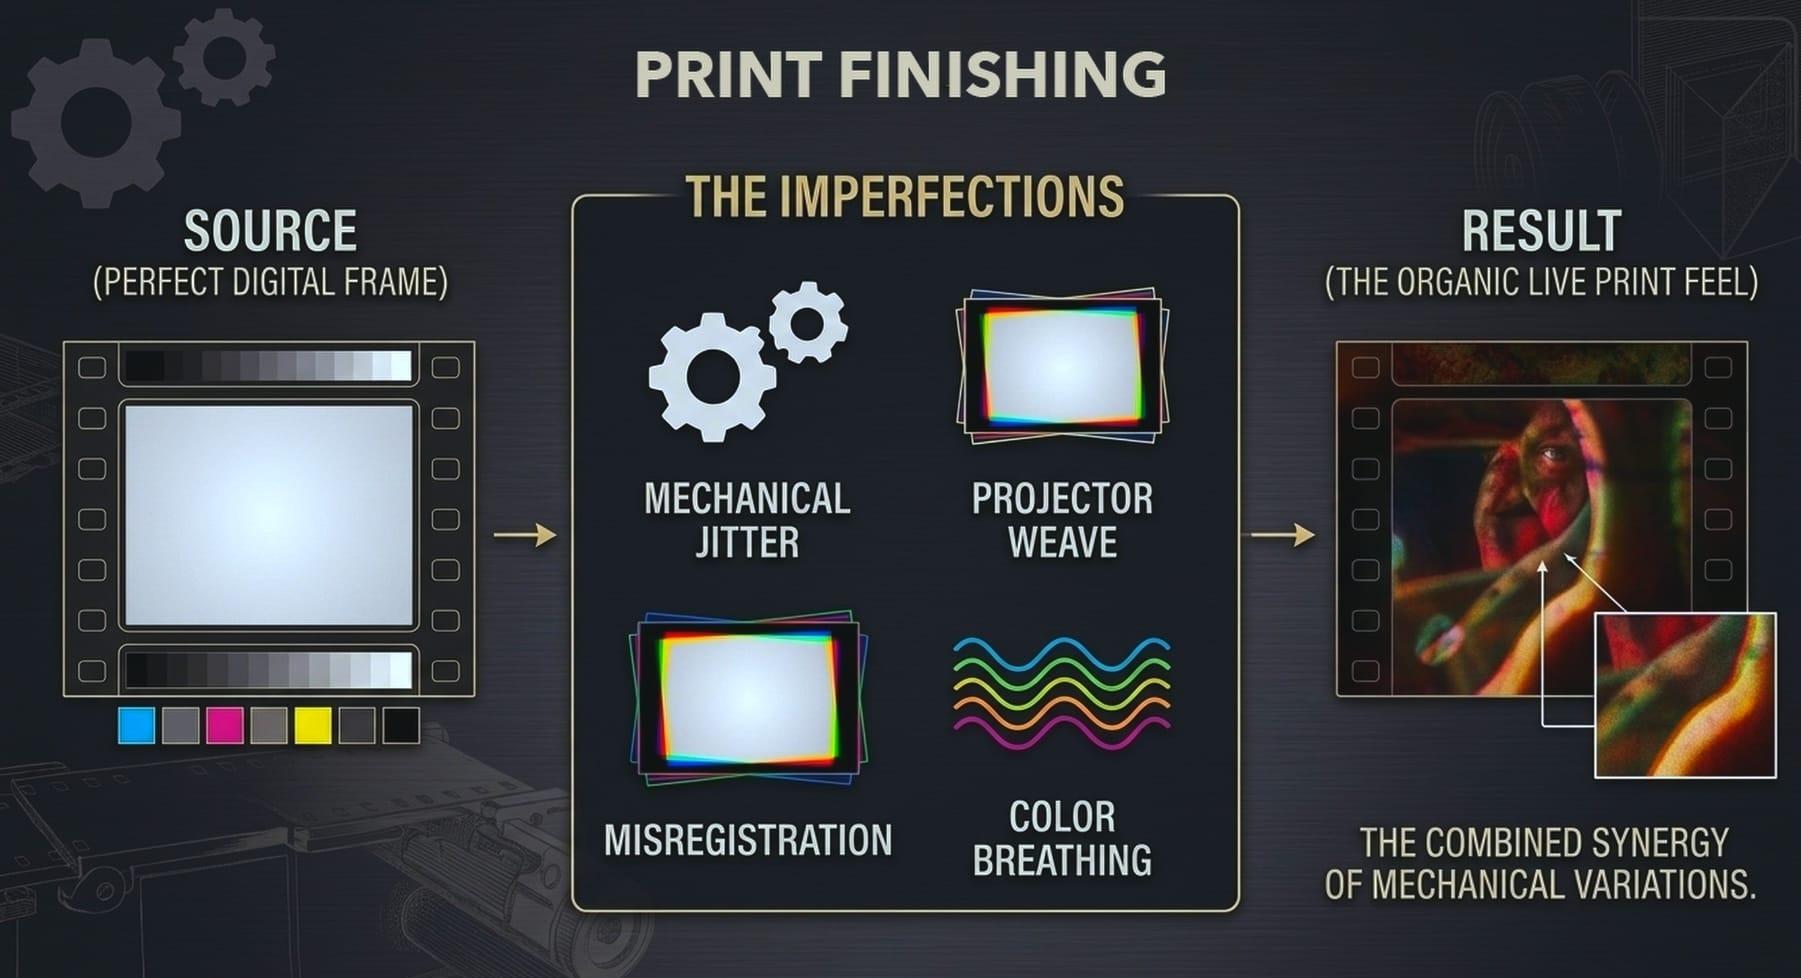
Print Finishing
Per-channel misregistration — because each dye matrix had its own alignment on the press. Per-frame mechanical jitter from pin-belt vibration. Projector gate weave. Color breathing from dye bath temperature drift. Radial film shrinkage.
Every mechanical signature that made a projected Technicolor print feel alive.
THE TEXTURE
The Grain That Isn’t Noise
Why Technicolor grain looks different from everything else.
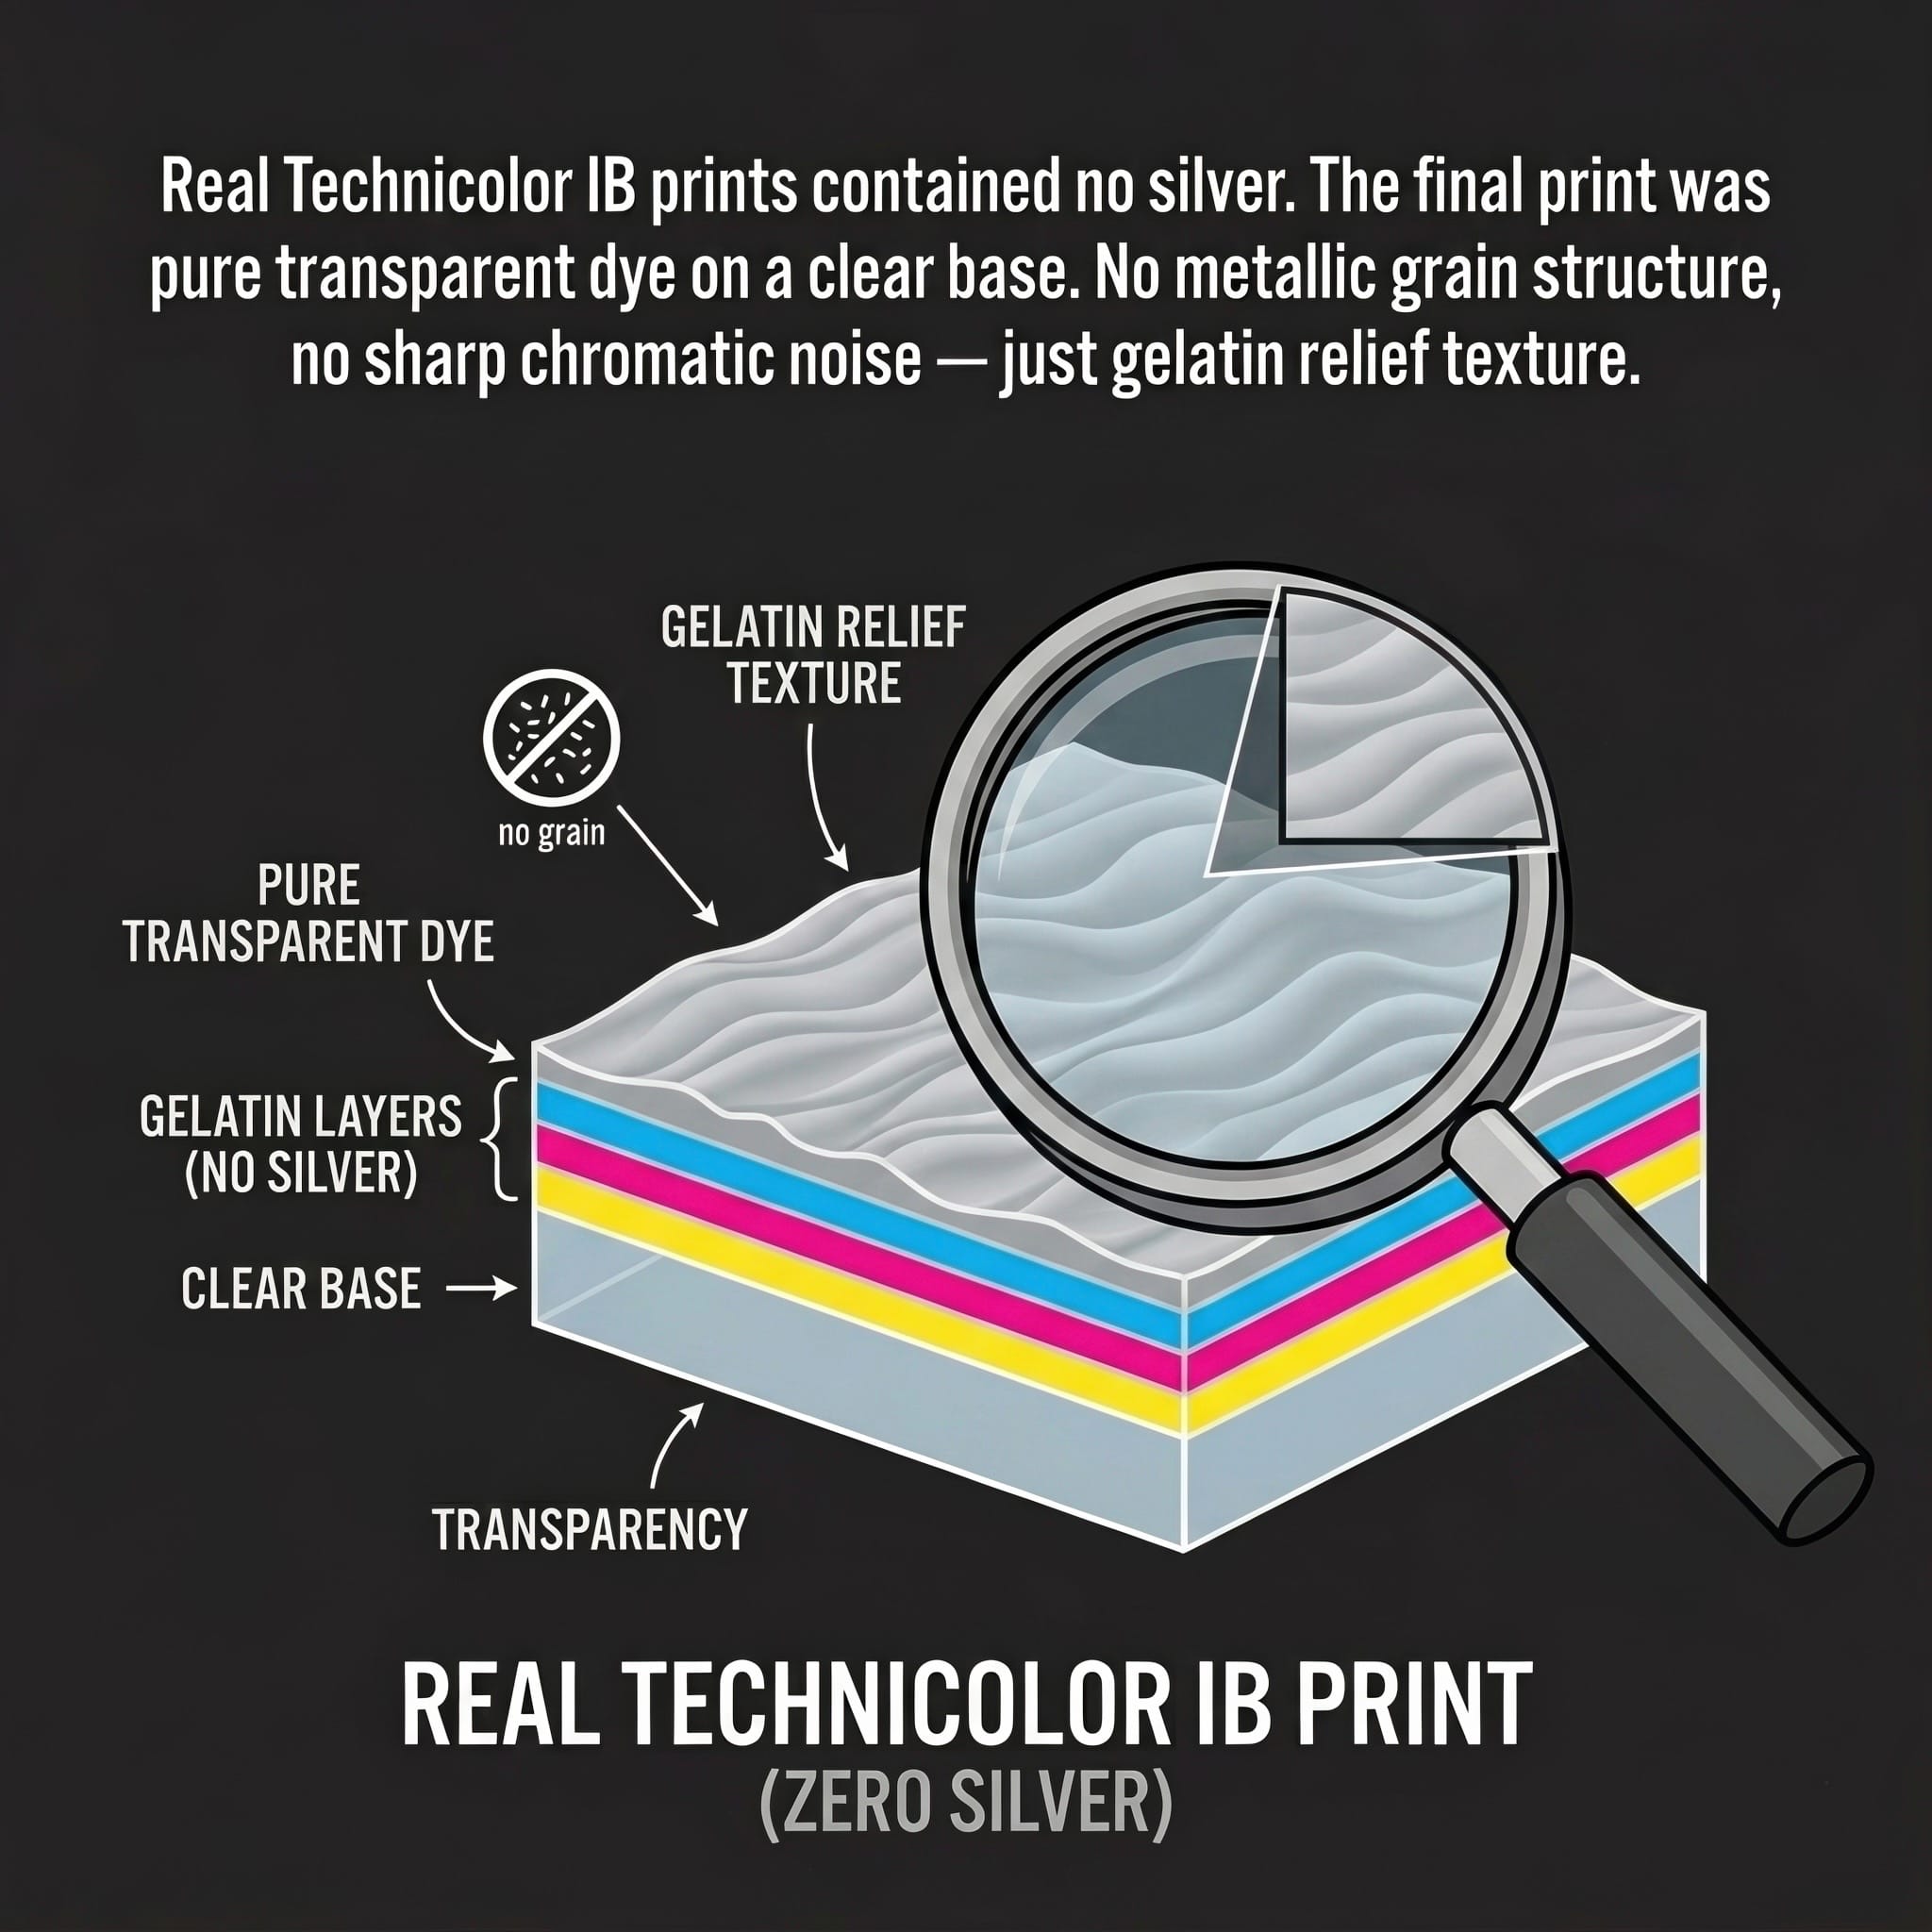
Zero Silver
Real Technicolor IB prints contained no silver. The final print was pure transparent dye on a clear gelatin base — no metallic grain structure, no sharp chromatic noise.
What you see is the physical surface of the hardened matrix, transferred during imbibition. The grain system uses a negative skew (soft dark dye pools) rather than the positive skew of silver-grain sparkle.
Fine Grain + Dye Cloud
Two independent stages work together. Bilinear interpolation handles the micro-texture of individual gelatin granules. A regional dye cloud octave captures the slow, frame-wide variation in gelatin hydration — the organic density undulation visible across large areas of real IB prints. Together they create texture that lives inside the image, not on top of it.
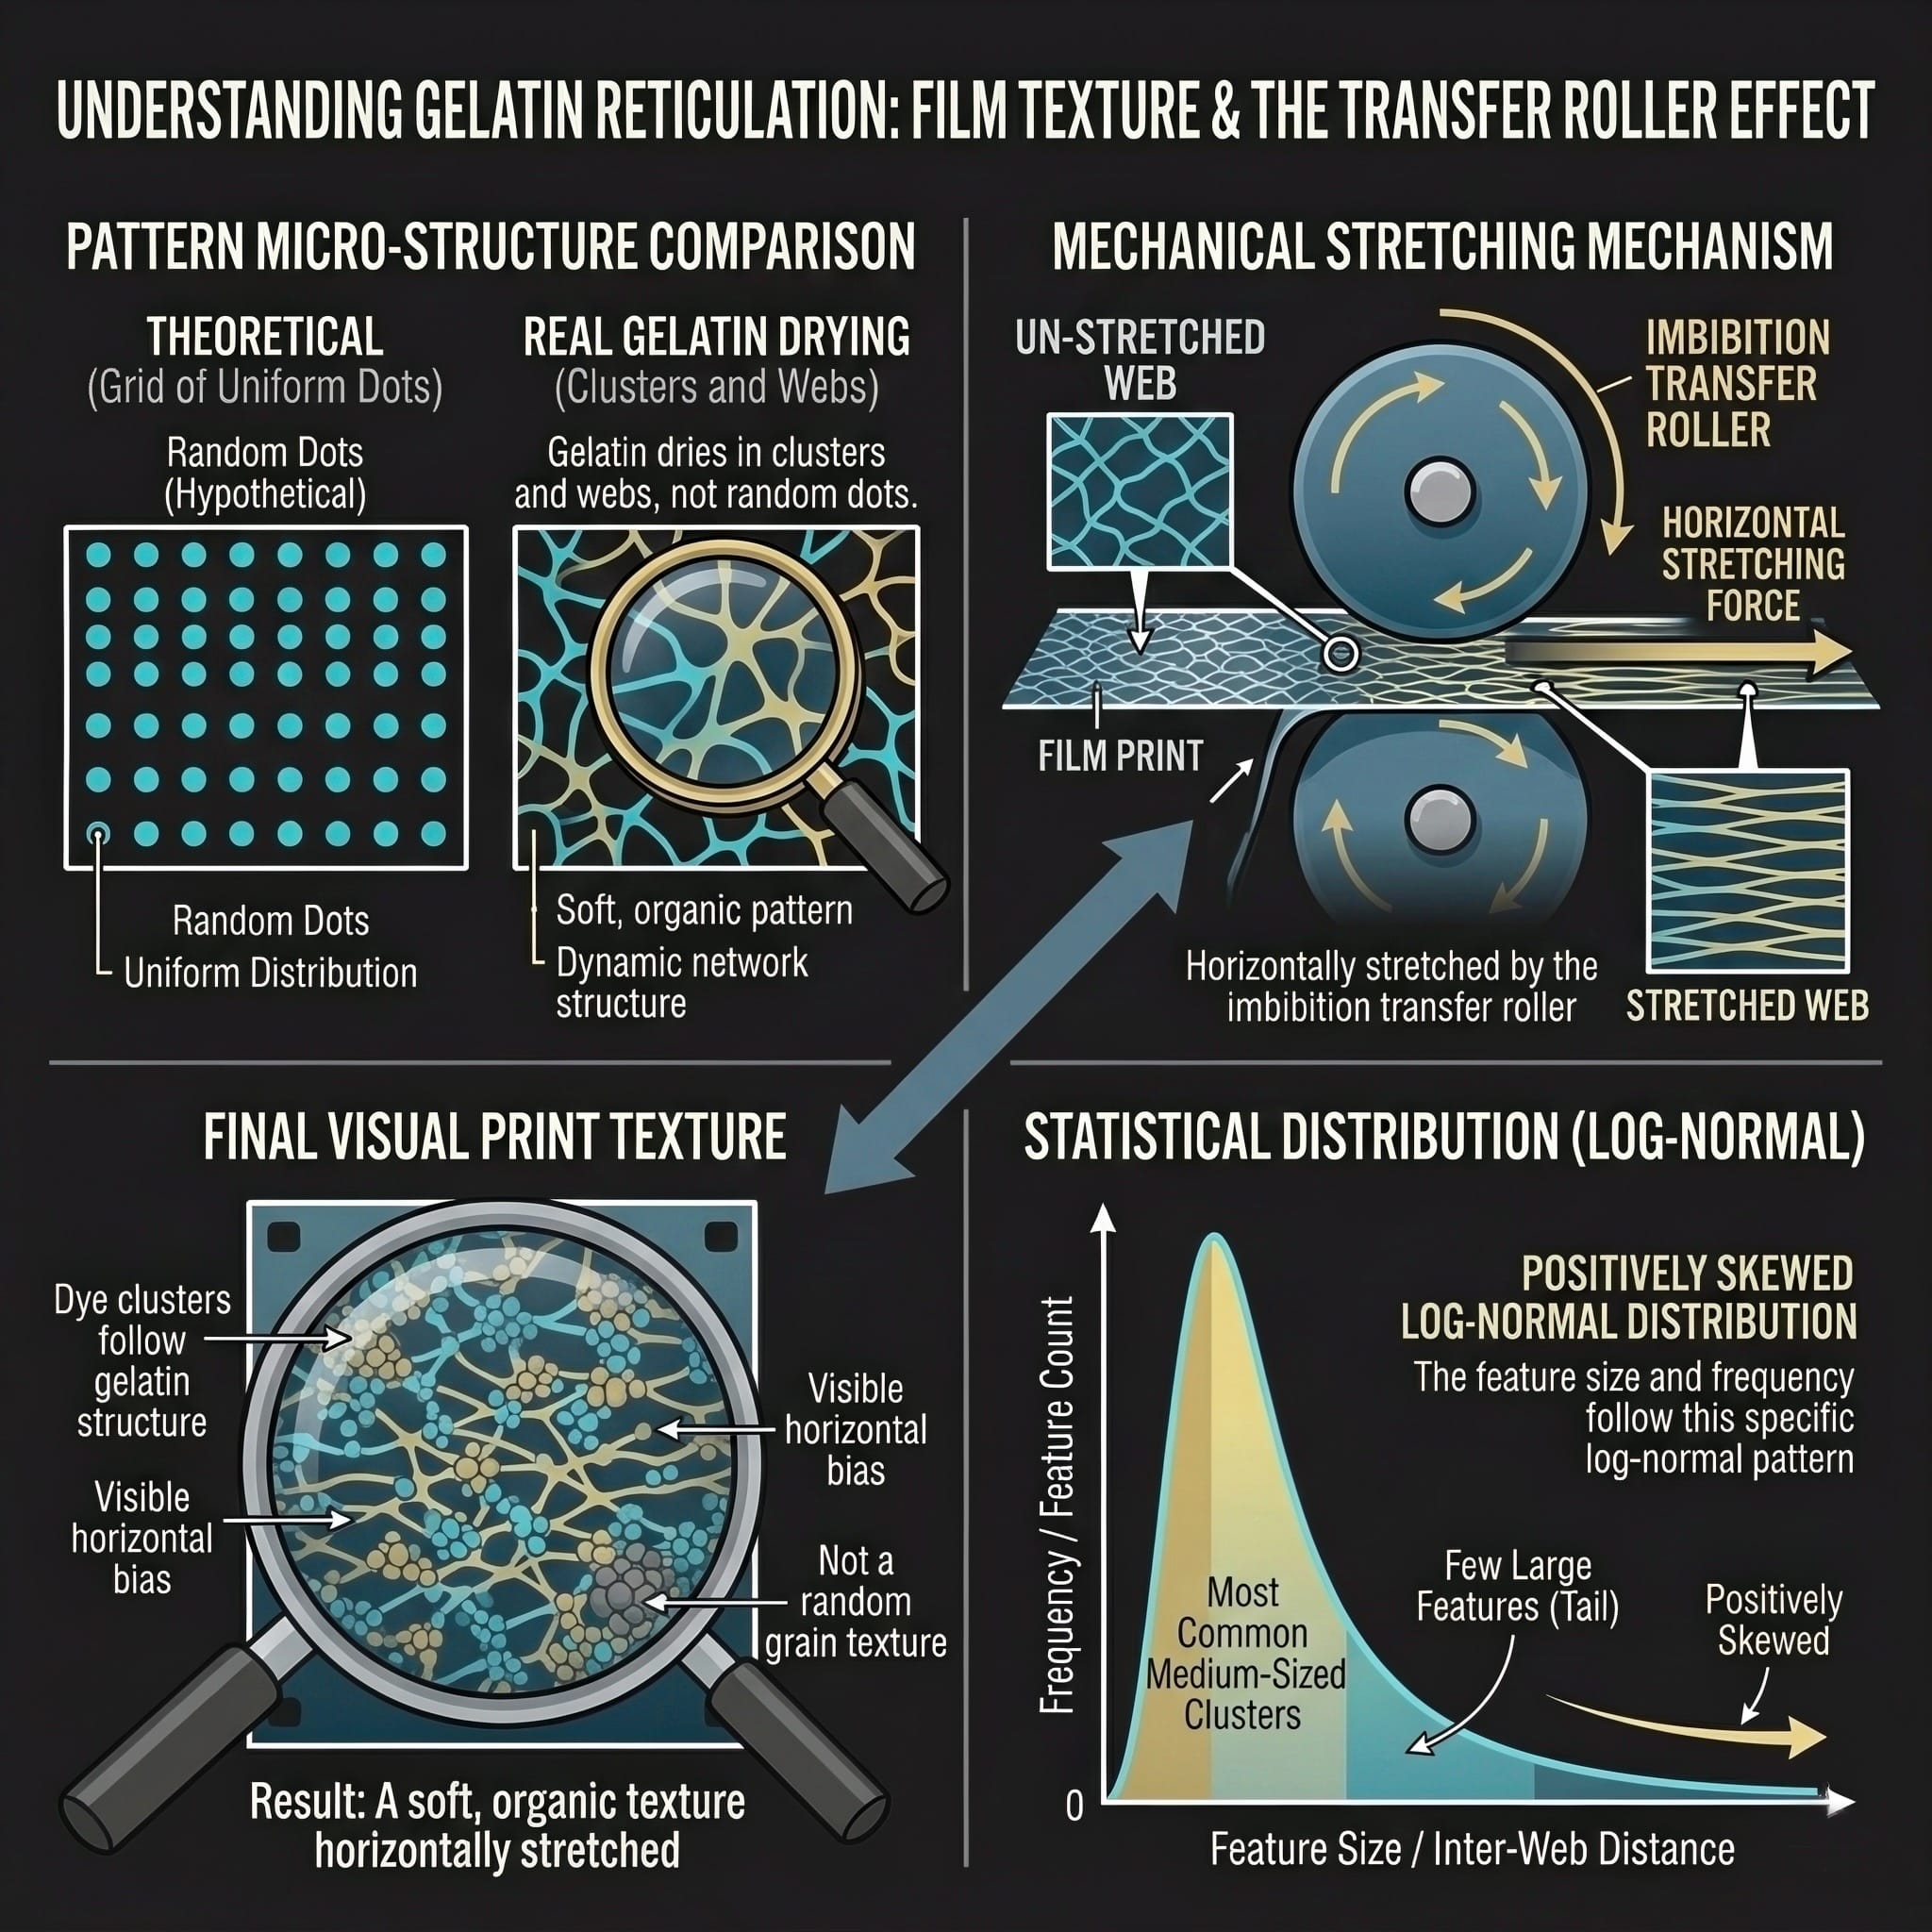
Reticulation & Density Response
Gelatin dries in clusters and webs — a soft, honeycomb reticulation pattern from the drying process, rendered with softened sqrt-edge weighting for the historically accurate barely-perceptible network. Grain is applied to dye concentration, not RGB output — Beer-Lambert physics naturally makes it dense in midtones and shadows, compressed in highlights.
COLOR SCIENCE
Color Separation & Color Contrast
Why Technicolor looks like nothing else.
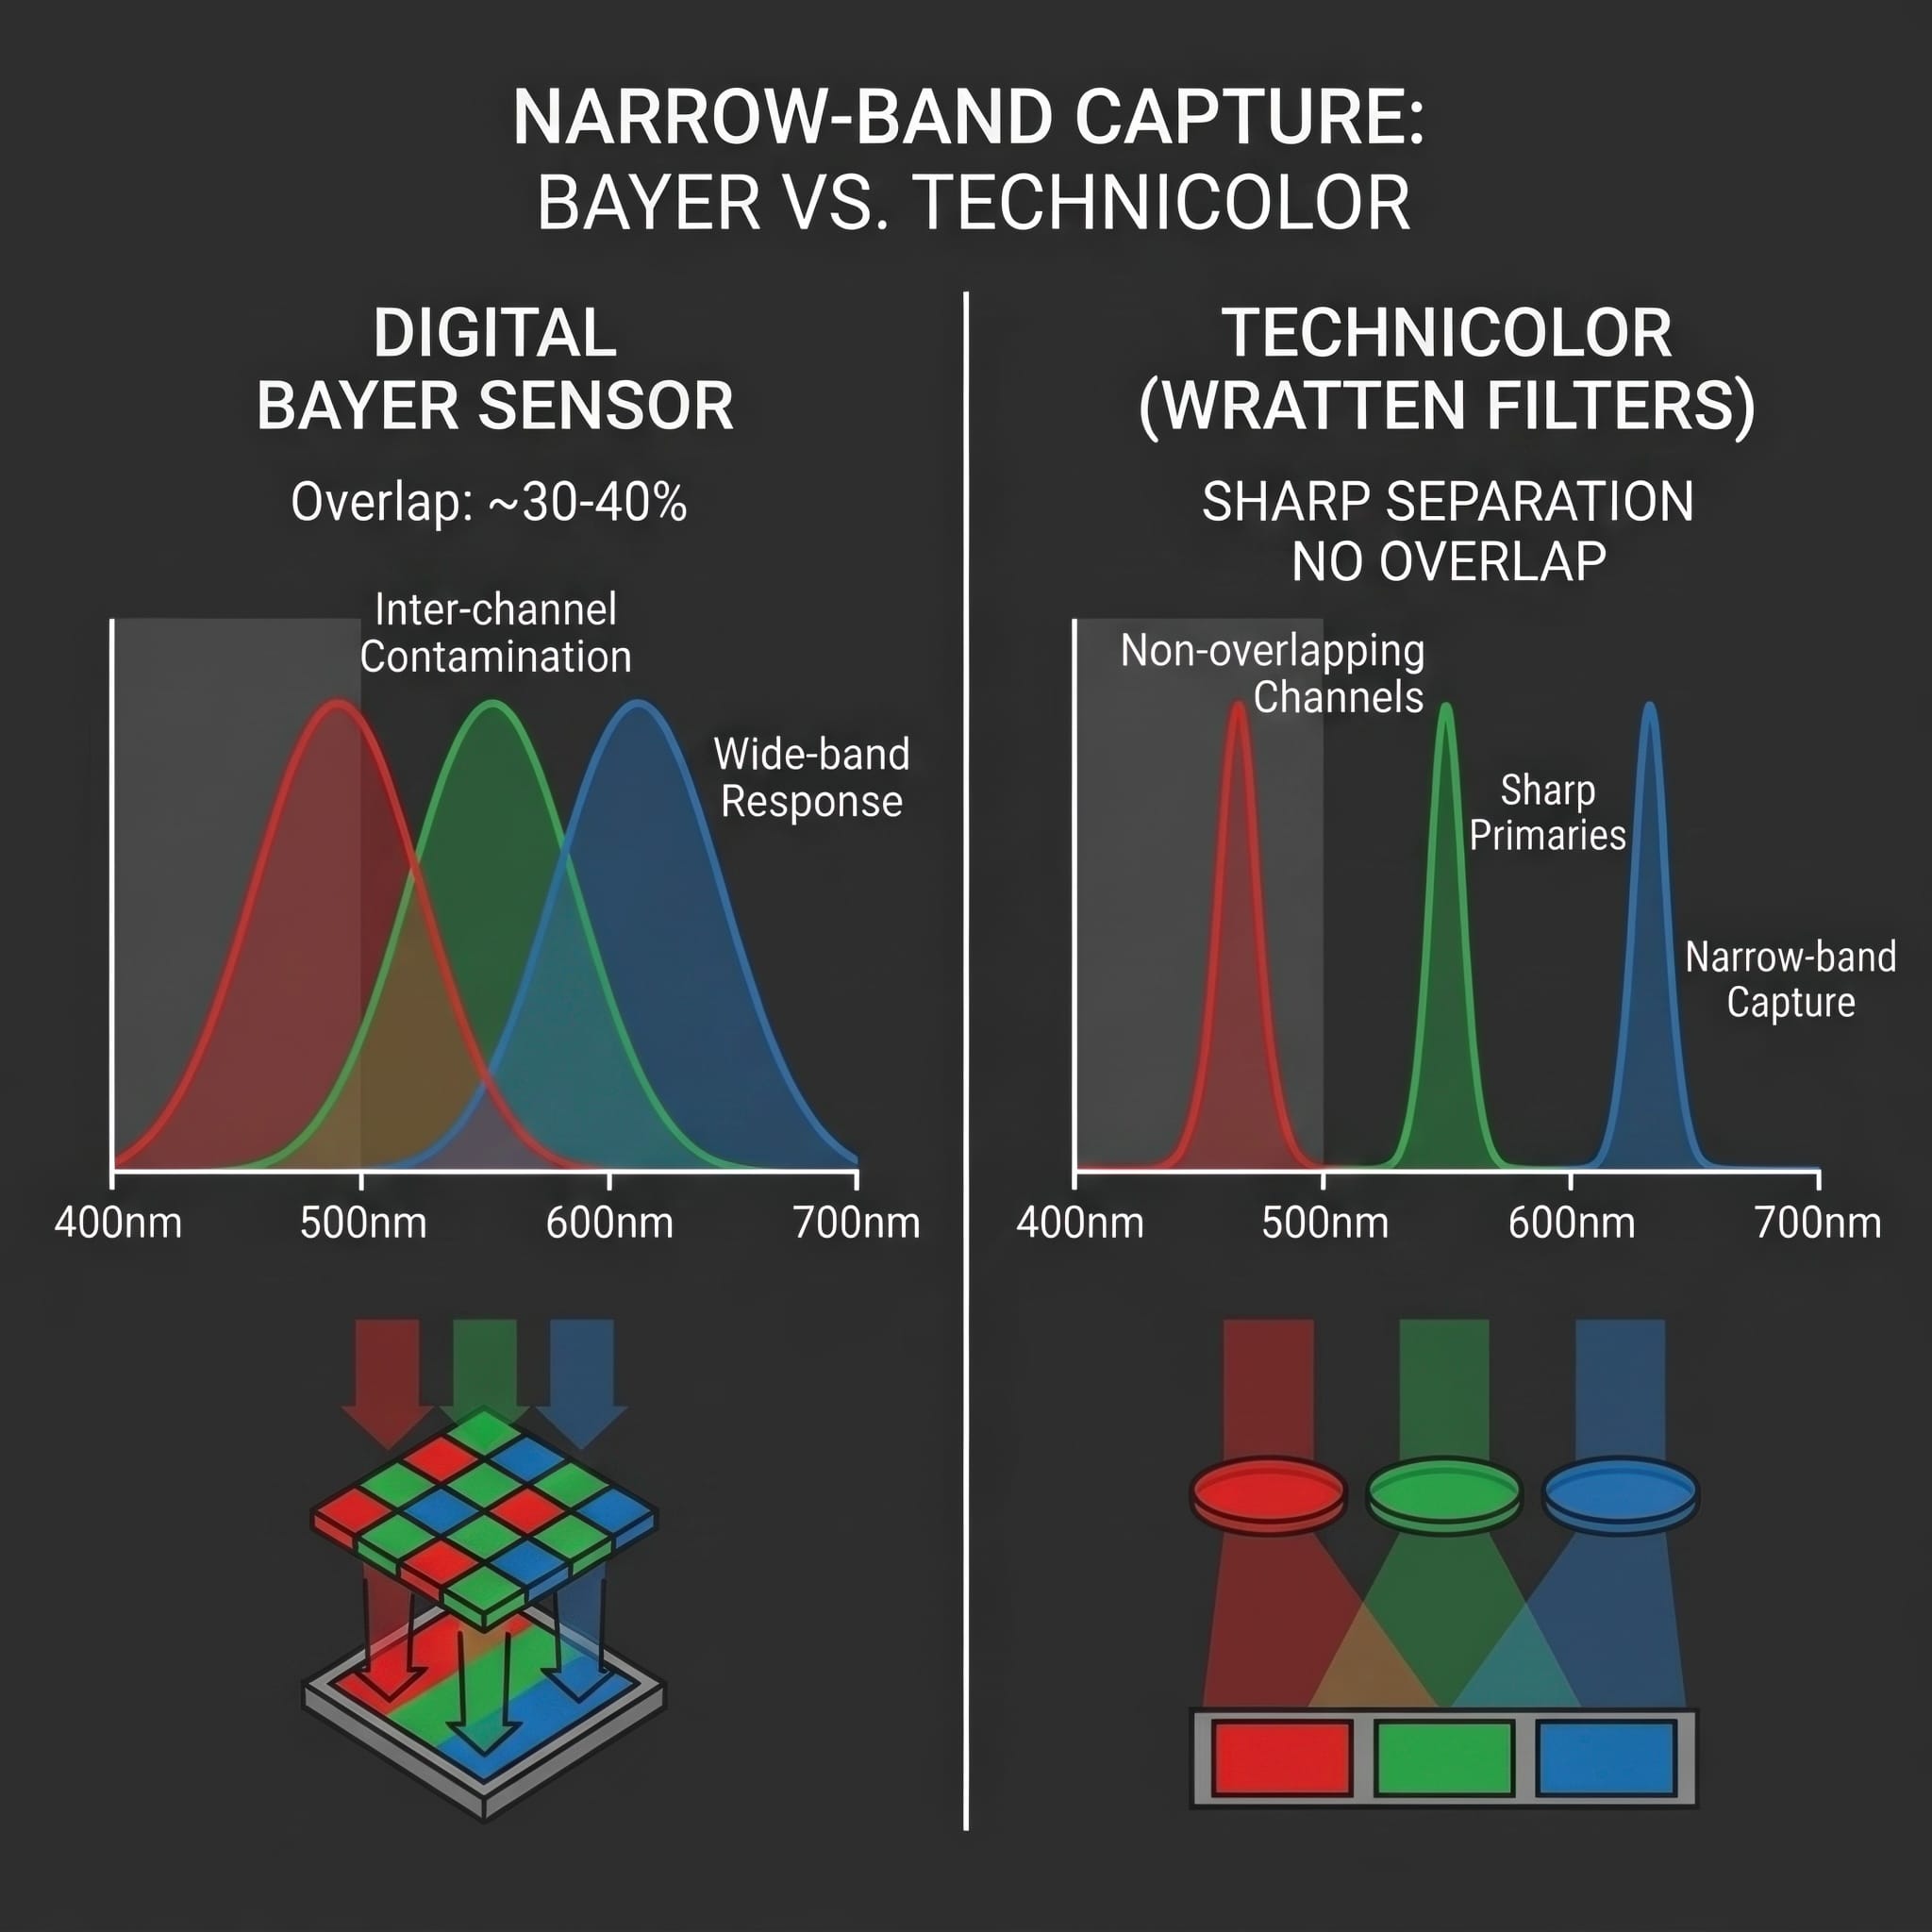
Narrow-Band Capture
The Wratten filters carved the spectrum into three non-overlapping channels. Unlike a digital Bayer sensor where red, green, and blue overlap by 50–70%, Technicolor’s separation was sharp. Primaries don’t contaminate each other.
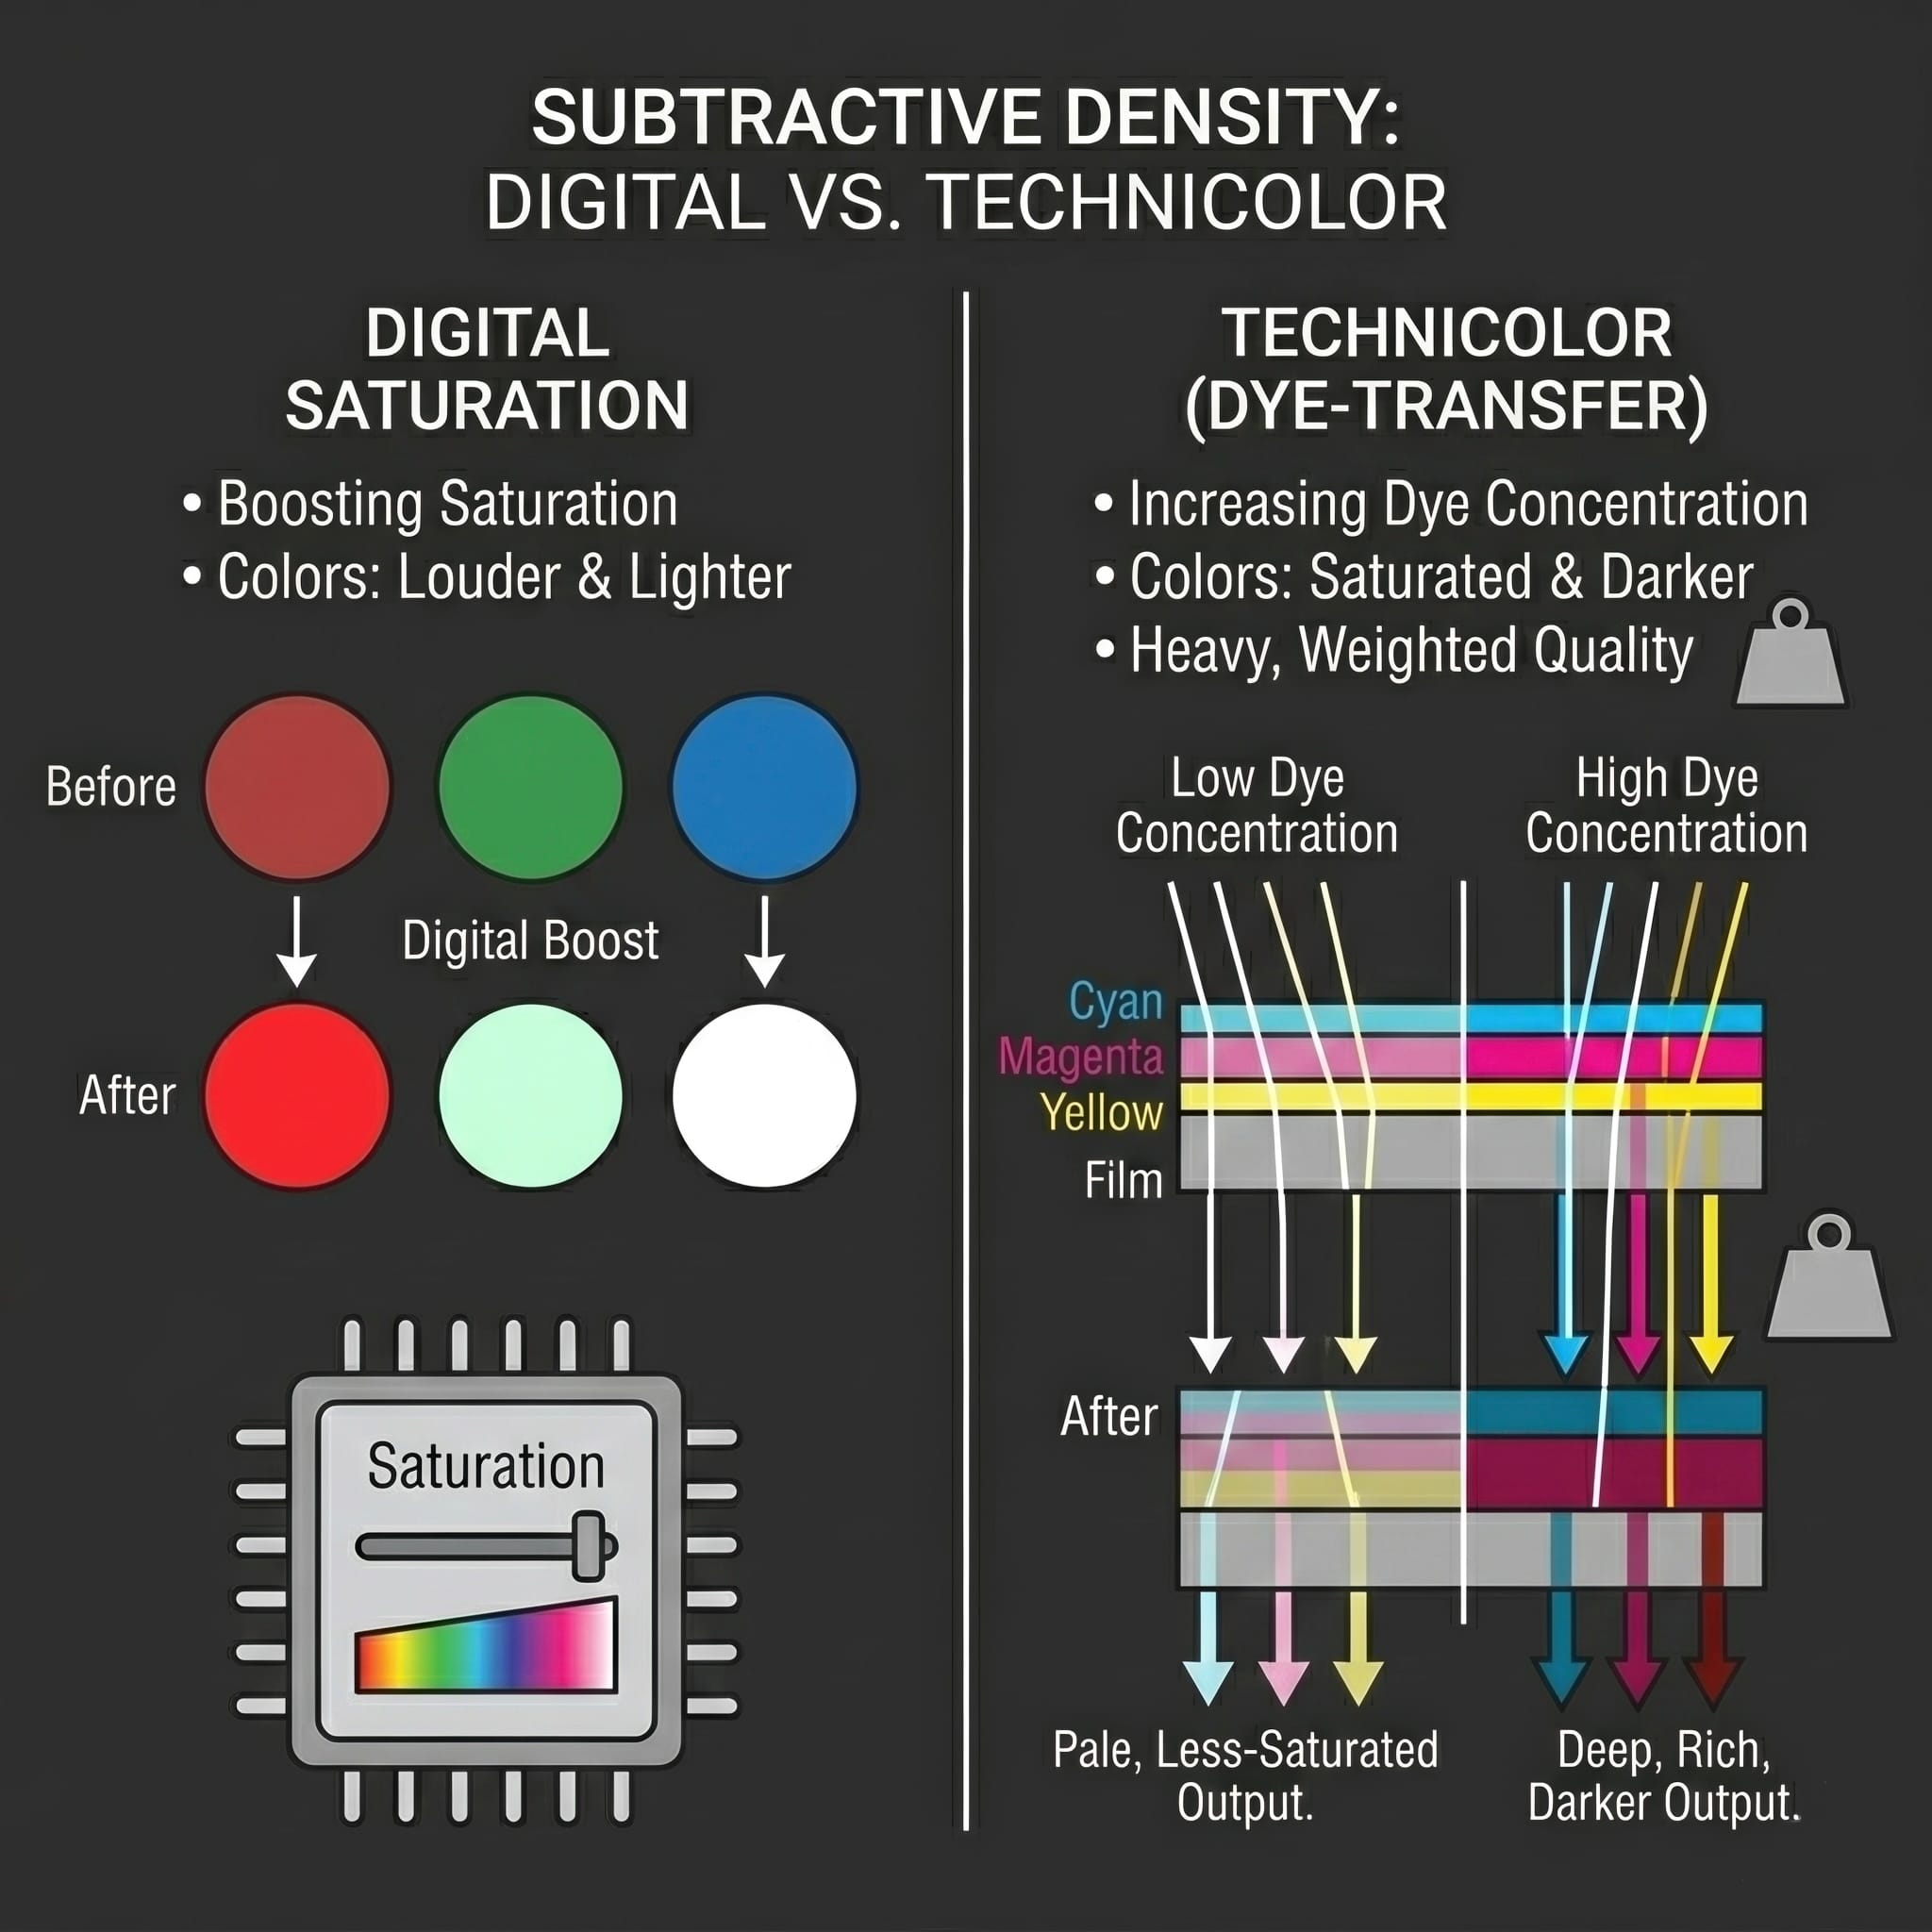
Subtractive Density
In digital, boosting saturation makes colors louder and lighter. In dye-transfer printing, increasing dye concentration makes colors more saturated and darker. The heavy, weighted quality of Technicolor that digital saturation can’t replicate.
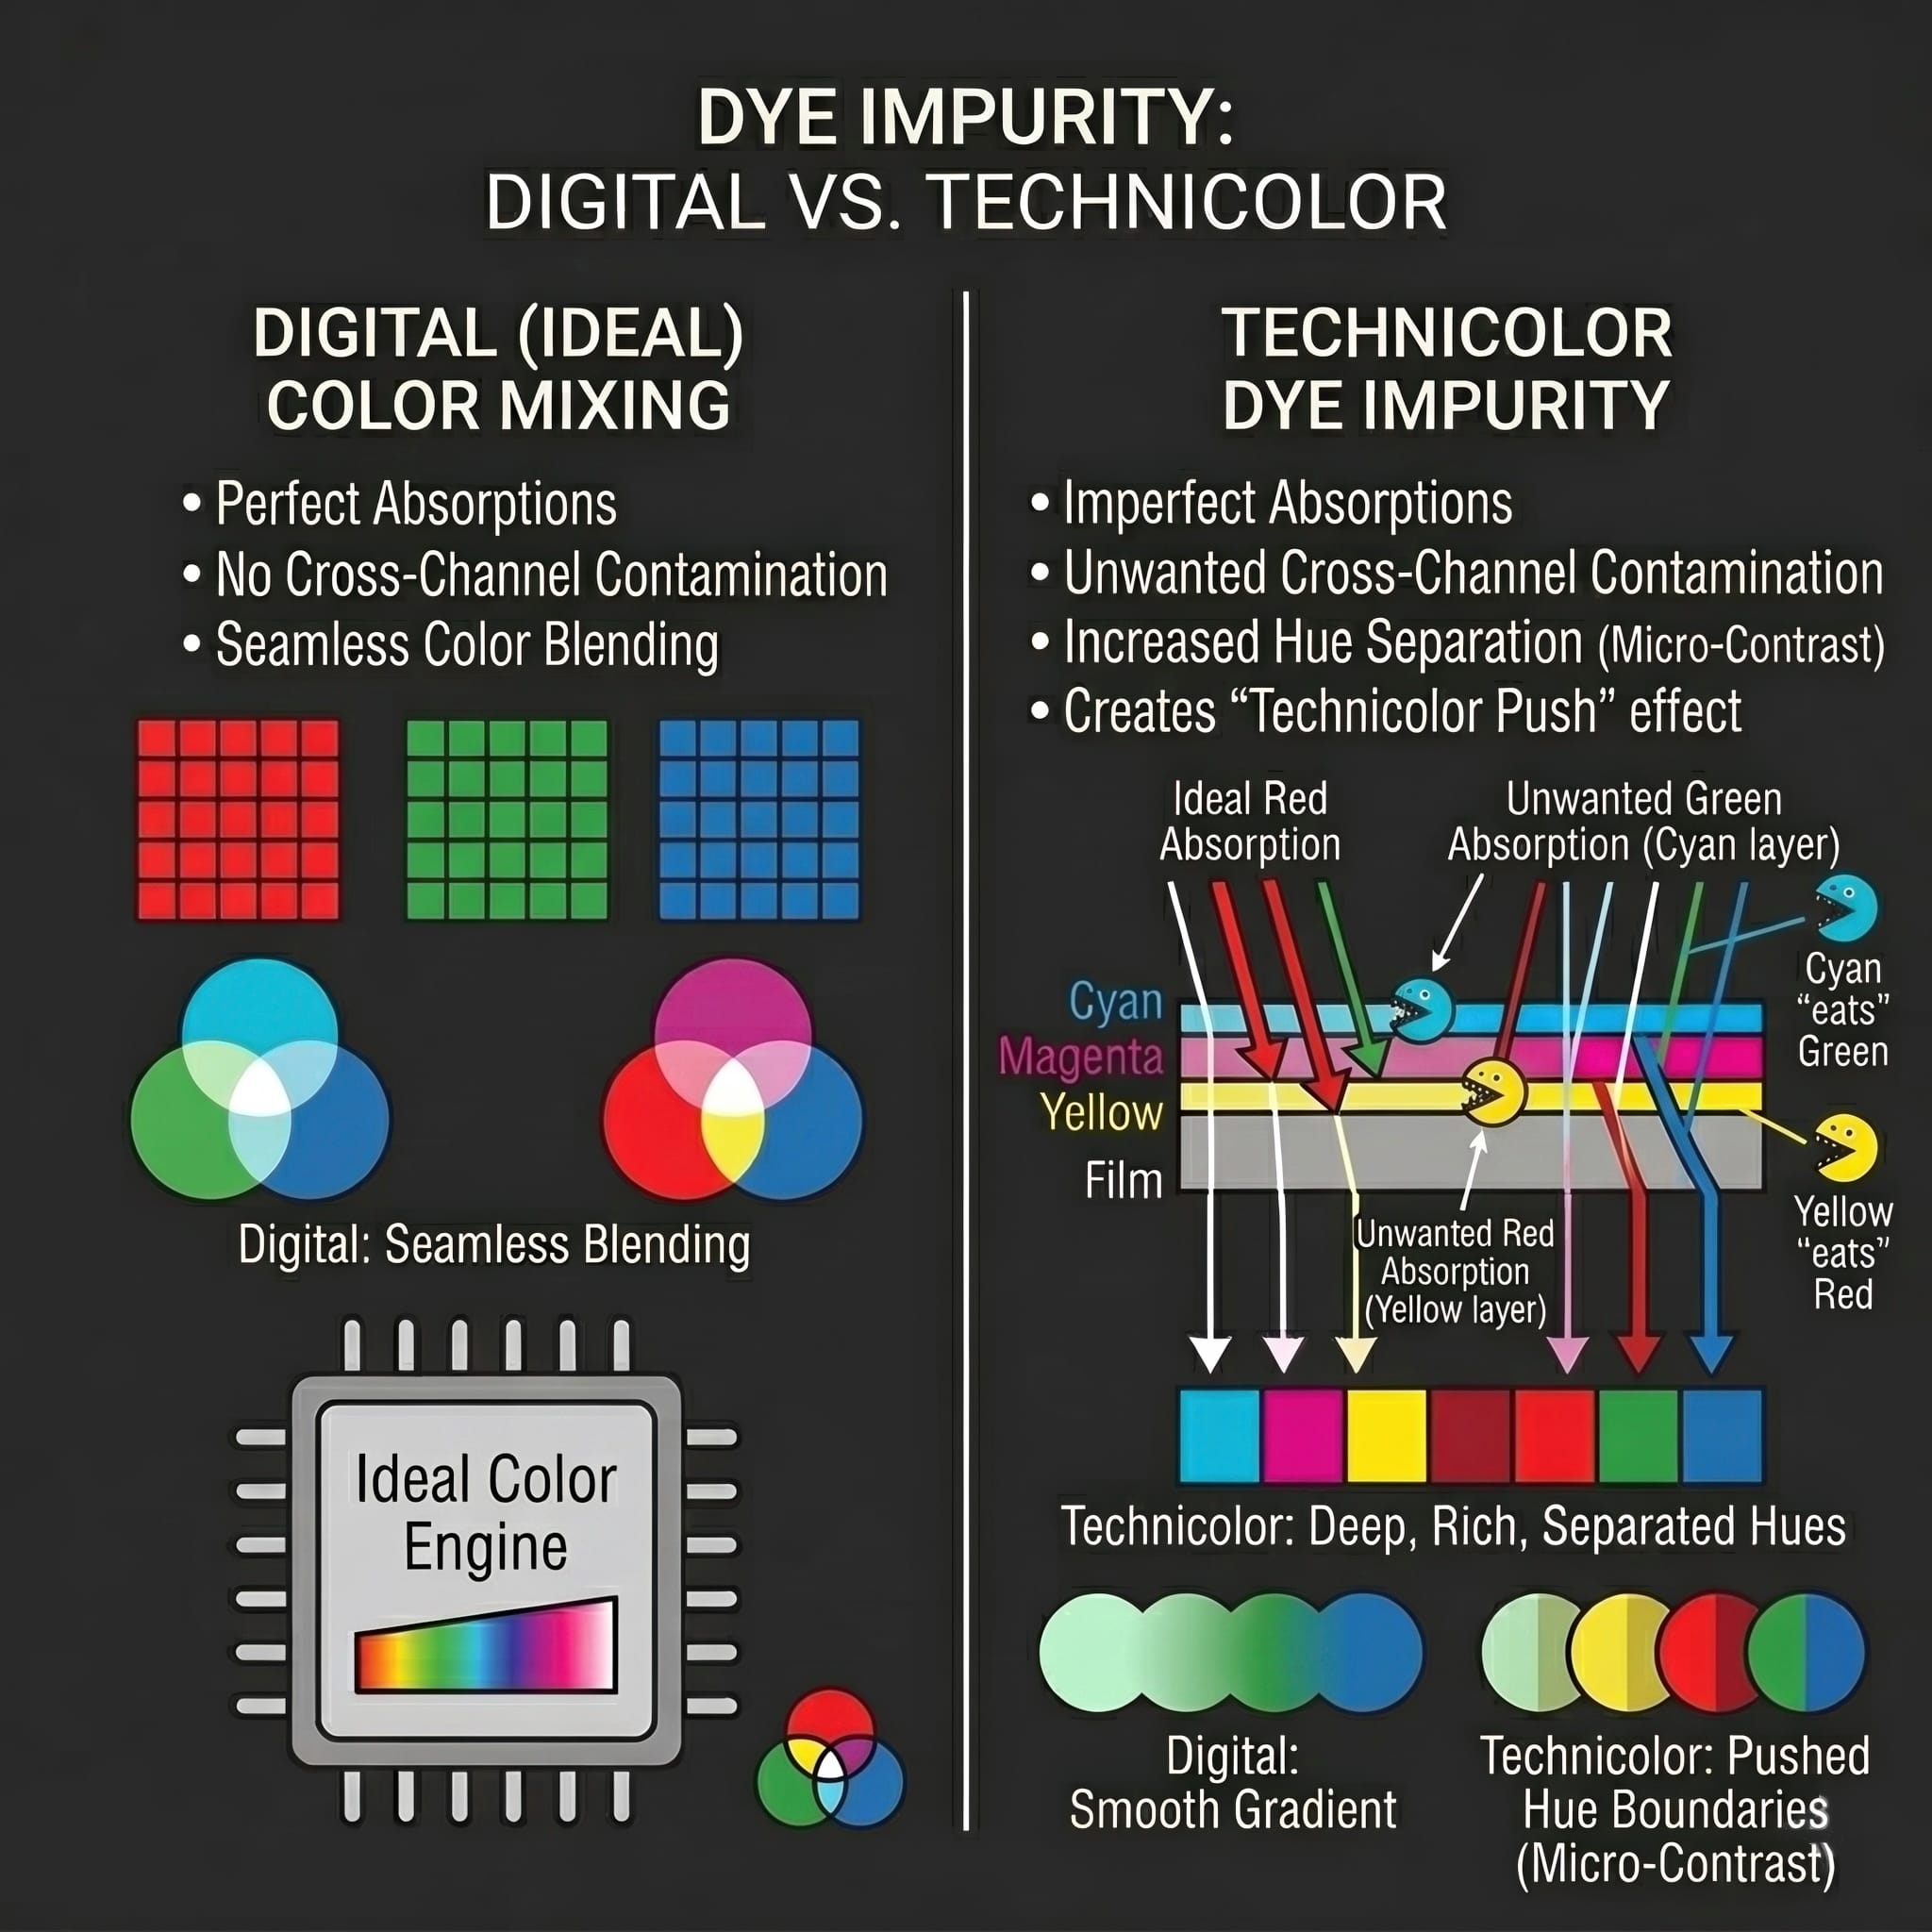
Dye Impurity
Each dye absorbed light it wasn’t supposed to. Cyan ate green. Yellow ate red. These “unwanted” absorptions created micro-contrast between adjacent hues — pushing neighboring colors further apart instead of letting them blend.
Colors feel like oil paint — each stroke distinct, heavy, occupying physical space.
THE DIFFERENCE
What Changes. What Doesn’t.
| LUTs & Filters | Nx 3-Strip |
|---|---|
| Static per-pixel color map | Per-pixel, per-frame physics simulation |
| Same result on any image | Responds to luminance, color, saturation, and position |
| Uniform across the frame | Density-dependent dye behavior |
| No spatial awareness | Halation, bloom, lens optics, dye spread, registration |
| Clean digital precision | Organic mechanical imperfections |
| Colored grain noise | Neutral, silver-free dye transfer texture |
| Saturated = brighter | Saturated = darker |
| Colors bleed into neighbors | Colors push apart — true separation |
| Color-wheel skin tones | Skin tones emergent from dye spectral impurity |
| Sharpen or soften uniformly | Acutance + gelatin softness target different frequency ranges |
THE RESULT
The Look
You don’t adjust Nx 3-Strip to get the Technicolor look. You apply it.
DYE TRANSFER PHYSICS
How Color Gets Heavy
Three controls that simulate what dye actually does inside gelatin.
Nothing like them exists in any other tool.
In a digital color grade, saturation is additive — push it up and your colors get louder and brighter. In dye-transfer printing, saturation is physical — more dye means more absorption, which means less light transmitted, which means darker. The two systems work in opposite directions.
These controls simulate the physical constraints of gelatin dye transfer — the phenomena that give Technicolor color its characteristic weight, dimension, and restraint.
These two controls don’t change how color looks. They change how color behaves.
ZERO CONFIG
Drop It On. Walk Away.
The defaults are the preset.
Every coefficient traces to a documented physical property — absorption spectra, film stack geometry, adsorption constants, primary coordinates.
The factory settings deliver the complete pipeline at historically researched values.
Apply it to Rec.709 footage. It works. Want subtlety? Pull back a few sliders. Want full Golden Age character? Push forward.
Want to disable halation, grain, or gate weave entirely? Toggle them off. The image still works — because the core color science stands on its own.
No presets. No profiles. No “Film Stock”. Just the physics, tuned to the real process, ready to go.
COMPLETE CONTROL
60 sliders. 9 toggles. 14 view modes.
Organized in processing order. Every stage independently controllable.
Exposure (stops), shadows, highlights.
IB Print Acutance strength and radius.
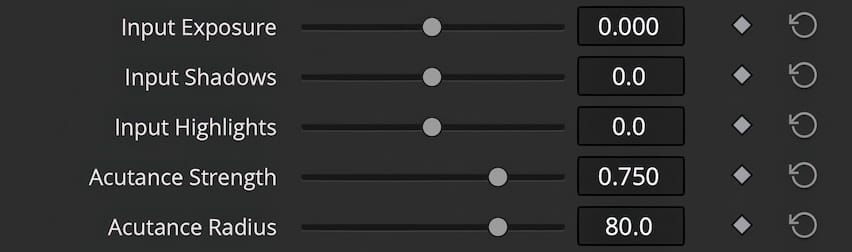
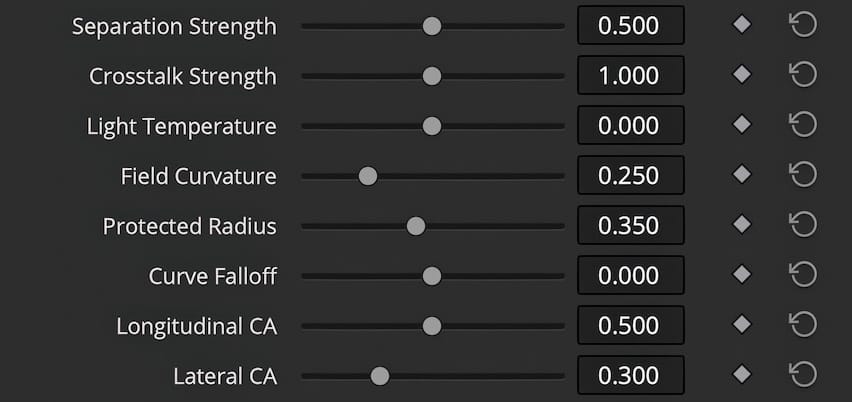
Wratten Separation Strength. Spectral crosstalk.
Light temperature (tungsten ↔ daylight — affects
contrast, not just tint). Field curvature, protected
center radius, curve falloff shape. Longitudinal and
lateral chromatic aberration.
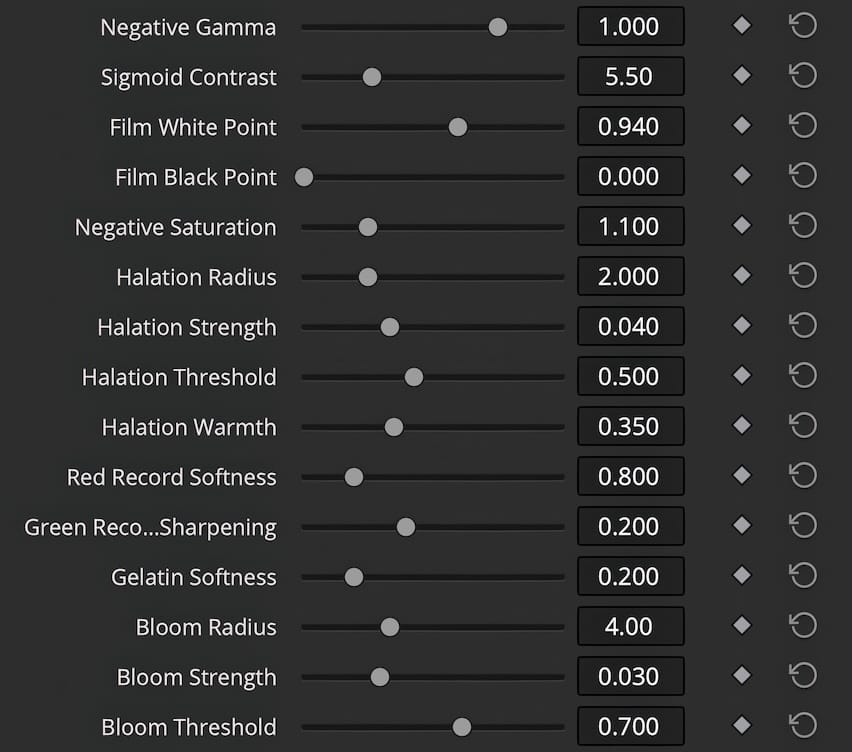
Sigmoid contrast, negative gamma, D-Min white
point, black point. Per-channel halation: radius,
strength, threshold, warmth. Red record softness.
Green record sharpening. Gelatin Softness.
Highlight bloom: radius, strength,
threshold.
Per-dye strength (Cyan / Magenta / Yellow). Dye
pickup gamma. Density desaturation. Matrix Key
strength and gamma. Dye trapping strength. Density
Coupling. Midtone Dye Boost.
Gamut limit (strength of compression toward
historical Technicolor primaries).
Highlight desaturation. Shadow desaturation.

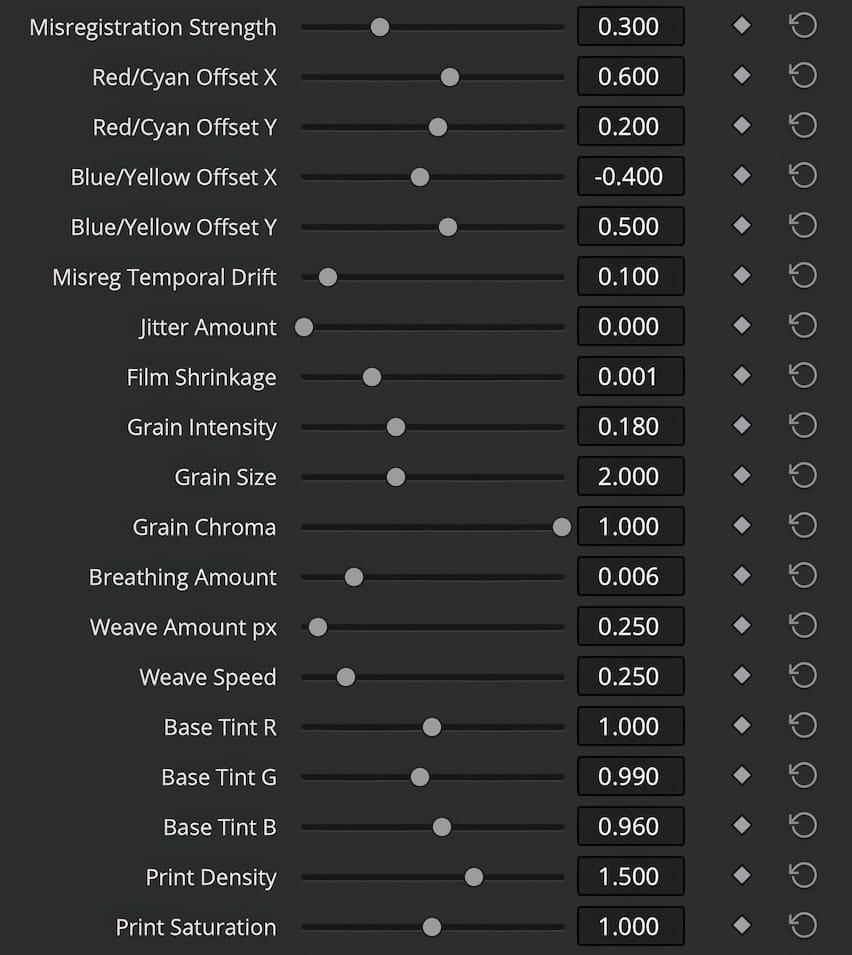
Misregistration strength, R/G/B X/Y offsets,
temporal drift, jitter. Film shrinkage. Grain intensity,
size, chroma. Color breathing amount. Gate weave
amount and speed. Base tint (R/G/B).
Print density and saturation.
SEE EVERYTHING
14 Diagnostic View Modes
The same diagnostics you’d use to calibrate a real imbibition printer.
| View | What You See |
|---|---|
| Final Result | Complete pipeline output |
| Wratten Separation | R/G/B records after spectral sharpening matrix |
| Lens Optics Map | Field curvature + chromatic aberration profile |
| Separation Negatives | Three-panel RGB records with Wratten filter labels |
| Halation Map | Per-channel bipack scatter with response curves |
| Dye Matrices (CMY) | Three-strip dye layers + combined absorption spectra |
| Cyan / Magenta / Yellow [Individual dye layer views.] | Individual dye transmission + absorption spectrum |
| Key Layer | Matrix Key density + gamma response curve |
| Dye Response Curves | 4-panel diagnostic: pickup, H&D, transmission, composite |
| Inhibition Trapping | Per-layer dye transfer efficiency |
| Imbibition Buildup | Progressive C → C+M → C+M+Y with trapping |
| Grain Map | Isolated grain + density-dependent visibility curve |
INPUT / OUTPUT
Supported Formats
15 input formats. One consistent output.
Scene-Referred Inputs
| Format | Log Encoding | Color Gamut |
|---|---|---|
| ACEScct / AP1 | ACEScct | ACES AP1 |
| ARRI LogC3 / AWG3 | LogC3 | ARRI Wide Gamut 3 |
| ARRI LogC4 / AWG4 | LogC4 | ARRI Wide Gamut 4 |
| Canon C-Log 2 / Cinema Gamut | C-Log 2 | Canon Cinema Gamut |
| Cineon Film Log / Rec.709 | Cineon | Rec.709 |
| DaVinci Intermediate / DWG | DaVinci Intermediate | DaVinci Wide Gamut |
| Panasonic V-Log / V-Gamut | V-Log | V-Gamut |
| RED Log3G10 / RWGRGB | Log3G10 | RED Wide Gamut RGB |
| Sony S-Log3 / S-Gamut3.Cine | S-Log3 | S-Gamut3.Cine |
Display-Referred Inputs
| Format | Color Space | Gamma |
|---|---|---|
| Rec.709 / Gamma 2.2 | Rec.709 | 2.2 |
| Rec.709 / Gamma 2.4 (default) | Rec.709 | 2.4 |
| Rec.709 / Gamma 2.6 | Rec.709 | 2.6 |
| P3-DCI / Gamma 2.6 | DCI-P3 | 2.6 |
| P3-D65 / Gamma 2.4 | DCI-P3 D65 | 2.4 |
| Rec.2020 / Gamma 2.4 | Rec.2020 | 2.4 |
Output
| Format | Color Space | Gamma |
|---|---|---|
| Rec.709 / Gamma 2.4 (always) | Rec.709 | 2.4 |
THE FOUNDATION
Built From the Archive
Most film emulations start with a scan and work backwards. Nx 3-Strip was built forwards — from the physics of the original process.
Every coefficient traces to a documented physical property.
The cyan dye’s green absorption ratio. The 0.006-inch bipack film stack offset. The color coordinates of the Wratten filter primaries. The adsorption constants for gelatin dye transfer. The white point of a 1940s carbon-arc projector.
THE LINEAGE
A Century of Color
Process 1
Two-color cemented prints
Process 2
Two-color subtractive
Process 3
Two-color imbibition — first dye transfer
Process 4 ★
Three-strip imbibition. The Wizard of Oz. Gone with the Wind. Singin’ in the Rain. The Red Shoes. An American in Paris. Rear Window.
Process 5
Single-strip (Eastmancolor negative). The end of three-strip photography.
Last US Print
Final American IB print struck
Last Global Print
Final IB print struck (Beijing lab). The imbibition presses go silent. The dye baths are drained. The matrices are archived.
Nx 3-Strip
Process 4, rebuilt from physics. Real-time. DaVinci Resolve.
Nx 3-Strip reconstructs the process marked ★ — the three-strip imbibition system that produced every iconic Technicolor film from 1932 to 1955.
Twenty-three years of cinema. Rebuilt in code.
System Requirements


Works on macOS, Windows and Linux
(Metal, CUDA & OpenCL Modes Supported)
Requires DaVinci Resolve Studio
Changelog:
v2.2 — May 6, 2026 Rendering & Highlight Update.
Lens Optics – Fixed chromatic aberration in scene-referred workflows. Edge blur and field curvature behavior have been refined for more natural vintage lens rendering.
Highlight Rolloff – Highlights now roll off more smoothly with better tonal separation in bright areas. Specular highlights, clouds, and bright light sources retain more detail with reduced clipping and flatter-looking highlights.
Color Retention – Bright skin tones, reds, and oranges stay saturated longer before bleaching. Color transitions into highlights are now more natural and film-like.
Technicolor Response – Warm highlight behavior has been refined for a more authentic Technicolor look. Bright surfaces retain their natural hue longer before transitioning into the characteristic warm cream highlight rolloff.
v2.1 — May 2, 2026 Color Science Update.
Scene-Referred Workflow – Fixed highlight clipping when using scene-referred inputs (EXR, LogC, S-Log3, etc.). Fire, specular highlights, and bright light sources now roll off smoothly instead of clipping to white. Highlights retain their natural color — warm tones stay warm, they don’t bleach out.
Tone Curve – Fixed a brightness dip in the tone curve that could cause highlights to briefly get darker before getting brighter.
Gelatin & Dye Diffusion – Each dye layer now has its own diffusion radius, matching the molecular weight of the real Technicolor dyes. Cyan dye spreads furthest, yellow spreads least — creates more authentic color bleed at edges. Blur profile changed to match real imbibition prints.
Film Grain – Shadow grain is now coarser and clumpier than highlight grain, matching real dye transfer prints.
Shadow Desaturation – When enabled, shadows now desaturate toward warm amber instead of cold gray. Matches the warm shadow character of real Technicolor prints caused by film base tint and residual dye staining.
v2.0 — April 24, 2026 Major update.
What’s New
Expanded Input Format — Replaces Input Encoding with a new Input Format selector covering 15 camera color spaces including ARRI LogC3/LogC4, Sony S-Log3, Canon C-Log 2, RED Log3G10, Panasonic V-Log, and more. Gamut conversion is handled automatically.
Wide-Gamut Rendering Fix — In v1.1, DaVinci Intermediate and ACEScct inputs were decoded from their log encoding but their wide-gamut primaries were never converted to Rec.709 — colors were systematically wrong for both scene-referred formats. v2 adds correct gamut matrices for all 15 input formats, applied in linear light before tone mapping. Spatial effects now process in the correct domain for scene-referred footage.
IB Print Acutance — New pre-dye sharpening stage that recreates the three-dimensional pop characteristic of original imbibition prints. Adds edge snap and midtone depth before dye processing.
Gelatin Softness — Simulates the resolution limit of the physical gelatin matrix — softening fine surface texture like skin and fabric while leaving edges intact. The diffuse quality unique to real IB prints.
New Dye Physics — Adds Density Coupling and Midtone Dye Boost. Together these model how real dye-transfer color behaves: saturation darkens rather than blooms, midtones carry the richest dye, and highlights desaturate gracefully.
Refined Grain Engine — Improved IB dye grain with smoother large-scale modulation, a new long-range density variation layer, corrected dye-pool skew, and softer reticulation. Re-tuned defaults better reflect the coarser, organic texture of real IB prints.
Major Performance Upgrade — All convolution cores rewritten for significantly faster processing. Approximately 5× faster at 4K on wide-gamut inputs. Halation and bloom now scale correctly to full slider range at any resolution.
Cleaner UI — Redundant enable/disable toggles removed throughout. Several controls consolidated into the new dye physics system.
v1.1 — March 30, 2026 Added ACEScct input support. The Input Encoding dropdown now includes ACEScct alongside the existing Rec.709, Cineon Film Log, and DaVinci Intermediate options.
v1.0 — March 26, 2026 Initial release.
Technicolor is a trademark of its respective owners. This product is not affiliated with or endorsed by them.