
Nx Color · User Manual Nx NexusIntelligent subject tracking, AI object detection, depth, mattes and a cinematic HUD — inside your edit, on your footage, in real time. FIND · TRACK · UNDERSTAND · RENDER 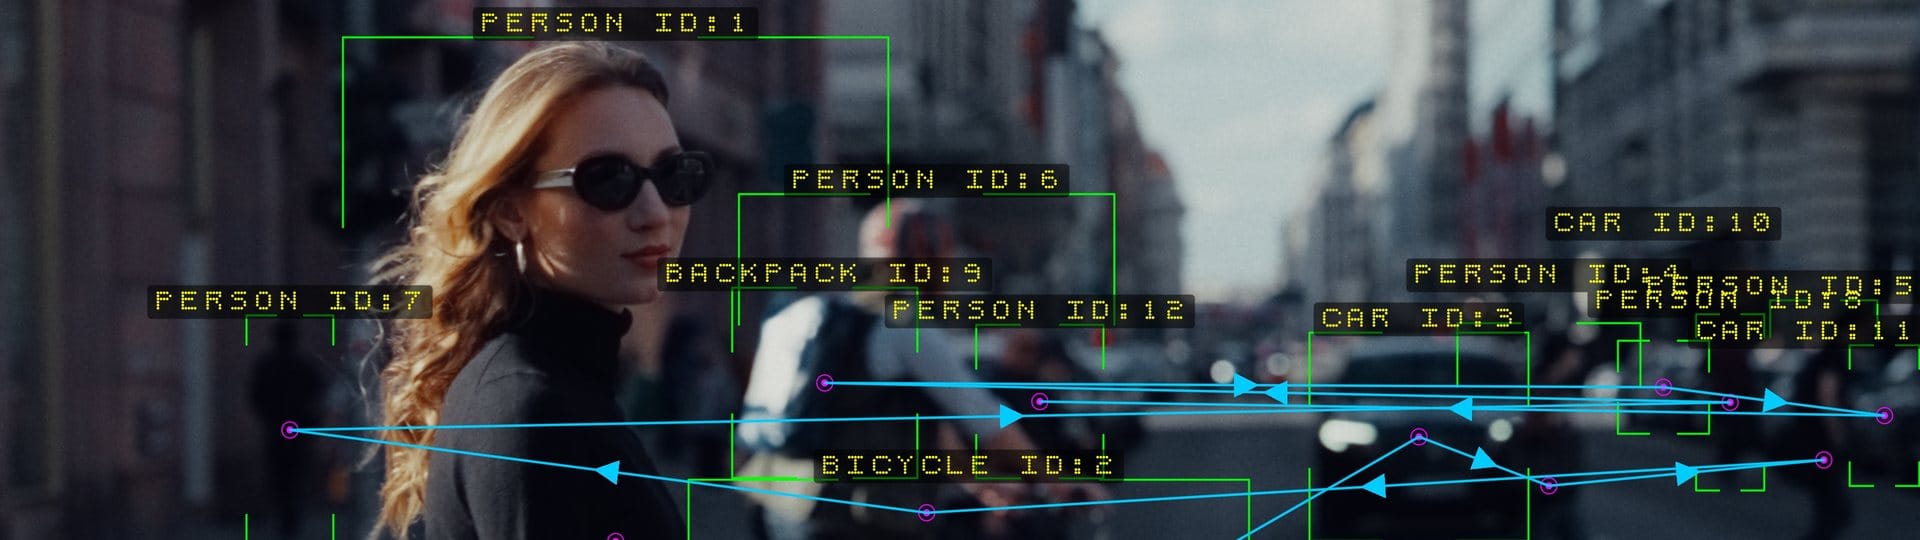
DaVinci Resolve · OpenFX
Premiere Pro
After Effects
Final Cut Pro · Motion
macOS · Windows
LOCAL AI
No cloud. No uploads. No subscription inference.
Contents What’s insideStart Here Part I · The System Part II · The Engine Part III · Getting Started Part IV · Reference Part V · The Foundation Start Here Five Steps to Your First ShotNexus is designed to work without an analysis pass, a tracking session or a single keyframe. Read this page and you can use it. Everything after it is refinement and reference. 1Apply Nx Nexus. Drop it onto your clip. It lives under Nx Color in every host.
2Choose a Detection Mode. Start with Smart Detect for people, vehicles and objects. If the thing you want isn’t a recognisable object, see the mode table overleaf.
3Let it play. Nexus reads the shot as it goes, finds your subjects and gives each one a stable identity. No pre-analysis, no waiting for a solve.
4Choose what to show. Boxes and labels are on from the start. Pick a frame style, and switch on centre markers and connections when the look calls for them.
5Pick a subject. Click one in the viewer, or type the number from its label into Subject 1. Region FX, Subject Glow and matte exports then apply to that subject alone.
For most shots, you can stop here
Two settings are worth knowing beyond that. Revive Frames (in Tracking) decides whether an identity survives a subject going briefly out of sight — it starts at 0, and around 15 is a much better default for real footage. Blur Strength (in Rack Focus) has to be above zero for a focus pull to do anything at all. How to read this manual Parts I and II explain what Nexus is and what it can do. Part III covers install and licensing. Part IV is the full control reference — every control, its range, its default and what it depends on. Passages marked “How it works” Some sections carry a HOW IT WORKS marker. Those explain the machinery underneath, for readers who want it. Skip every one of them and nothing about using Nexus gets harder. Part I The SystemWhat Nx Nexus is, and what changes the moment you drop it on a clip. The Idea What Nexus Actually IsEvery tracking shot you’ve admired — the reticle that never slips, the label that follows a running subject through a crowd, the interface that seems to understand the frame — was traditionally built by hand. Track a point. Fix the drift. Parent a box. Redo it all when the edit changes. Nx Nexus removes the hand. It is a subject-tracking engine: something that finds what matters in a frame, gives it an identity, holds that identity through the shot, works out where it sits in space, and then lets you do something with it. Overlays, mattes, focus, effects, exported channels — all of it downstream of one idea. Find anything. Track anything. Make it do something. The part people notice first is the AI. A neural detector reads every frame and recognises what’s in it — people, vehicles, animals, eighty kinds of everyday object, each one named. But the detector is an input, not the product. Nexus doesn’t assume that everything worth tracking is a person or an object. Sometimes the thing you want is a face. Sometimes it’s a car. Sometimes it’s a light, a colour, a bright reflection, a logo, a particle, or an abstract shape with no name at all. So Nexus has several ways of finding a subject — neural object detection, dedicated face detection, and six classical computer-vision detectors that lock onto brightness, edges, colour, a picked hue, or local bright and dark spots. Once found, every one of them enters the same tracking system, gets the same stable ID, and reaches the same overlays, the same depth, the same mattes and the same effects. Downstream, it doesn’t stop at overlays. Nexus estimates a depth map of the scene from a single camera, so it knows which subject is in front of which. It can cut an AI matte around a subject — hair, fingers, the gap under an arm — and use it to blur a face, glow an outline, or hand a clean alpha channel to the rest of your comp. It can pull focus onto a moving actor with a smoothness no hand-keyframed blur will match. Local AI
No cloud. No uploads. No subscription inference. Every model ships inside the plug-in and every frame is analysed on your own machine. There is no service to sign into, nothing to download on first run, and no footage, frames or metadata ever leave your computer. On client work under NDA, that is not a convenience — it is the requirement. What It Feels LikeYou drop the effect on a clip and the frame comes alive. Corner brackets snap onto every person in the shot, each with an ID and a name — PERSON · ID 3 — and the IDs hold. Someone walks behind a pillar and emerges still ID 3. The camera pans and the boxes stay glued to their subjects instead of smearing across the frame. Then you start playing. Connection lines web the subjects together and route themselves like circuit traces. Labels pick up speed and depth readouts. A cyan rim traces the exact silhouette of one actor. Everything behind them hazes into atmospheric fog. A rack focus follows your lead through the shot. It feels less like applying an effect and more like switching on an instrument that was already watching. 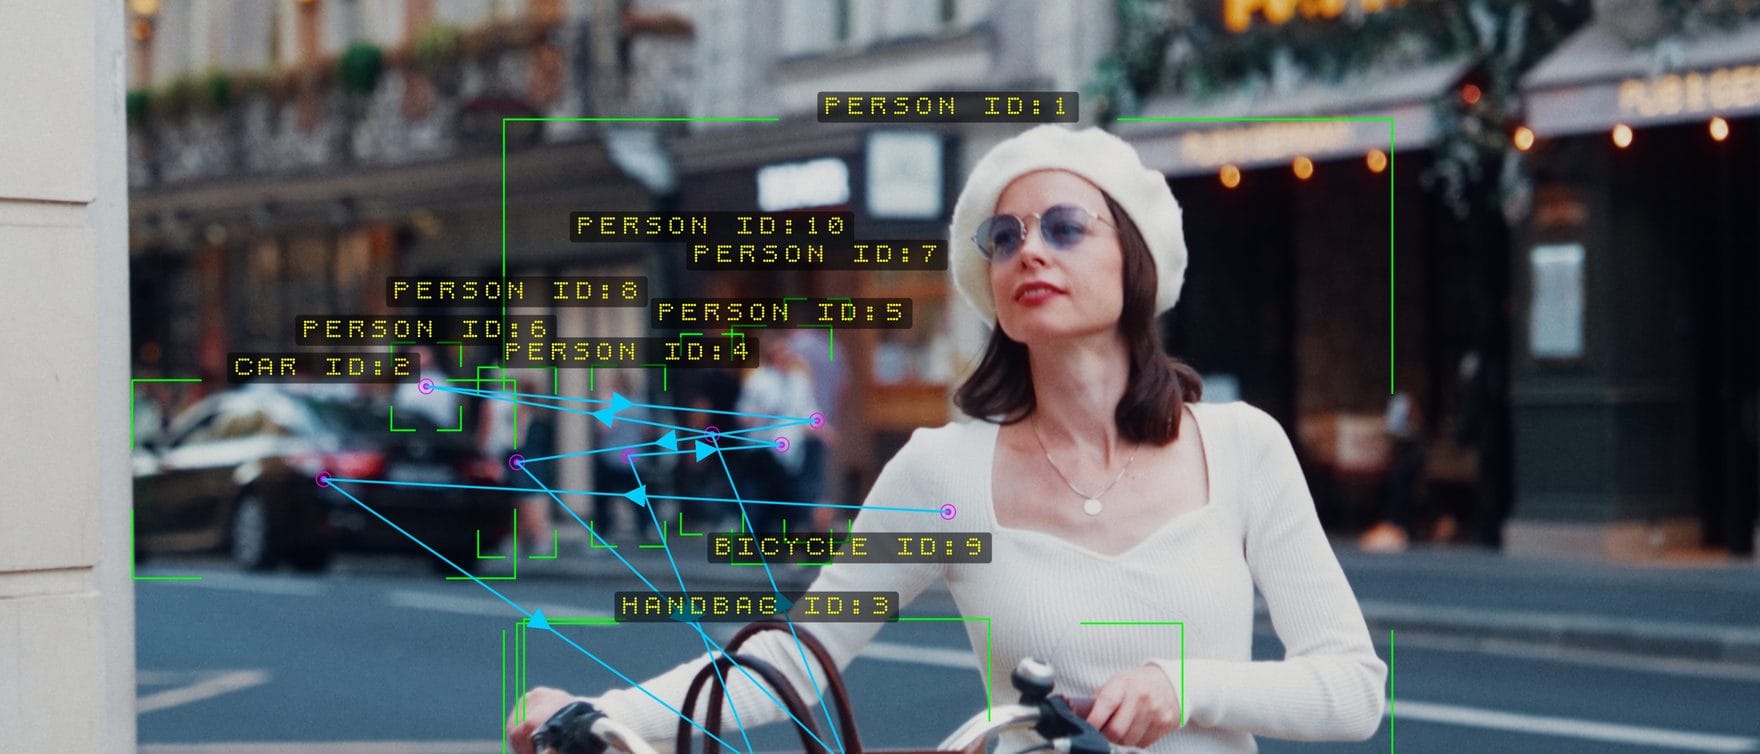
Part II The EngineHow the frame is read, how identity survives, and everything the plug-in can do with what it finds. The Pipeline Detect. Track. Render.Every frame travels a three-stage pipeline. The analysis runs once per frame — not once per pixel — so the heavy thinking happens exactly once, and the GPU’s only job is painting the interface. That split is why styling changes feel instant even on 4K. Detect Stage one The frame is read once and handed to the detector you’ve chosen. Smart Detect runs a neural object detector that recognises eighty classes of real-world object and names each one. Face Detect runs a dedicated, very fast face model. Six classical modes analyse luminance, edges, saturation, a chosen colour, or locally bright and dark spots — with hysteresis thresholding, so regions that sit right on the threshold don’t flicker in and out. The output is the same either way: a list of scored, classified boxes.
Track Stage two Raw detections become subjects. A ByteTrack-style multi-object tracker runs a motion-prediction filter per subject — on position and box size — then matches predictions to new detections optimally rather than greedily. Identity follows the box, not the name the detector gives it, so a boat the detector briefly calls a truck is still the same subject. Global camera motion is estimated and subtracted first, so a pan doesn’t read as sixty objects sprinting sideways. Up to 64 subjects hold IDs at once.
Render Stage three The tracked subjects are handed to a single-pass GPU renderer that draws everything you see: seven frame styles, ten marker shapes, six connection topologies with six line routings and five arrowheads, labels on rounded legibility plates that automatically step out of each other’s way in crowds — every layer anti-aliased and composited in order, with a thin dark outline that keeps light overlays readable on bright footage and an optional glow — plus Region FX, Subject Glow and depth fog composited underneath. Because the drawing is cheap, styling changes are instant.
Fast by design
Detection and depth run concurrently, so switching depth on costs far less than it sounds like it should. Everything the AI needs ships inside the plug-in — there is nothing to download, sign in to, or configure. Curious where the time goes? Turn on Show Performance Stats for a live readout of detection, depth and matte time, the AI backend in use, and the live tracker count. Detection Eight Ways of SeeingNexus doesn’t assume that everything worth tracking is a person or an object. Sometimes the thing you want is a face. Sometimes it’s a car. Sometimes it’s a light, a colour, a bright reflection, a logo, a particle, or an abstract shape. So there are several ways of finding a subject — from neural detection to classical computer vision. Once found, they all enter the same tracking system. One control, Detection Mode, decides which one is used; everything downstream behaves identically whichever you pick. Which mode should I use?
The eight modes in full
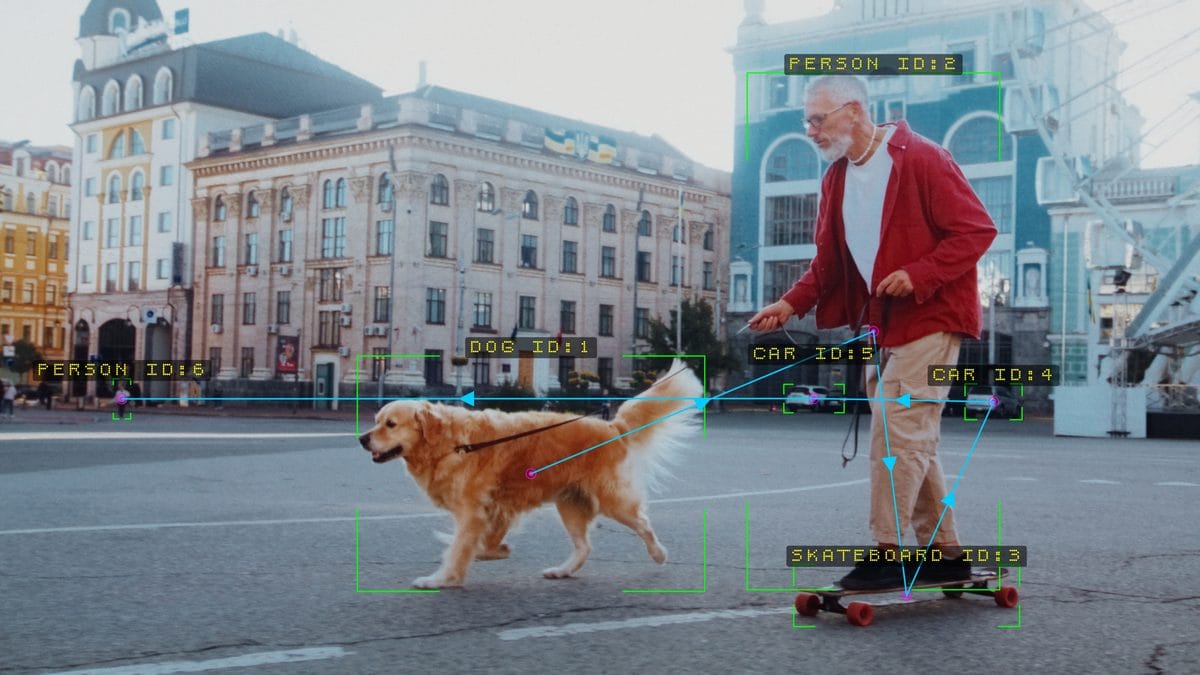
Smart Detect. One frame, four kinds of thing — a person, a dog, a skateboard, two cars — each named and numbered.
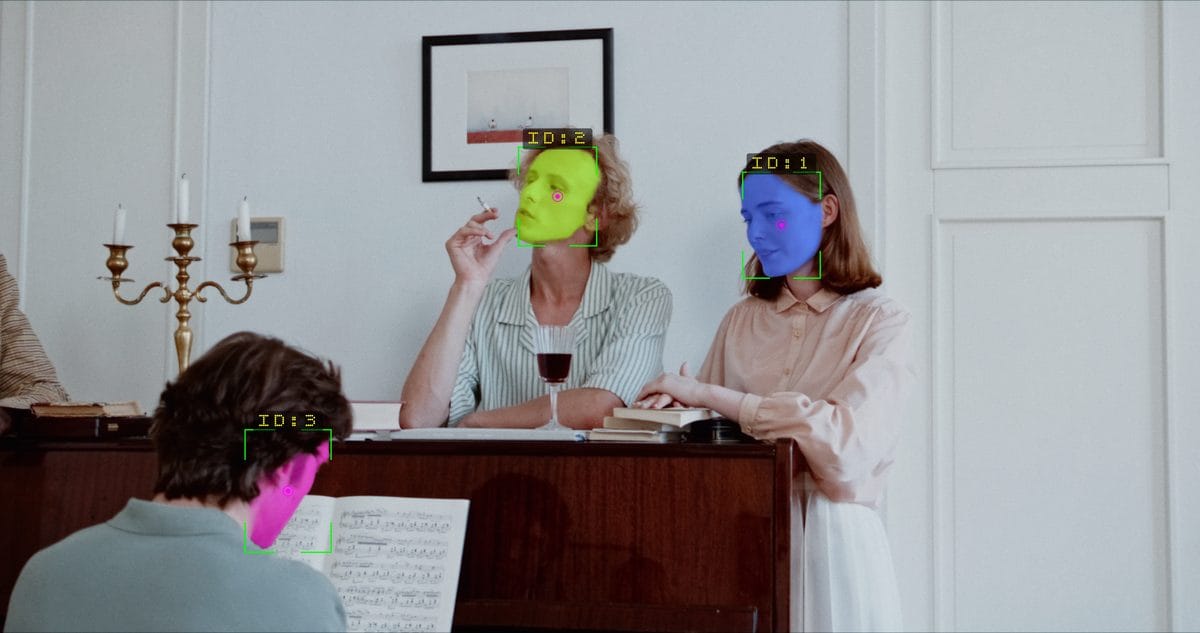
Face Detect. Faces only, ID and no name. Here with Visualize Segment Masks on, so each face shows the outline the matte model cut for it.
Narrowing what Smart Detect looks forWith Smart Detect running, Class Filter restricts the search to one category. Filtering happens before tracking, so excluded objects never become subjects and never consume an ID or a tracker slot. PeoplePeople. Plus People + Vehicles and People + Animals as ready-made unions. VehiclesBicycle, car, motorcycle, aeroplane, bus, train, truck, boat. AnimalsBird, cat, dog, horse, sheep, cow, elephant, bear, zebra, giraffe. Sports EquipmentBall, racket, bat, glove, skis, snowboard, skateboard, surfboard, frisbee, kite. Food & DrinkBottles, glasses, tableware and prepared food. ElectronicsTV, laptop, mouse, remote, keyboard, phone. FurnitureChair, couch, potted plant, bed, dining table, toilet. Bags & AccessoriesBackpack, umbrella, handbag, tie, suitcase. Street ObjectsTraffic light, fire hydrant, stop sign, parking meter, bench. Some household objects the detector knows — clocks, books, vases, kitchen appliances — don’t belong to any filter group. Leave Class Filter on All Objects to reach them. First run on a new machine
The first time an AI mode runs on a given computer, Nexus prepares the neural model for your GPU in the background. This happens once per machine — one shared, prepared copy serves every host you have installed — and is kept until you delete it (see Disk space under System requirements). Nothing freezes: the plug-in renders without overlays until the model is ready, usually within seconds to a minute, and the viewer refreshes on its own the moment it is. Face Detect uses a tiny model and is effectively instant. Once the detector is up, Nexus quietly prepares the depth, face and matte models one after another while you work, so they are normally ready before you reach for them. The panel keeps up
In DaVinci Resolve and After Effects, controls that don’t apply to the current mode grey themselves out, so the panel always shows you what matters right now. Premiere Pro and Final Cut show every control as active — their plug-in interfaces have no way to grey things — so use the group structure and the label hints as your guide there. Tracking IDs That HoldDetection tells you what’s in this frame. Tracking tells you it’s the same one as last frame — and that second claim is the hard one. In practice there are only two things to set. Temporal Stability is the master switch and is on by default. Revive Frames decides how long an identity survives while its subject can’t be seen, and it starts at 0 — raise it. Everything else has a sensible default and a job it does quietly. How it works · the five mechanisms Five things run under that single switch. You never configure them, but knowing they exist explains why the IDs behave the way they do. Prediction Motion filter Each subject carries a motion model that predicts where it will be next frame — position and box size. Detections are matched against predictions, not against last frame’s pixels, so fast movers and growers (someone walking toward camera) stay locked. Confident detections correct the model strongly; shaky ones barely nudge it. The size filter is deliberately asymmetric: it grows fast and shrinks slowly, so a box never crops a limb as a subject approaches.
Association Staged, optimal High-confidence detections are matched first; leftover subjects then get a second chance against faint ones — which is how someone half-hidden behind another person keeps their ID instead of being dropped. Faint detections can extend an existing subject but can never spawn a new one, so partial occlusion doesn’t breed ghosts. The matching itself is solved optimally, not greedily, and it goes by the box rather than the class name: where boxes alone can’t tell two subjects apart, the colours inside them break the tie.
Camera compensation Automatic The global camera translation between frames is estimated and subtracted before any matching happens. Pans, tilts and handheld shake stop reading as object motion, and IDs survive camera moves that would churn a naive tracker completely. There is nothing to configure; on flat or ambiguous frames where no reliable estimate exists, the plug-in reports no motion rather than guessing.
Occlusion coasting Revive + Ghost When a subject vanishes behind something, its track can coast on its motion prediction for as many frames as Revive Frames allows, then reacquire on the far side with the same ID. Turn on Show Occluded (Ghost) to keep drawing the predicted box at reduced opacity while it coasts — far better on screen than a box that blinks out.
A sticky top list Max Trackers When a scene holds more objects than Max Trackers allows, the biggest subjects win the slots — but a subject that was on screen last frame gets a substantial head start. A newcomer must be decisively bigger to displace it, and a subject that is briefly hidden keeps its place until it returns. Without that stickiness, labels flicker on and off at the boundary in any crowded shot.
Read this before you file a bug about IDs
Revive Frames starts at 0. At zero, a subject that goes undetected for a single frame is dropped outright and comes back with a new ID. Occlusion tolerance is opt-in, and it is the single most useful control in this group: set it to 10–20 for handheld and crowd work, higher for shots with long, hard occlusions. From 2 upward it also carries a box, at full strength, through a frame or two that the detector simply misses. If you’ve ever thought “my IDs keep changing,” this is almost always why. Two dials for calm Temporal Smoothing trades responsiveness for steadiness — raise it and boxes glide, lower it and they snap. Confirm Frames debounces: a subject must persist that many frames before it is drawn at all, which silences one-frame false positives entirely. One dial for reach Max Move Distance caps how far a subject may travel between frames and still keep its ID. Leave it at 0 and Nexus sizes the gate automatically from each subject’s own dimensions — the right answer almost always. Raise it only for genuinely fast, small subjects. 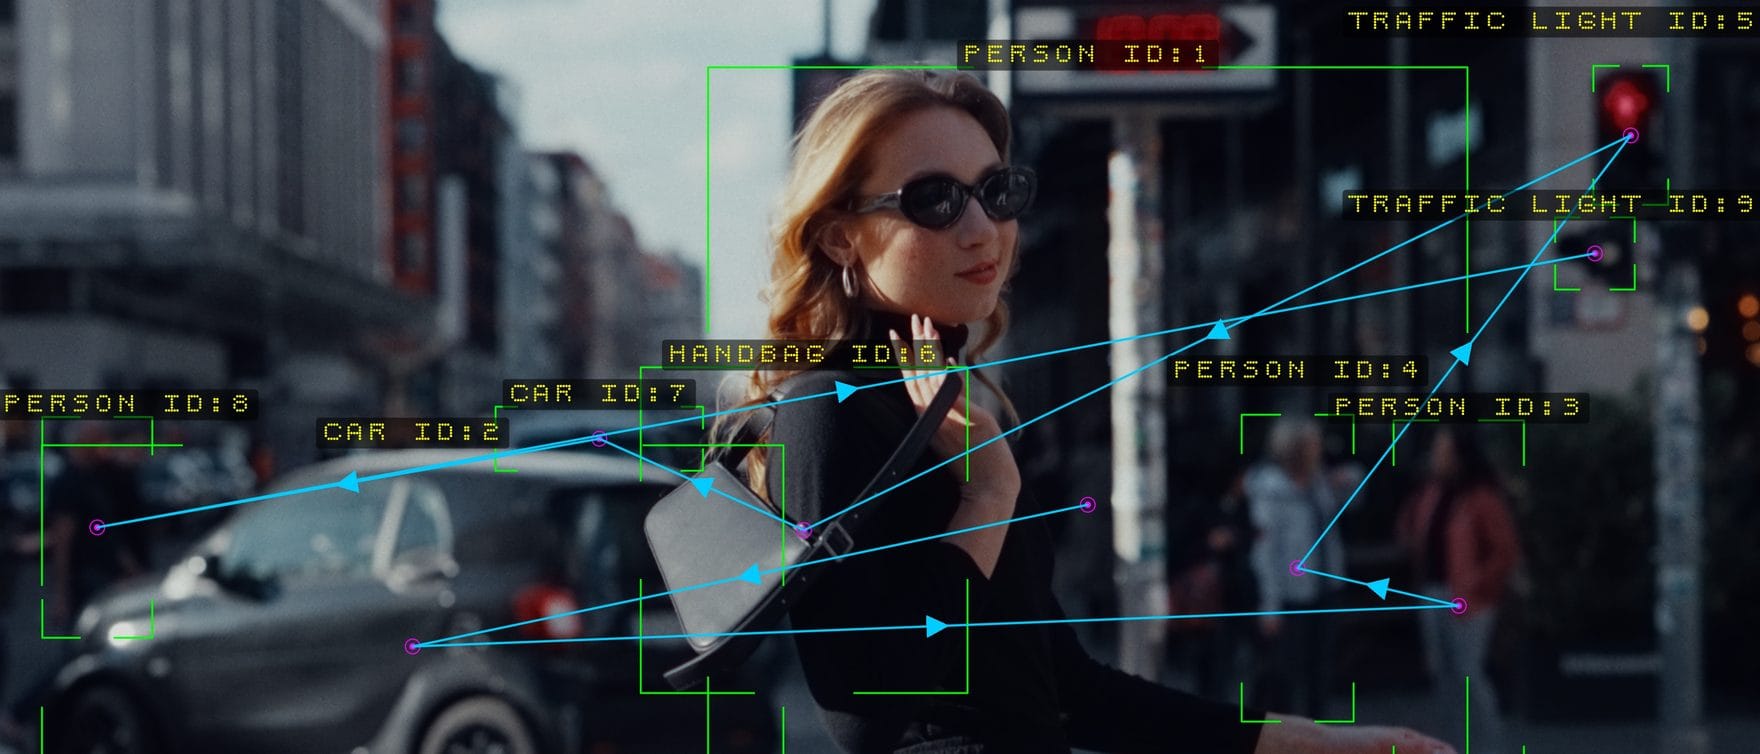
How it works · Determinism The Same Every TimeA tracker is, by nature, a thing that remembers. Feed it frames out of order and a naive one gives you different answers every pass — different IDs on scrub, different IDs on export, different IDs on the machine next to yours. Editing hosts do exactly that, constantly: they scrub, they play backwards, they re-render a paused frame after every slider nudge, they split a render across threads. Nexus solves it by keeping a rolling per-frame record instead of a single “current” state. Every frame it renders, it stores the tracker state, the camera-motion reference and the published result for that exact frame number. When you ask for a new frame, it seeds from the frame before it — not from whatever ran most recently. When you ask for a frame it has already produced, it hands back the stored answer verbatim. Scrubbing back is cheapDragging back over frames you’ve already played re-uses the stored tracking result: the detector doesn’t run again, and the IDs can’t change. Order doesn’t matterReverse playback, out-of-order export and multi-threaded rendering reproduce the IDs a straight playthrough would give. Focus pulls and mattes tooDepth levels, the automatic focus pull and a matte’s frame-to-frame checks ride the same record, so focus moves and cutouts reproduce too. Tweaking is safeChanging a styling control never re-runs analysis. Changing a detection control re-detects, but identities carry across rather than resetting. If you jump before you play
A frame you jump straight to has nothing before it in the record. In After Effects, Nexus fetches the frames leading up to it and tracks them first, so the frame you land on is the frame a playthrough gives; a long jump takes a few seconds the first time. Resolve does the same over a run-up of about a dozen frames. A longer jump there, and any jump in Premiere Pro, Final Cut Pro or Motion, where Nexus works only from the frames it is handed, starts a fresh chain that may briefly show different ID numbers than a full playthrough will. A fresh chain repairs itself: play through the shot and each frame recomputes once from the correct chain as the playhead passes over it. So outside After Effects — play the shot through once before you judge the IDs. The rolling record holds roughly 600 frames (about 20 seconds at 30 fps); beyond that window the oldest frames retire. The Third Dimension Depth, Fog & Rack FocusNexus estimates a full depth map of the frame from a single camera — no stereo rig, no LiDAR — then reads a robust depth value for every tracked subject. It samples the inside of each box densely, weighted toward the middle, and takes the dominant surface it finds there, so the backdrop between spread arms, the floor at someone’s feet or a neighbour at the edge of the box can’t drag the reading off. The flat list of subjects becomes a scene with front and back, and six things become possible. Colour by depthBoxes and markers tint by distance — nearest warm, farthest cool — stretched across the tracked group, so the spread reads clearly even in a shallow scene. Occlude by depthA depth-aware 3D HUD: wherever a nearer object covers a farther one, the farther subject’s box, label and connectors are hidden behind it. Overlays stop floating on the image and start living in it. 3D connectionsWith 3D Tilt, links taper thin and dim toward the farther subject and bow into the scene. 3D Connection Depth makes the proximity, nearest-neighbour and spanning-tree graphs link true 3D neighbours instead of screen-space ones. Depth fogEdge-aware atmospheric haze graded by distance. Set where it starts and where it saturates, pick a colour, and the background recedes — cheap separation that would otherwise need a rotoscope. Rack focusA real depth-of-field with bokeh discs and depth-aware sampling, so a sharp foreground doesn’t halo into a blurred background and a blurred near foreground spills softly over what’s behind it. Follow a tracker ID, the nearest subject, the farthest, or set the distance by hand. Depth as a matteInside each box, keep only the pixels sitting at that subject’s distance. Hair, smoke and held objects survive; the background behind them doesn’t. Fast, and it works while the outline AI is still loading. Enable Depth is not the master switch you think it is
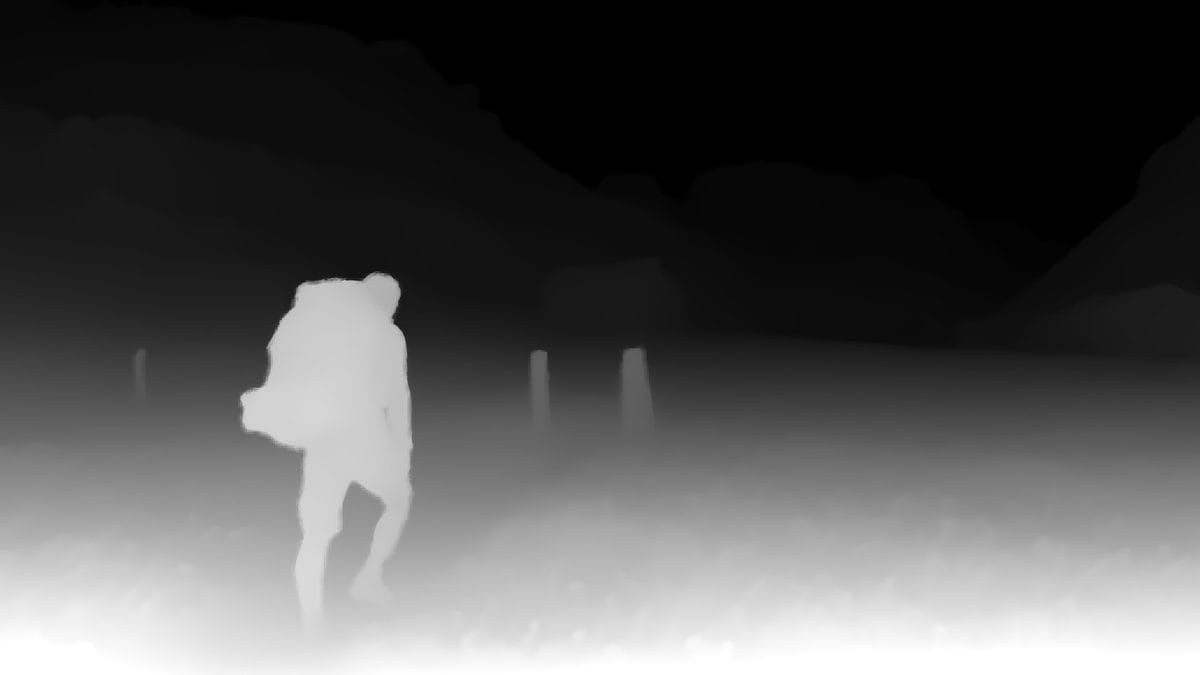
Enable Depth governs the features in the Depth group itself — fog, occlusion, 3D tilt, the Z label, and colour-by-depth. Four other things are their own statement of intent and switch the depth engine on by themselves: Visualize Depth Map, an Output Mode set to Depth, a Matte Source of Depth Silhouette while something is actually consuming the matte, and a Focus mode with Blur Strength above zero. You never need to hunt for a checkbox to make those work. The corollary matters too: picking a Focus mode and leaving Blur Strength at 0 does nothing at all. A focus mode with no blur has nothing to express. 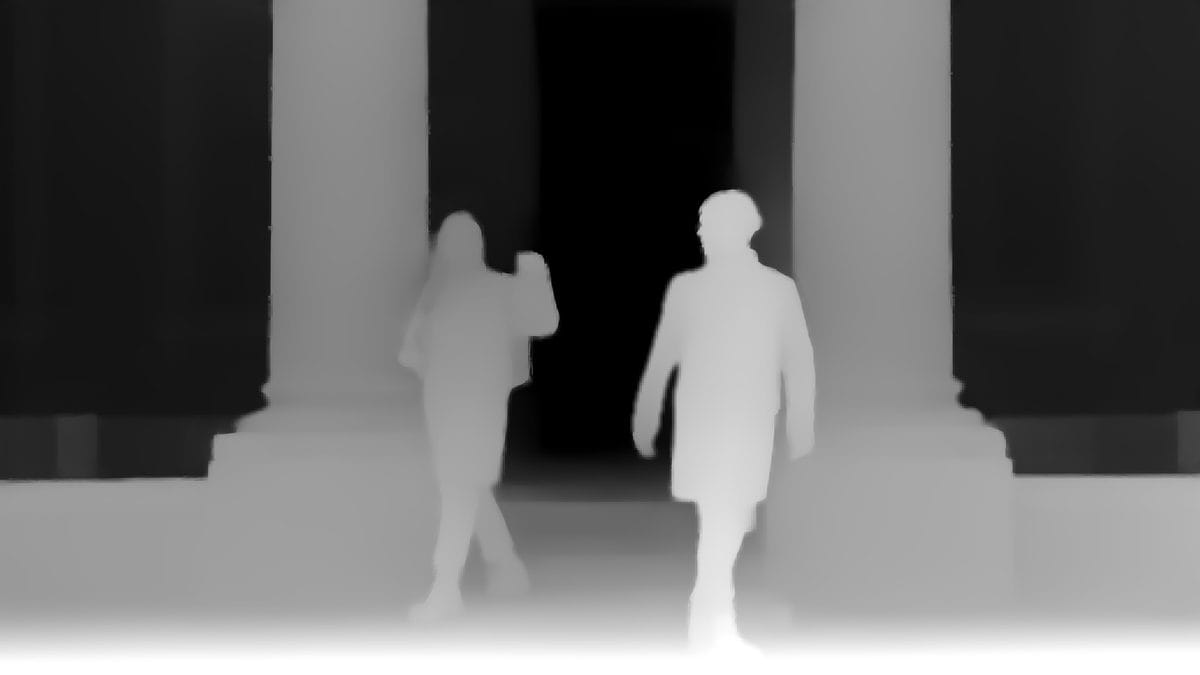
What this depth is, honestly
It is relative depth inferred from a single image — not a measurement. Values are normalised to the scene with 1 meaning nearest, and the range is carried from frame to frame: it follows a real change in the scene only gradually — about a tenth of the range per second — so levels don’t pump when a subject enters or leaves frame, and it starts afresh at a cut. It is excellent for separation, focus, fog and mattes. It is not a survey instrument, and an exported depth pass should be treated as a relative depth channel, not metric distance. Subject Mattes Outlines, Not RectanglesA tracking box tells you where a subject is. A matte tells you which pixels are the subject. Nexus can cut one automatically — the actual silhouette, with hair, fingers and the gap under an arm — using the tracker’s own boxes as prompts to a segmentation model. No roto, no keyframes, and it follows the subject for the whole clip. Matte Source, in the Subject Mask group, decides how tightly the subject region hugs each subject. It shapes both Region FX and the matte you export from the Output group; Subject Glow always follows the AI outline. 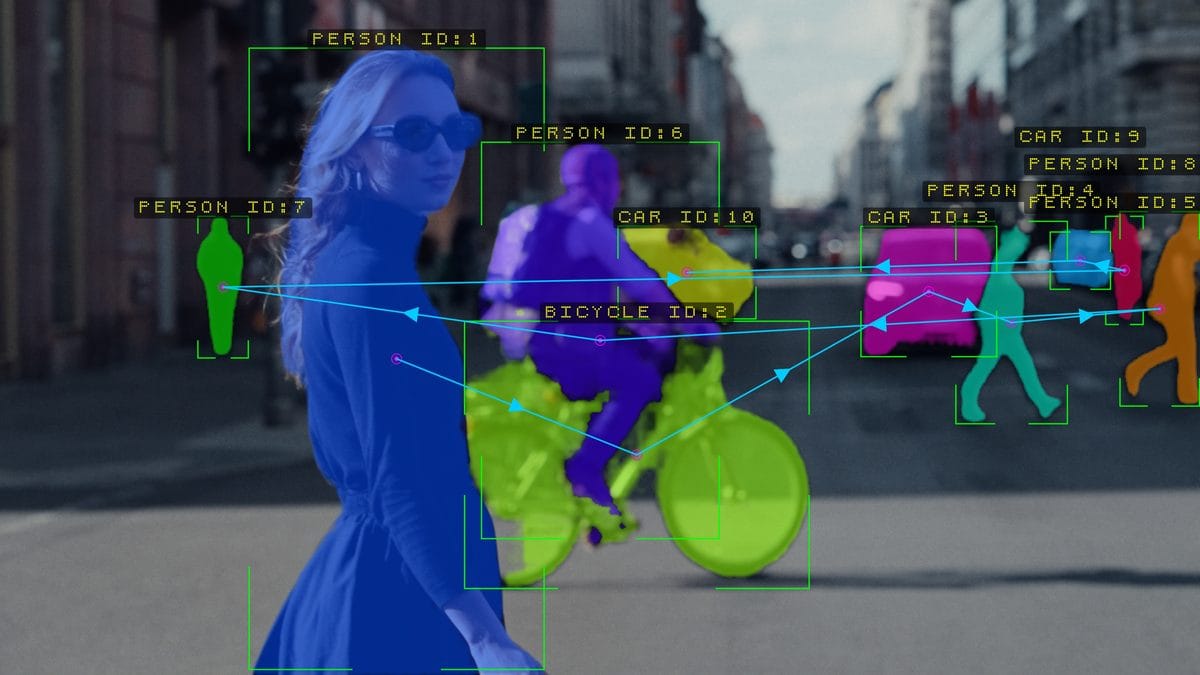
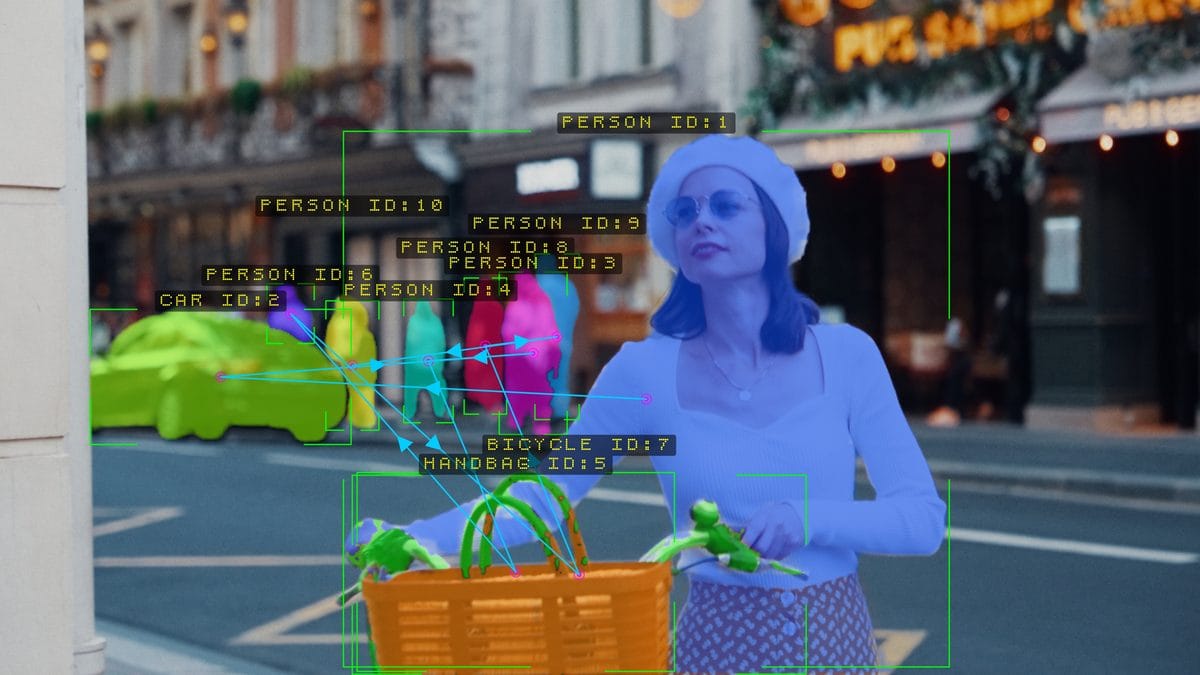
Matte QualitySegmentation runs in one of two modes. High (Per-Subject), the default, zooms the AI into each subject’s neighbourhood and analyses it there — so edge detail scales with how much of the frame your subject occupies, and a quarter-frame actor gets roughly four times the edge resolution of a whole-frame pass. Standard analyses the whole frame once. It is meaningfully faster and perfectly good for censoring, spotlighting and glow. Switching High → Standard is the single biggest speed lever once segmentation is on. Shaping the edgeThe AI matte is solid inside the outline and soft only along it. Feather and Grow / Shrink work on that edge. Matte Grow / Shrink −20 to +20 px A true expand and choke, not a blur. Push it positive to swallow a stubborn edge fringe; pull it negative to pull the matte inside the subject and avoid a halo.
Matte Feather 0 to 1 Widens the soft ramp at the edge. The place to reach when hair or motion blur is shimmering frame to frame — a little feather buys a lot of stability.
Matte Range Depth Silhouette only How wide a band of distance around the subject counts as “the subject.” Tighter cuts closer; wider keeps outstretched arms and held objects.
Being straight about it
Each frame’s matte is cut from that frame’s own pixels and then checked against the sixteen frames before it. A part of the subject the model suddenly wavers on — a fan held in a hand, a strand of hair — is held where it was for up to sixteen frames, and a short run of frames the model gets plainly wrong is replaced by the last good one. Nothing is averaged across frames, so a moving subject leaves no trail behind it. On difficult material you may still see a little edge shimmer, and a small part can drop out for a single frame. Matte Feather is the fix for the shimmer. This is an outstanding automatic matte; it is not a substitute for hand roto on a hero VFX shot. Subject GlowA neon rim and halo that hugs the segmented outline and screen-blends over the image, so it reads as emitted light rather than a drawn stroke. Set intensity, width and colour; point it at specific subjects with the Subject Mask selection; let it pulse with Animate Overlays. Glow always uses the segmentation outline, whatever Matte Source is set to — it’s the one feature that needs the outline to look right. 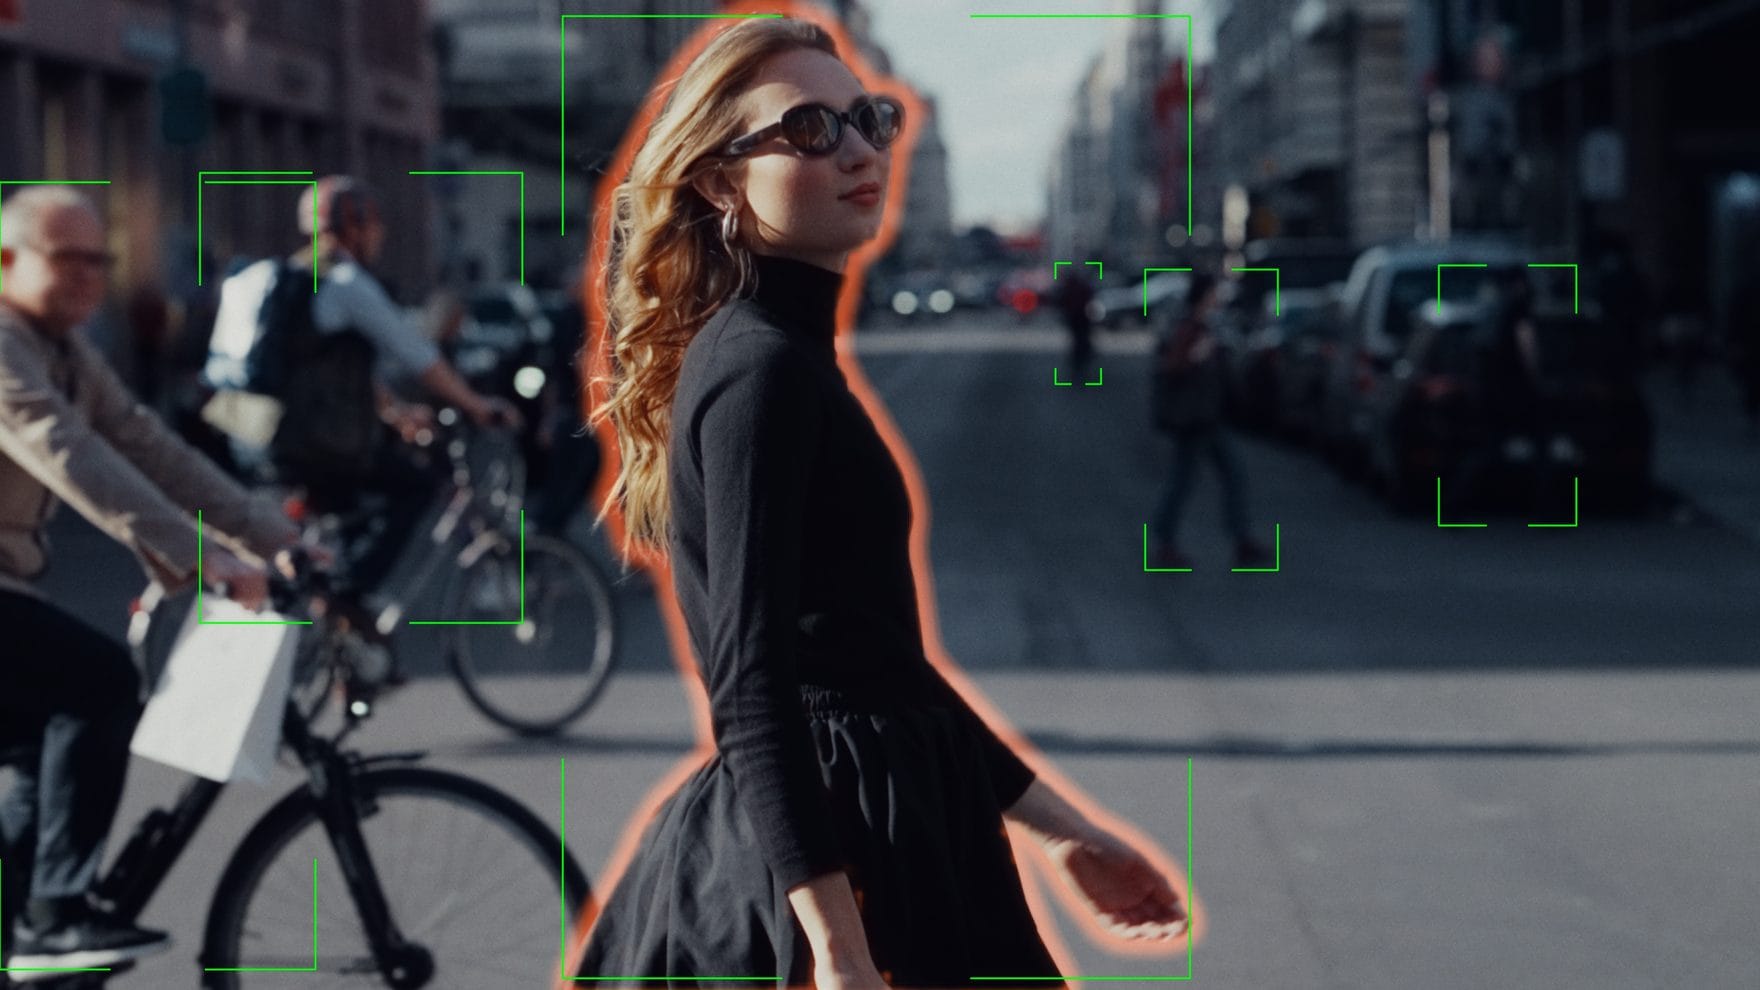
The first time you use a matte
The segmentation model is the largest of the AI models and takes the longest to prepare — the one-time preparation on a new machine is the longest wait in Nexus, and each later launch of a host needs a few seconds to bring it back. Nexus starts that work in the background soon after the effect first renders, so it is usually done before you ever reach for a matte control. If you get there first, you’ll see MATTE AI PREPARING... in the top-left corner, the matte falls back to depth or box in the meantime, and the picture updates by itself the moment the model is ready. Show Performance Stats keeps a running clock on it if you want one. Region FX Effects That FollowBecause Nexus always knows where its subjects are — and, with segmentation on, exactly what shape they are — it can treat the pixels inside them, or everything outside them, with no masks, no roto and no second tracking pass. One menu, twenty effects, applied underneath the overlays so boxes and labels stay crisp on top. Tracker ZoomMagnifies the content inside the box, anchored on its centre. Always rectangular by design. Spotlight (Dim BG)Dims everything outside the subjects. Instant attention. BlurA softer privacy option, or a way to push a background back. Pixelate (Mosaic)Censor blocks that scale with FX Amount. The standard privacy tool. Solid FillFlat fill in the Tracker colour. Redaction bars on boxes; a clean rotoscoped silhouette with the Segmentation matte. Amount = opacity. SharpenUnsharp mask on the subject only — the “make them pop” control. Amount = strength. Black & WhiteDesaturates by FX Amount — colour-pop the subject, or drain it. InvertNegative image, blended by FX Amount. Colorama (Hue Shift)Rotates hue while preserving luminance. Posterize (Cel Shade)Quantises brightness into flat tones while keeping the colours. Amount = fewer levels. ThermalHeat-camera palette: black through violet and orange to pale yellow. Amount = mix. Night VisionGreen image intensifier with scanlines and sensor grain. HalftoneNewspaper dot screen at 45°: bigger dots in the shadows, on warm paper. Amount = cell size. Ink SketchA pencil drawing on paper: contour lines, and hatching that deepens to cross-hatching in the shadows. Amount = line weight and shading. Dither (Retro)Ordered 4-level dither in a hand-held-console green palette. Amount = pixel size. ASCII MosaicTerminal look: cells drawn as glyphs chosen by brightness, in the cell’s own colour. Amount = cell size. HologramThe picture as a projection made of light: blue-to-cyan tone map with lifted blacks and bloom, thin scanlines, a slow rolling band, flicker and rare row tears. Reads best in motion. Chromatic GhostRGB split with a faint double-exposure offset. GlitchRow-wise datamosh with an RGB channel offset. Heat RippleHeat-shimmer displacement over the subject; animates with Animate / Speed. Amount = amplitude. Every effect works on the subjects selected in the Subject Mask group. Apply To flips the whole thing inside out: Inside Subjects treats them, Outside Subjects treats the background. And because the region is whatever Matte Source says it is, switching to Segmentation makes every one of these effects follow the subject’s actual outline instead of its rectangle. Two effects deliberately ignore that: Tracker Zoom keeps rectangle semantics (a silhouette-shaped magnifier looks wrong), and Spotlight always dims the outside. The animated effects — Night Vision grain, Glitch, Hologram and Heat Ripple — are driven by the frame number rather than a random seed, so they render identically every pass, and identically whether the frame was drawn by the GPU or on the CPU. No boiling on re-export. Thermal’s sensor noise and the Ink Sketch hatching and paper grain don’t move at all. Like the Halftone screen they are fixed to the frame, so a still subject stays still. Effects stay clean right up to the frame border: a subject touching the edge of the picture shows no dark fringe from Zoom, Blur, Glitch or Chromatic Ghost. The one-minute face censor
Detection Mode Face Detect → Region Effect Pixelate → Apply To Inside Subjects → switch off Boxes and Labels. Every face in the shot is found, tracked and censored for the whole clip, hands-free. Add Revive Frames 15 so a head-turn doesn’t drop the censor for a frame. 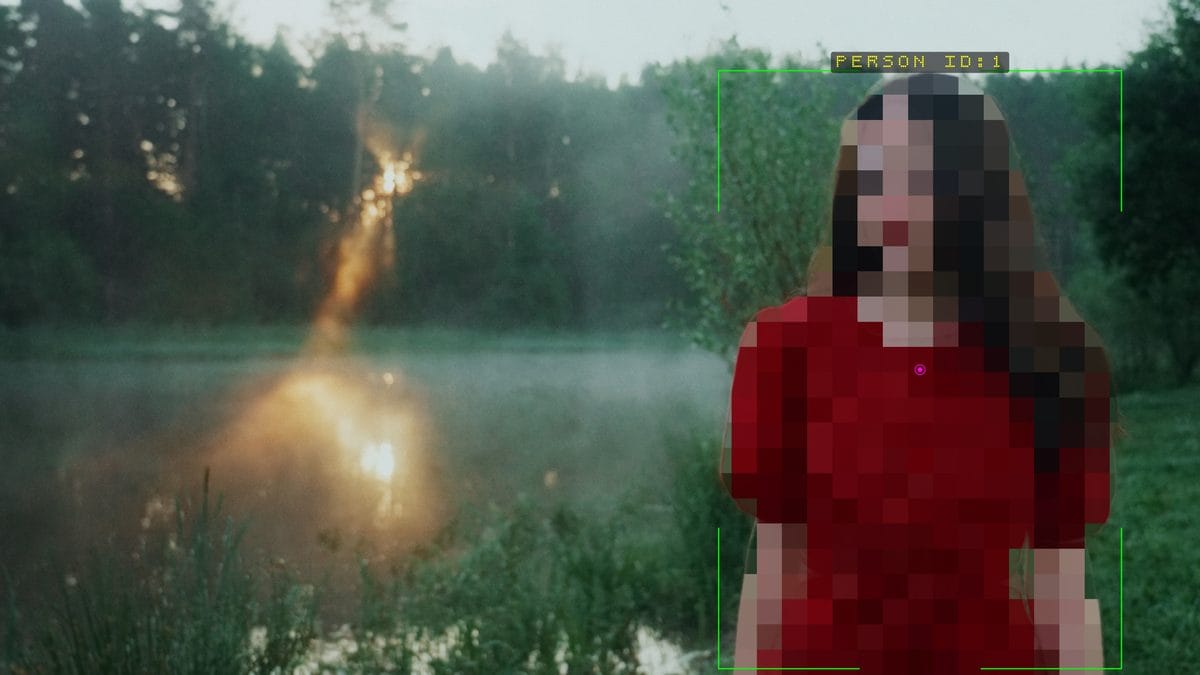
Pixelate, Matte Source: Segmentation. The mosaic stops at her silhouette — the lake behind her is untouched, even inside the box.
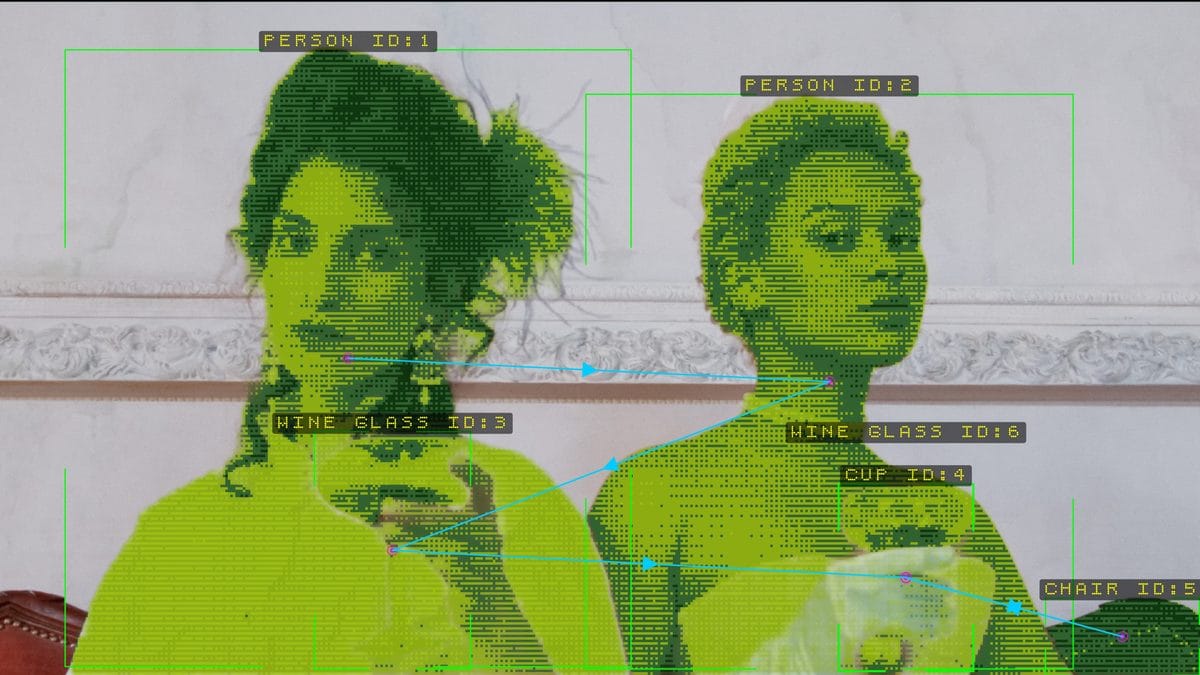
Dither (Retro), Matte Source: Segmentation. Two subjects in a hand-held-console palette, the wall behind them left exactly as shot.
The Look Anatomy of the OverlayFour independent layers stack into the HUD. Each has its own group in the panel, its own colour and its own switch — use one layer or all four. Boxes and labels are on when you apply the effect; centre markers and connections wait for their switch. Overlay sizes given in pixels — line widths, marker size, dash length, arrowheads, glow width — are measured at HD and scale automatically with the frame, so a look you build on a 1080p proxy survives the move to 4K. Tracker Frames 7 styles Corner brackets, rounded rectangles, targeting circles, hexagons, diamonds, reticles and target rings, with control over line width, bracket length, circle gap and opacity. Every stroke is anti-aliased and the layers are composited in order, each with its own coverage: a one-pixel line is a clean one-pixel line, boxes that overlap blend where they cross instead of one recolouring the other, and opacity is a real per-layer setting. Box Color Mode switches between one fixed colour, a distinct colour per object class, or a warm-to-cool tint by distance. With Animation on, the circular styles spin.
Center Markers 10 styles A precise mark at each subject’s centre — dots, plus, cross, crosshair, ring, target, dot-and-ring, diamond, square, triangle. Markers pulse gently when Animation is on. The Velocity Arrow lives here too: a real motion vector drawn from the centre of anything that’s moving.
Connections 6 topologies × 6 routings Lines that web the subjects together: sequential chains, star, full mesh, proximity webs, nearest-neighbour graphs, or a minimum spanning tree. Route them straight, curved, as a wave, as a circuit-board trace with a 45° dogleg, or as right-angled runs with sharp or filleted corners. Solid, dashed or dotted; five arrowhead styles that ride the actual route. Dashes march when Animation is on.
Labels Anti-overlap Object name, ID, coordinates, speed, depth and confidence — any mix, on a dark, rounded legibility plate that keeps text readable over any footage; the text sits cleanly on the plate, with no halo at any plate or text opacity. When labels collide in a crowd, a layout pass stacks them apart automatically and holds that arrangement steady between frames so they don’t jitter between rows. A label sits just above its box, clear of the brackets. Where there is no room it goes below, and on a box that fills the height of the frame it sits inside, along the bottom edge; having moved, it stays put until there has been room above for a dozen frames, so it doesn’t hop while a subject bobs at the frame edge. The whole plate always stays inside the picture. There is nothing to tune.
Outline and glowTwo finishes apply to all four layers at once, from the Overlay Style group. Overlay Outline draws a thin dark edge under every stroke and every glyph and around the label plate, so a white bracket stays readable against a white wall. It is on by default, at 0.5: higher is wider and darker, and 0 switches it off. Overlay Glow adds light around boxes, markers, arrows and connections, screen-blended onto the picture underneath the overlays. Each overlay glows in its own colour unless you choose one with Overlay Glow Color, and Overlay Glow Width sets how far the light reaches. Labels deliberately take no glow: the text stays crisp, and the plate hides whatever glow falls behind it. The top-left status messages and the performance readout take neither finish. Reading a labelWhatever you switch on appears in a fixed order, on one line: 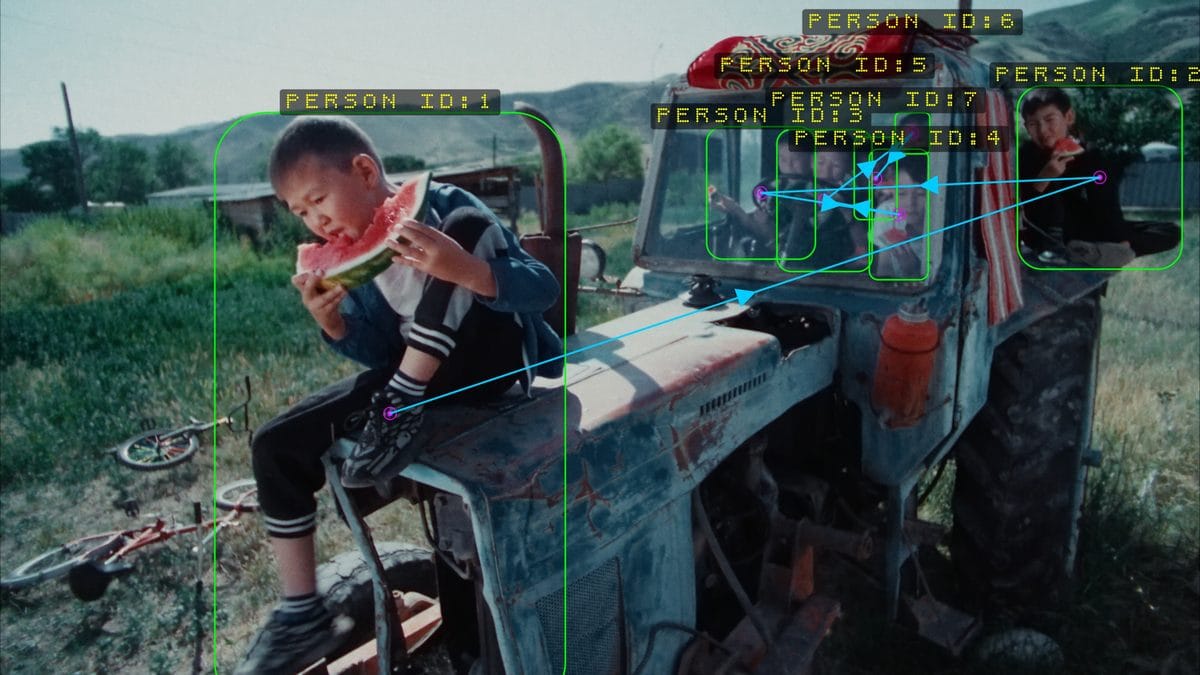
Rounded Rectangle frames, Straight connections, Dot + Ring markers.
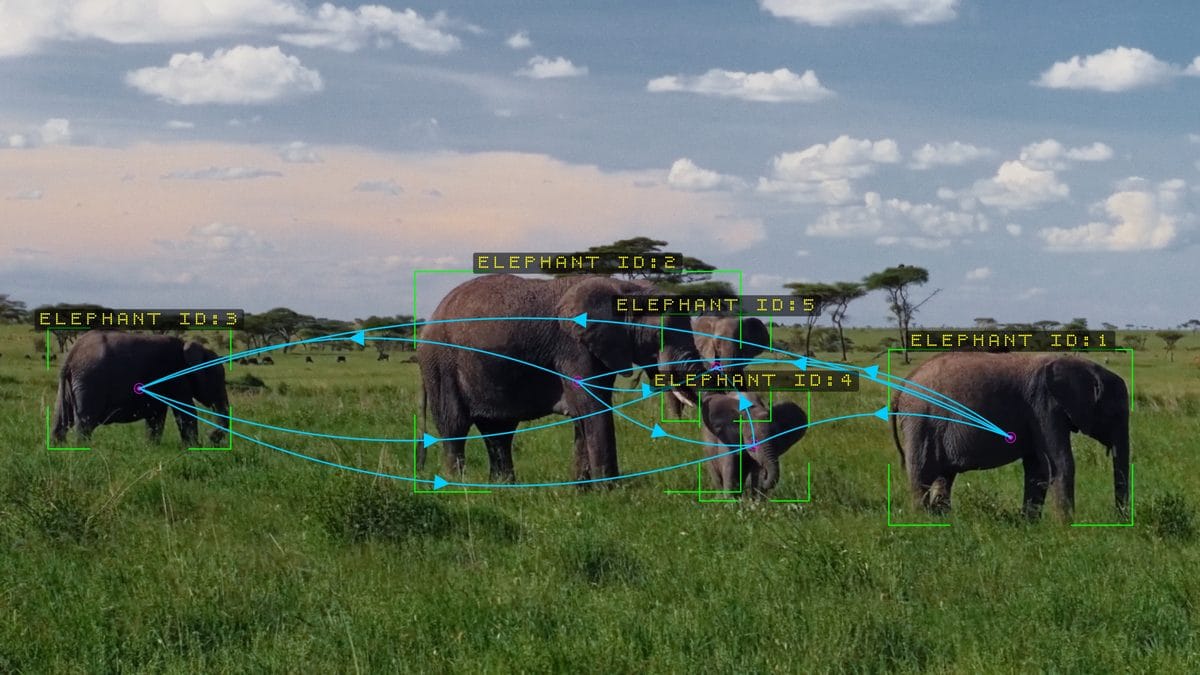
Corner Brackets with Curved connections bowing between five elephants.
Targeting Choosing Your SubjectBy default, Region FX, Subject Glow and matte export apply to every subject Nexus is tracking. Very often you want one person, not all of them. That’s what the Subject Mask group is for — and the fastest way to use it is to click the subject in the viewer. Click-to-select
Click a subject → it becomes the only selected subject.
Click another → it’s added — up to four subjects at once.
Click a selected subject again → it’s removed. Remove the last one and nothing is selected.
Click empty background → the selection clears.
No modifier keys, no drag. If subjects overlap, the smallest box containing your click wins — so you can pick a face inside a body. Selected subjects get a soft white halo and everyone else’s overlays dim, so you can see the selection at a glance. The numbers it sets are exactly the ones the labels show. You can always set it by hand. Subject 1 at Clicking works in DaVinci Resolve, After Effects, Final Cut Pro and Motion. In Resolve, the OpenFX overlay must be visible in the viewer. In After Effects, select Nx Nexus in the Effect Controls panel, then click in the Composition panel with the Selection tool. In Final Cut Pro, select the clip and click Nx Nexus in the Video inspector, then click in the viewer; in Motion, select the layer and the filter. Premiere Pro doesn’t pass viewer clicks to effects, so there you type the numbers into the Subject controls and use the two buttons. Delivery Handing Off — Mattes & DepthNexus doesn’t have to be the last word. The Output group turns it into a source of channels for the rest of your node tree or timeline.
Honours your selection Matte exports follow the Subject Mask selection, so you can export a clean alpha for one actor in a crowded frame — automatically, for the whole clip. Invert Output Flips the exported matte or depth in one click, for garbage-matte and hold-out workflows. If a depth mode is selected before the depth engine has a map, Nexus renders the normal image rather than a black frame. In Overlays Only the status messages and the performance readout count as overlays, so switch Show Performance Stats off before a final export. In demo mode this output stays opaque — overlays on black — so the watermark remains visible. Pixels Nexus does not draw on pass through exactly as they arrived. On a linear, ACES or HDR timeline, super-whites and values below black survive the node untouched — only the alpha channel is kept within range. Honestly Know the LimitsEverything in this part works, and works well. None of it works everywhere. These are the places where the technology has real edges — worth knowing before a deadline finds them for you. AI detection misses things Smart & Face Detect Heavily obscured subjects, very small ones, extreme angles, unusual costumes and heavy motion blur can all fall below the detector’s confidence. Lower AI Confidence to catch more (at the cost of false positives), and raise Revive Frames so a subject that briefly disappears keeps its identity. If the AI simply doesn’t recognise your subject, that is what the classical modes are for.
Classical often beats AI And that’s the point For unusual visual targets — a moving light, a laser dot, a coloured marker, a particle, a reflection, an abstract shape — a classical detector is not a fallback, it is the better tool. It is also far cheaper. Reach for the AI when you need the object to be named; reach for classical vision when you just need it found.
Depth is relative, not metric Monocular estimation Depth is inferred from a single image. It is normalised to the scene, held steady from frame to frame and excellent for separation, focus, fog and mattes — but it is not a measurement. An exported depth pass is a relative depth channel, not calibrated distance, and its absolute values shift as the scene’s depth range changes.
Segmentation depends on the subject AI mattes Matte quality scales with how large the subject is in frame, how much it contrasts with its background, and how complex its edges are. A close-up figure against a clean background cuts beautifully; a distant figure in matching tones does not. Each frame is checked against the sixteen before it, which holds a part the model wavers on and replaces a frame it gets plainly wrong, but the edge itself is not averaged over time: difficult material can still shimmer there, and a small part can drop out for a single frame. Matte Feather is the mitigation. Excellent automatic matte; not a replacement for hand roto on a hero shot.
Long occlusions break identity Tracking Revive Frames buys real tolerance, but it is finite. A subject hidden for longer than that, or one that leaves frame and returns much later, comes back as a new identity. Two similar subjects crossing with heavy overlap can also swap — the tracker weighs overlap, motion and the colours inside each box, which prevents most of it, not all of it.
Camera compensation is translation only Automatic Nexus estimates and subtracts a global frame-to-frame shift, which covers pans, tilts and handheld drift. A shift only counts when most of the textured picture shares it, so a passer-by filling a third of the frame can’t pass for a camera move. It does not model rotation, zoom or perspective, and on flat or ambiguous frames it deliberately reports no motion rather than guessing. This is identity maintenance, not camera tracking.
Reproducibility has a window Determinism Identities reproduce across scrubbing, reverse play and out-of-order rendering within a session. The rolling record holds roughly 600 frames; a render that starts cold, far into a long clip, begins its own chain rather than inheriting one. In Premiere Pro and Final Cut Pro, Nexus works only from the frames it is handed, so there a jump always begins a new chain until the shot has been played in order.
Very small frames pass through By design Frames under 200 pixels on either side render untouched. Below that size there isn’t enough information for detection to be meaningful, so Nexus declines rather than producing noise.
One diagnostic caveat
Visualize Detection Field shows what the detector sees. In the classical modes it draws the field they threshold (red = above Threshold), which is exactly what you want while dragging Threshold. In Smart Detect and Face Detect it paints each detection’s box in its class colour, brighter and more opaque the more confident the detector is, over the dimmed frame — a quick read of what was found and how surely. Part III Getting StartedInstall, license, lock on. Everything you need to get a tracked HUD on screen in minutes. Requirements & Hosts Where It RunsNx Nexus runs on macOS and Windows, GPU-accelerated through Metal, CUDA or OpenCL depending on your platform. The AI models ship inside the plug-in — the installer delivers everything, and nothing needs to be downloaded, signed into or configured afterwards. DaVinci Resolve & other OpenFX hostsMAC · WIN · OPENFX
Adobe Premiere ProMAC · WIN
Adobe After EffectsMAC · WIN
Final Cut Pro & MotionMAC · FXPLUG
In every host the effect is named Nx Nexus and lives under the Nx Color group. The engine — detector, tracker, camera compensation, depth, mattes, label layout — is identical everywhere; only the surrounding panel chrome changes. System requirements
Each host component carries its own private copy of the AI models, which is why the disk figures look large — installing fewer components saves proportionally. On macOS, allow a further ~1.6 GB for the prepared AI models in ~/Library/Caches/NxColor/nexus/coreml-cache. It is built once, shared by Resolve, the Adobe apps and Final Cut Pro, and safe to delete at any time — Nexus rebuilds it on the next launch (the first frames then take a little longer while the models are prepared again). No GPU? Still works.
Every host has a full CPU path that runs the identical engine, so the picture is the same — just slower. The AI models fall back to CPU inference too. Smart Detect in particular is much happier with a GPU; if you’re CPU-bound, the classical detection modes are nearly free and give you the same tracker, the same overlays and the same identity behaviour. Installing Adding the EffectQuit your host applications first — plug-ins are only loaded at launch. Then run the installer for your platform and pick the components you want. macOS
Open Nx-Nexus-1.0.0-macOS.pkg and follow the prompts. Choose any combination of OpenFX, Adobe and Final Cut components. The Motion template that Final Cut needs is installed for you; nothing else to register. Windows
Run Nx-Nexus-1.0.0-Windows.exe as administrator. The installer detects which hosts you have and pre-selects the matching components. Finding it in your hostDaVinci Resolve In the Effects library, open OpenFX › Nx Color and drag Nx Nexus onto a clip, or onto a node on the Color page. Premiere Pro In the Effects panel, open Video Effects › Nx Color › Nx Nexus and drag it onto a clip. After Effects With a layer selected, apply Effect › Nx Color › Nx Nexus. Final Cut Pro In the Effects browser, find Nx Nexus under Nx Color and drag it onto a clip. Motion In the Library, choose Filters › Nx Color › Nx Nexus and apply it to a layer. Before activation
Until the machine is activated, Nexus runs in demo mode — every feature unlocked, no restrictions, so you can evaluate it properly on your own footage — with a watermark over the output. Nothing else is held back. See the next section to remove it. Uninstalling
On macOS, double-click nx-uninstall-nxnexus.command in /Library/Application Support/NxColor/. It releases your license seat before removing the files, so the seat is free for another machine. On Windows, use Add or Remove Programs. Licensing & Activation Your LicenseAt a glanceOne purchase = one license key, emailed right after checkout. It looks like
NXNS-XXXX-XXXX-XXXX.A license covers 2 machines (2 seats). Activate on each machine once.
One activation licenses every supported app on that machine — Resolve, Premiere Pro, After Effects, and on macOS Final Cut Pro and Motion.
Works offline. After a one-time online activation, Nx Nexus keeps running without an internet connection and checks in quietly on its own whenever you’re connected.
Activating1Buy Nx Nexus — your license key arrives by email within a few minutes. (Check spam if you don’t see it.)
2Install the plug-in, then open any supported host and add the Nx Nexus effect to a clip.
3Open the License group at the bottom of the effect panel and click License…. Paste your key and click Activate. If the key is already on your clipboard, the field fills itself.

4The watermark disappears and the License window shows Status: Activated. You’re done — and licensed in every supported app on this machine.
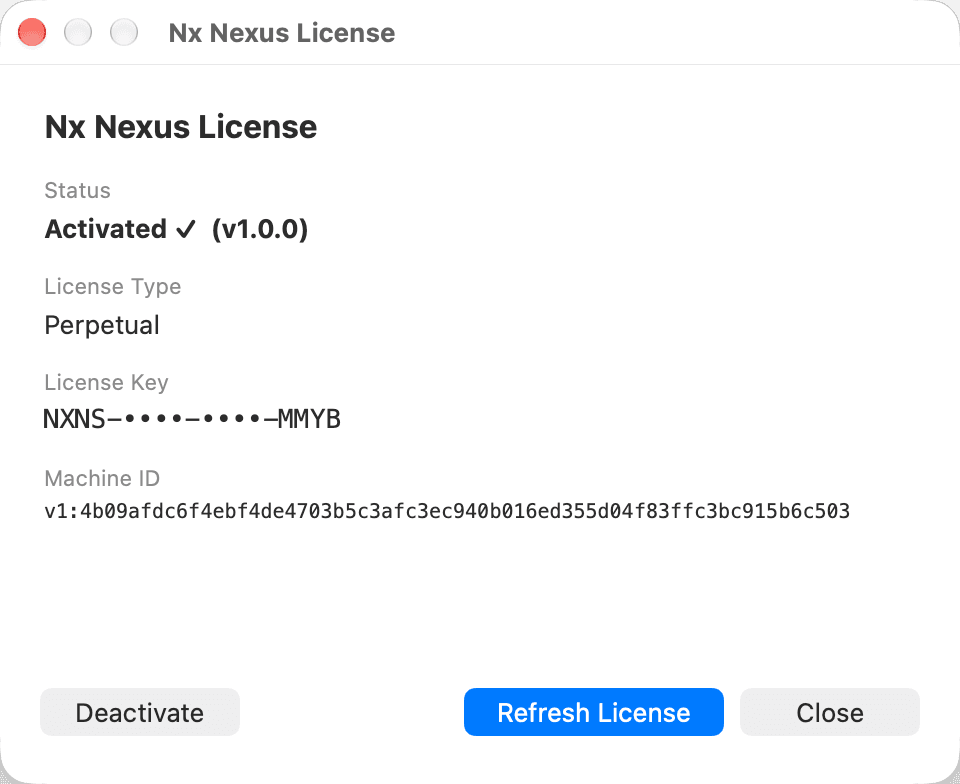
Moving to a new machineYour license works on two machines, and it’s easy to move between them. Switching machines? Deactivate first. On the machine you’re leaving, open the License window, click Deactivate (bottom-left in the window above), and confirm — that seat is freed. (Uninstalling deactivates it too.)
Old machine gone for good? Just activate on the new one. Activating beyond your two machines clears the earlier activations — then re-activate any machine you still use.
Refresh License asks the server for your current status on the spot — useful after a seat change or a long stretch offline.
Good to know
Ordinary upgrades — RAM, GPU or drive — don’t burn a seat; Nx Nexus still recognises your machine. If you stay offline for a long stretch, the License window warns you a week before it needs a check-in; connect once and it resets. Lost your key? It’s in your order email, or sign in at nxcolor.com under My Account. Anything off — email [email protected] and we’ll sort it out. In Final Cut Pro and Motion the License… button opens a separate Nx Nexus window rather than a dialog inside the host — that’s a Final Cut requirement, and the flow is otherwise identical. Quick Start Five Minutes to a Tracked HUDThe five steps at the front of this manual get you a working shot. This is the same path with the refinements filled in — what to reach for, and in what order, once the boxes are on screen. 1Drop it on a clip and play. Boxes and labels appear on everything the detector recognises. On the very first use, give it a few seconds to prepare the model.
2Tidy up the detections. Too many subjects? Raise AI Confidence toward 0.5 and lower Max Trackers. Only want people? Set Class Filter to People.
3Make the IDs stick. In Tracking, set Revive Frames to about 15. This is the difference between IDs that hold through an occlusion and IDs that renumber constantly.
4Choose your look. In Boxes, pick a Tracker Style and colour. In Labels, switch on only the content you want. Center Markers and Connections start switched off; turn each on in its own group when you want it.
5Add one idea. A Region FX on the subject. A Subject Glow rim. Depth fog. A rack focus following your lead. One is usually enough.
If the shot is abstract
No people, no cars, nothing the AI recognises? Switch Detection Mode to Bright Spots (lights, particles, stars) or Select Color (pick the colour you want to follow) and tune Threshold until the right things are found. Everything downstream — tracking, labels, Region FX, glow — behaves exactly the same. 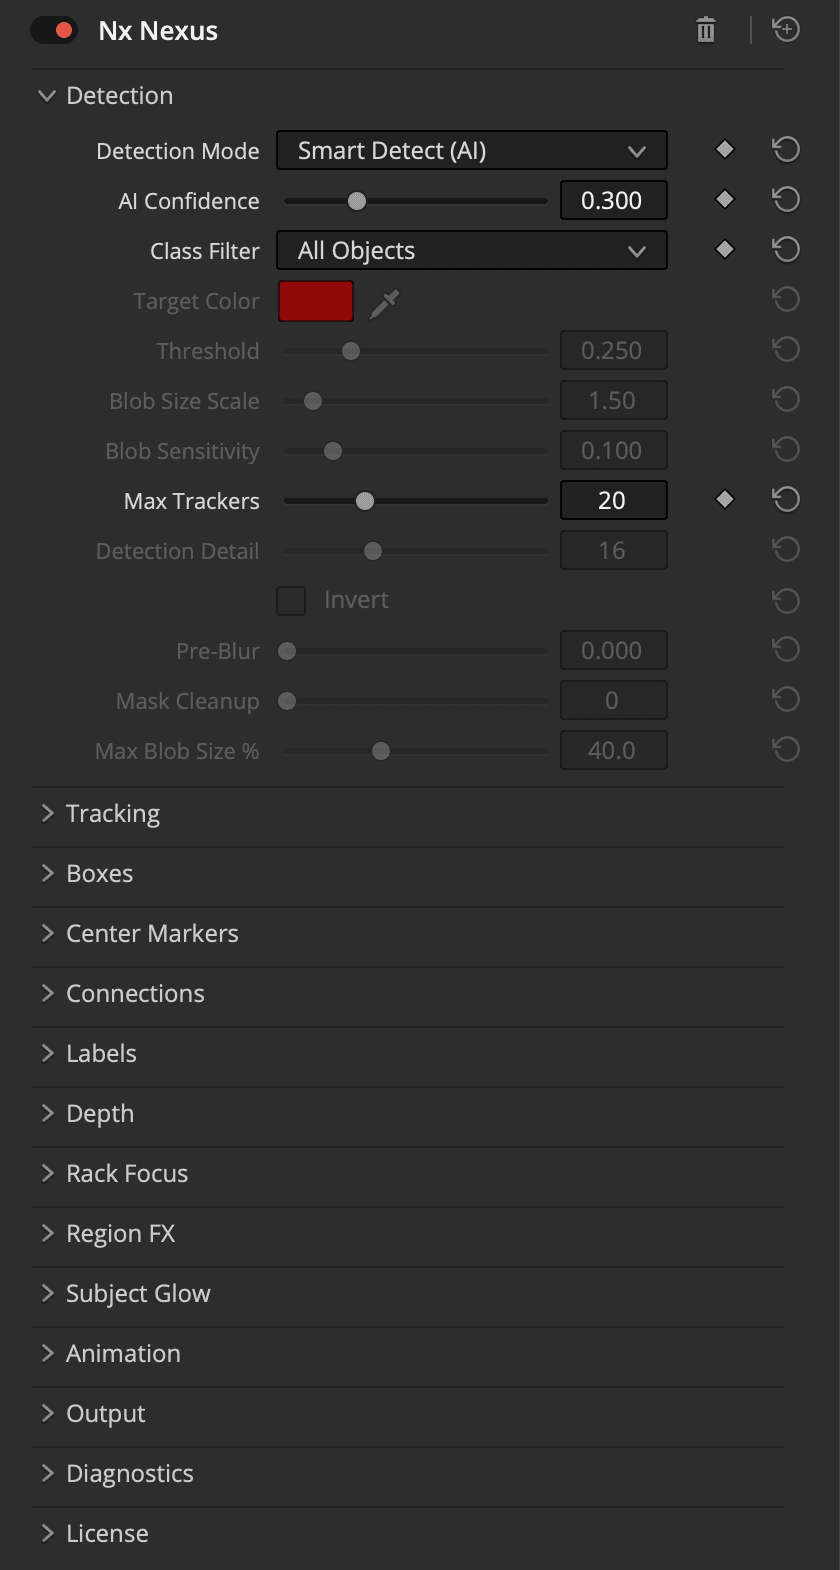
Part IV ReferenceEvery control, every default, every dependency — plus diagnostics, recipes and the honest list of host differences. Control Reference Sixteen GroupsThe panel is ordered the way you work through a shot: find the subjects, hold them, then draw on them, then treat them, then deliver. Drawing sizes given in pixels are measured at HD and scale with frame size; the two analysis distances — Max Move Distance and Max Connection Distance — are not scaled, so re-check them if you re-tune a look at a different resolution. Reading the tables The Default column is what a fresh instance gives you. The line beneath each description tells you what has to be true for the control to do anything — in Resolve and After Effects, controls that fail that test grey out on their own. Typing past the slider A few controls accept larger typed values than the slider shows: Text Size up to 0.10, and the Subject and Focus Tracker ID fields up to 999 — tracker IDs keep counting up over a long clip, so the wider range matters. In Final Cut Pro and Motion the sliders already span the full range.
Detection Mode Smart Detect (AI) · Face Detect (AI) · Luminance · Edges · Saturation · Select Color · Bright Spots · Dark Spots
Class Filter All Objects · People · Vehicles · Animals · People + Vehicles · People + Animals · Sports Equipment · Food & Drink · Electronics · Furniture · Bags & Accessories · Street Objects
Tracker Style Corner Brackets · Rounded Rectangle · Targeting Circle · Hexagon · Diamond · Reticle · Target Rings
Box Color Mode Fixed Color · By Class · By Depth
Marker Style Dot · Plus · Cross · Crosshair · Ring · Target · Dot + Ring · Diamond · Square · Triangle
Connection Type Sequential · Star · Mesh · Proximity · Nearest Neighbor · Spanning Tree (MST)
Line Style Straight · Curved · Wave · PCB Trace · Smooth Bend · Step Bend Line Pattern Solid · Dashed · Dotted Arrow Style Filled Triangle · Outline Triangle · Angle · Double Angle · Circle
Coordinates Off · X Y · X only · Y only Order on screen NAME ID:n X:n Y:n V:n Z:n n%
Focus Off · Manual (slider) · Follow Tracker ID · Nearest Subject · Farthest Subject
Matte Source Box · Depth Silhouette · Segmentation (AI) Matte Quality Standard · High (Per-Subject)
Region Effect None · Tracker Zoom · Spotlight (Dim BG) · Blur · Pixelate (Mosaic) · Solid Fill · Sharpen · Black & White · Invert · Colorama (Hue Shift) · Posterize (Cel Shade) · Thermal · Night Vision · Halftone · Ink Sketch · Dither (Retro) · ASCII Mosaic · Hologram · Chromatic Ghost · Glitch · Heat Ripple
Apply To Inside Subjects · Outside Subjects
Output Mode Normal · Matte Only · Matte in Alpha (Cutout) · Depth Map · Depth in Alpha · Overlays Only
Diagnostics What the Plug-in Tells YouThe performance readoutSwitch on Show Performance Stats and a compact block appears in the bottom-right corner of the frame — one topic per row, with a fixed label column so the numbers line up and can be read at a glance: NX NEXUS: the detection mode, where the AI is running (COREML on Apple hardware, DIRECTML on Windows GPUs, CPU if neither is available) and the frame number. TRACKED: subjects published out of the Max Trackers cap. TIMING: how long each stage took on this frame — CACHED when the frame was replayed from the tracking history without running the detector again, and depth and matte times only when those passes actually ran. MODELS, over two rows: every AI model’s state — READY, PREPARING with a running clock, FAILED, MISSING, or NOT LOADED for a model nothing has asked for yet. If you ever wonder why a shot is slow, or why nothing is happening yet, this block answers it in one glance. On-screen model statusYou don’t need the performance readout to know what the AI is doing. Whenever a model that your current settings need is not ready, a small message appears in the top-left corner on every host — there is no switch for it. Amber means wait; red means something needs your attention:
The notice only speaks about models your settings actually use — a matte model preparing quietly in the background is not mentioned until you reach for a matte control — and it never draws on a matte or depth export. In Overlays Only output it counts as an overlay and is exported with the rest. Diagnostic viewsVisualize Detection FieldClassical modes: the raw field, the fastest way to set Threshold. AI modes: every detection’s box in its class colour, brighter with confidence. Visualize Depth MapThe depth pass as greyscale. Useful for sanity-checking fog ranges and focus distances. Visualize Segment MasksTints each AI outline over the normal render, so you can confirm the matte is on the right subject before you commit to it. Recipes Known-Good Starting PointsEach of these takes under a minute from a fresh instance.
Troubleshooting When Something Looks WrongNo boxes at all on the first use The AI model is still being prepared for your GPU. Give it a few seconds to a minute — this happens once per machine, then never again — and the viewer updates by itself when it is ready (in Premiere Pro, touch any control to refresh). If boxes never appear, check that your Detection Mode is what you expect and that AI Confidence isn’t set very high. IDs keep changing Raise Revive Frames. At its default of 0, a single missed detection ends the track, and the box blinks out with it. Try 15. If IDs still churn, raise Temporal Smoothing, and check that Max Trackers is comfortably above the number of subjects in frame. IDs differ after scrubbing A frame reached by jumping has no predecessor to build on. Play the shot through once and the numbering settles onto the correct sequential set as the playhead passes over each frame. After Effects works the earlier frames out for you, and Resolve does over short jumps — see The Same Every Time. The first frame after a jump is slow In After Effects, and over short jumps in Resolve, Nexus first tracks the frames leading up to the one you jumped to, and with a Segmentation matte it reads up to sixteen of them for the matte as well. That is what makes the frame match a playthrough. It happens once; the frames after it play normally. Boxes clip the edge of the subject In the classical modes, raise Blob Size Scale. In Smart Detect, the box comes from the detector; raising Temporal Smoothing slightly and lowering AI Confidence often gives a fuller box on a partly-occluded subject. Too many detections Raise AI Confidence, set a Class Filter, lower Max Trackers, and add a couple of Confirm Frames. In the classical modes, raise Threshold and Blob Sensitivity and lower Max Blob Size %. The matte is a rectangle Set Matte Source to Segmentation (AI). If it’s already set, look for MATTE AI PREPARING... top-left — the outline model is still preparing itself and the matte is temporarily falling back. The matte edge shimmers Add a little Matte Feather. A small negative Matte Grow / Shrink also helps by pulling the edge inside the subject where the model is most confident. A status message is baked into a render The render started while a model was still being prepared, which happens on first use. Nexus waits briefly for a model that is almost ready, but a first-time preparation can take longer than that. Let the top-left message clear in the viewer before you start a final render. Rack focus does nothing Blur Strength is at 0. Choosing a Focus mode alone has nothing to express — raise Blur Strength and the pull appears. Depth features look inert Fog, occlusion, 3D tilt, the Z label and By-Depth colours all need Enable Depth. (Rack focus, depth export, the depth matte and the depth visualiser don’t — they switch it on themselves.) Playback is slow Turn on Show Performance Stats and read where the time goes. Matte time dominant? Switch Matte Quality to Standard. Detection dominant? Try a classical mode, or lower Max Trackers. Depth dominant but unused? Switch Enable Depth off. Clicking a subject does nothing In DaVinci Resolve, the OpenFX overlay must be visible in the viewer. In After Effects, select Nx Nexus in the Effect Controls panel first, then click in the Composition panel with the Selection tool. In Final Cut Pro, select the clip and click Nx Nexus in the Video inspector. Premiere Pro doesn’t pass viewer clicks to effects — type the number from the subject’s label into Subject 1 instead. The effect isn’t in the host at all The host was running during installation. Quit it completely and relaunch — plug-ins are only loaded at launch. Very small frames render untouched Frames under 200 pixels on either side pass through unmodified. Thumbnails and tiny proxies are below the useful limit for detection. Still stuck?
Email [email protected] with your host and version, your operating system, and a screenshot of the panel. If an AI feature is misbehaving, Nexus keeps small diagnostic logs (they never grow past a few megabytes) — on macOS in ~/Library/Logs/NxColor/ for every host, on Windows in %LOCALAPPDATA%\NxColor\, named nx_nexus_yolo.log, nx_nexus_depth.log, nx_nexus_face.log and nx_nexus_seg.log, plus nx_nexus_trace.log, which records model loading and cache activity for every host. Attaching the relevant one saves a round trip. If a message is showing in the top-left corner of the frame (What the Plug-in Tells You › On-screen model status), quote it word for word — it tells us which model, and whether it is still preparing or has actually failed. Host Differences The Same Engine, Four PanelsEvery feature in this manual is available in every host — the detector, tracker, depth, mattes, Region FX, glow and output modes are one shared engine. What differs is what the surrounding application allows a plug-in panel to do.
DaVinci Resolve · OpenFX
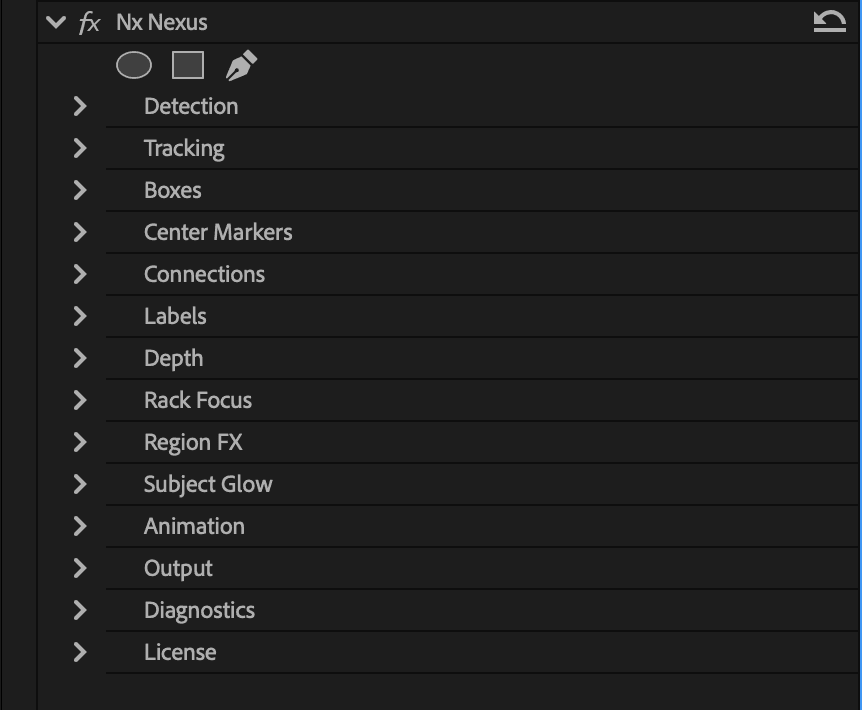
Premiere Pro · After Effects
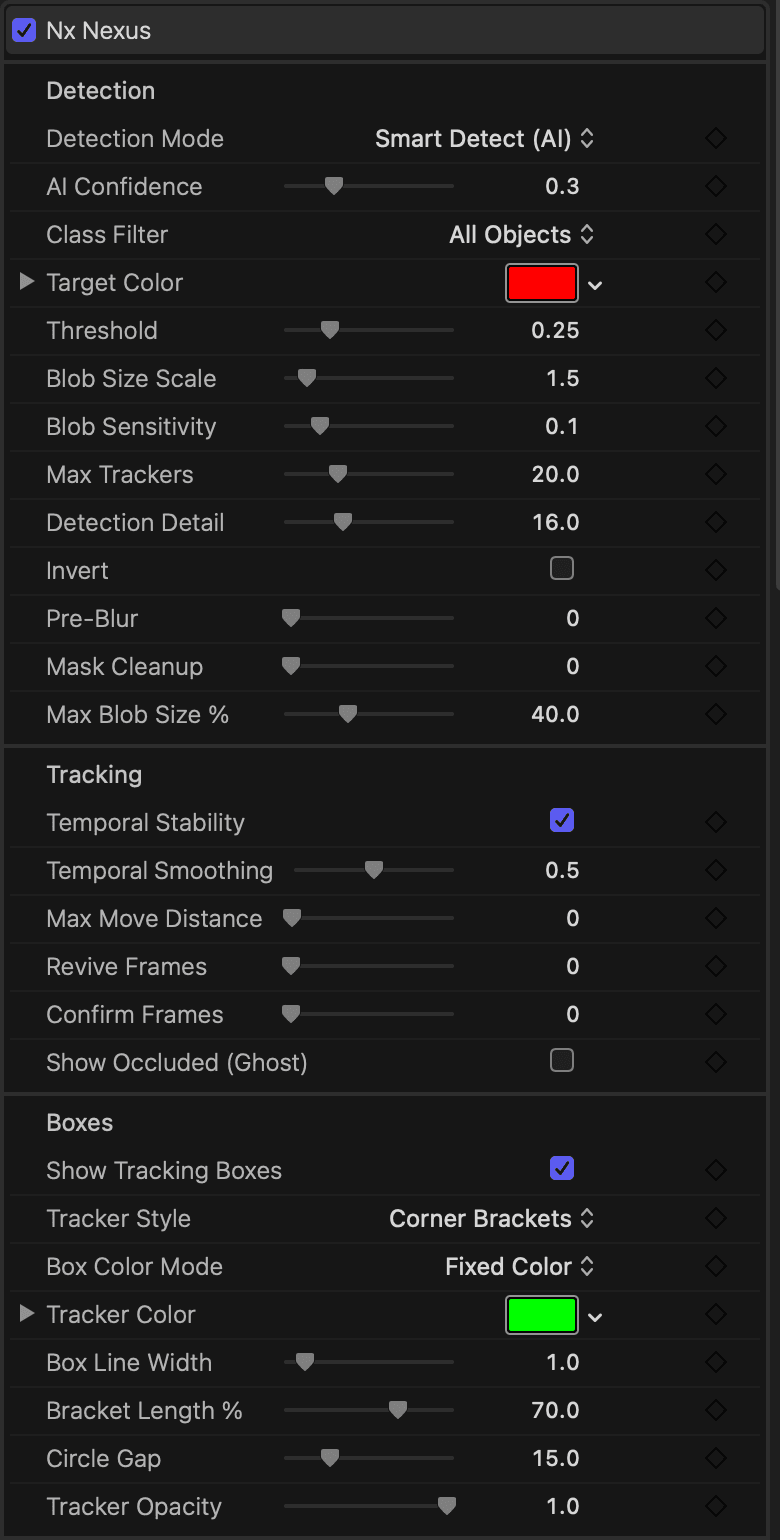
Final Cut Pro · Motion
Premiere Pro rendering GPU rendering uses Metal on macOS and requires an NVIDIA card (CUDA) on Windows. On other GPUs, in OpenCL mode, or in Mercury Software Only, Premiere renders Nexus on the CPU — every feature still works, just more slowly, and the picture is identical. After Effects Nexus renders on the CPU in After Effects, by design: it is the path on which two Nexus layers in one project keep separate identities. Each frame’s pixel work is spread across the processor’s cores, and frames may be rendered in any order, several at a time — Multi-Frame Rendering gives the IDs, boxes and mattes of a straight playthrough. Premiere Pro & Final Cut panels Every control appears active, including ones that do nothing in the current mode — those hosts give plug-ins no way to grey a control out. Use the group structure, and the Control Reference in this manual, which notes under each control what it needs in order to do anything. Colours in Adobe Premiere’s GPU interface has no colour-picker type, so colours are three sliders. The values are identical to the colour wells in the other hosts. Part V The FoundationWhat Nx Nexus is built on, and who to talk to. Credits Built on Open ResearchNx Nexus is built on published computer-vision research and permissively licensed open-source components. Each third-party component is distributed under its respective licence, with the applicable licence texts included alongside the plug-in. Each was selected for the combination of accuracy, performance and practical deployment inside a real-time editing environment — and all of it runs on your own machine. Nothing leaves your computer. There is no cloud service, no account, no telemetry and no upload. Your footage is analysed locally, every frame, on your own hardware.
The table names the principal components and the research they come from; the complete third-party licence texts are installed alongside the plug-in. Support Getting HelpSupport[email protected] Account & licence keysnxcolor.com › My Account Nx Nexus Version 1.0.0 · © Nx Color. All rights reserved. Nx Nexus performs all analysis locally. No footage, frames or metadata are ever transmitted. | ||||||||||||||||||||||||||||||||||||||||||||||||||||||||||||||||||||||||||||||||||||||||||||||||||||||||||||||||||||||||||||||||||||||||||||||||||||||||||||||||||||||||||||||||||||||||||||||||||||||||||||||||||||||||||||||||||||||||||||||||||||||||||||||||||||||||||||||||||||||||||||||||||||||||||||||||||||||||||||||||||||||||||||||||||||||||||||||||||||||||||||||||||||||||||||||||||||||||||||||||||||||||||||||||||||||||||||||||||||||||||||||||||||||||||||||||||||||||||||||||||||||||||||||||||||||||||||||||||||||||||||||||||||||||||||||||||||||||||||||||||||||||||||||||||||||||||||||||||||||||||||||||||||||||||||||||||||||||||||||||||||||||||||||||||||||||||||||||||||||||||||